Authenticate with OAuth
To enable Imply Hybrid (formerly Imply Cloud) Auth for your organization, contact your Imply account representative.
With Imply Hybrid Auth enabled, you can create custom OAuth clients to authenticate REST API requests to the Imply API using the OAuth 2.0 authorization framework.
To create and manage OAuth clients, you must have one of the following roles:
administer-account: This role allows you to administer the entire organization including managing users, creating API clients, and setting password policies.administer-clients: This roles allows you to create, manage, and delete OAuth clients.
See User roles for more information.
Use the following flow to authenticate with OAuth:
- Enable OAuth clients on your cluster.
- Create a custom OAuth client to obtain OAuth 2.0 credentials. You configure and manage OAuth clients from the User management console, the same console you use to manage Imply Hybrid users.
- Obtain an access token. The access token is tied to the OAuth client and grants API access.
- Send the access token to the Imply API in the HTTP
Authorizationrequest header using the Bearer authentication scheme:Authorization: Bearer.
Enabling OAuth clients on your cluster
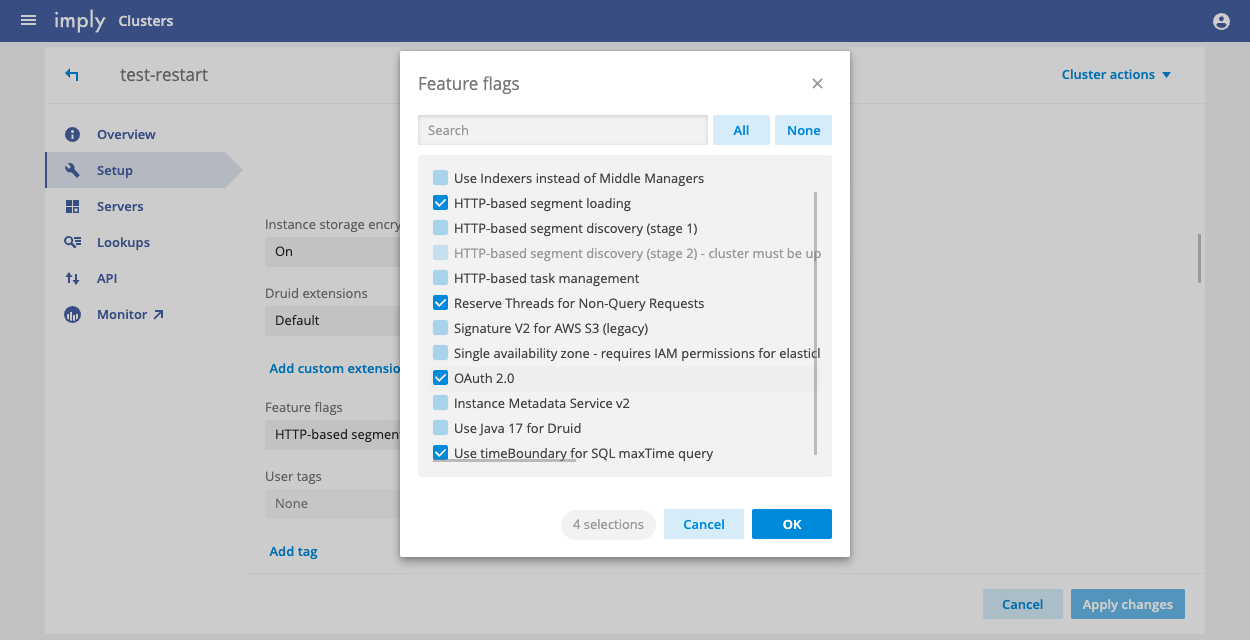
Client applications can authenticate with OAuth tokens only if the OAuth 2.0 feature flag is enabled for their Imply Hybrid account. It is disabled by default.
To enable OAuth 2.0 in an existing cluster, follow these steps:
- From the Imply Manager, click Manage for the cluster.
- Click Setup from the left menu.
- Scroll down and expand the Advanced config settings.
- Under Feature flags, click the edit icon to open the feature flags dialog.
- Find and enable the OAuth 2.0 feature flag and click OK.

- Restart the cluster to apply the changes. This will interrupt the service for a few minutes.
For a new cluster, in the New cluster page, expand the Advanced config settings and click the edit icon next to Feature flags. Find and enable the OAuth 2.0 feature flag.
Configuring OAuth client access
To configure a custom OAuth client, follow these steps:
-
Navigate to the User management console.
-
Click OAuth Clients from the left sidebar.
-
Click Create.
-
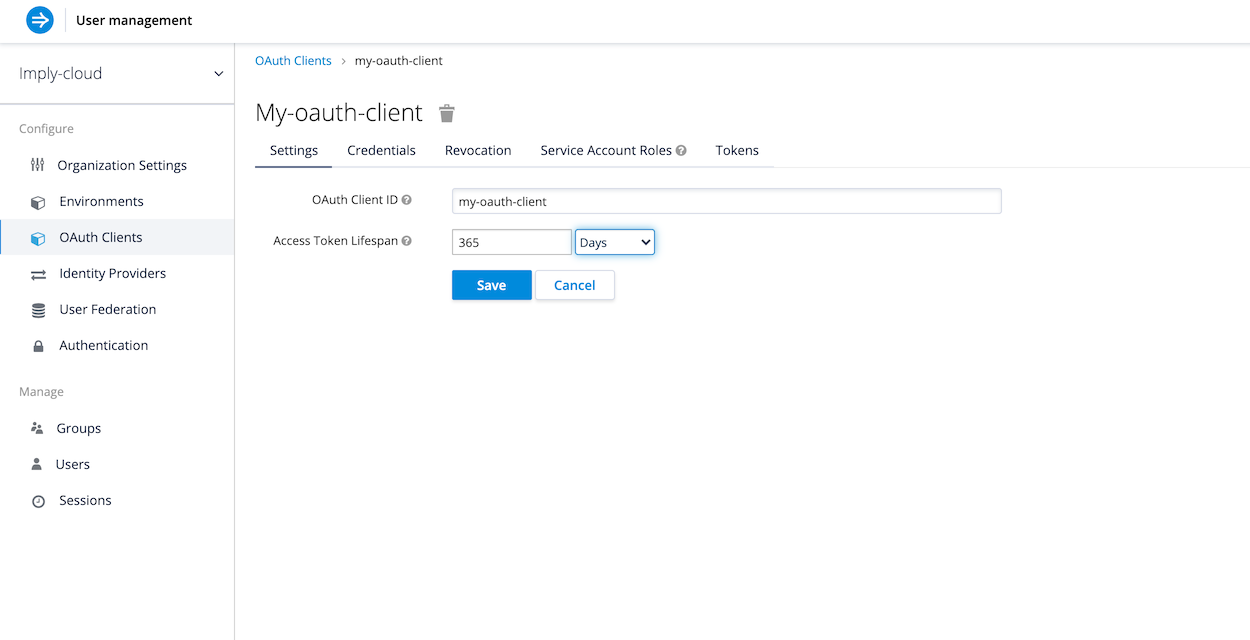
Enter a client identifier in the OAuth Client ID field. Your application needs a client ID and client secret to acquire access tokens programmatically. Click Save. Once you create an OAuth client, you can view your client secret from the Credentials tab.
-
By default, API tokens expire after five minutes. Applications should acquire tokens as needed, given this token lifespan and frequency of requests. If acquiring new tokens at this cadence is not possible for a given application, you can modify the lifespan of the token in the Access Token Lifespan field. Tokens are automatically revoked when their lifespan reaches the configured amount of time.

-
Go to the Service Account Roles tab to select the applicable organization and client roles. For the OAuth Client Roles, choose the entity that contains the roles you want to assign.
-
You can download the token from the client using one of the following methods:
- In the UI, click Tokens > Download Token.
- Call the API as described in Getting the token by API.
Getting the token by API
You can acquire access tokens programmatically. The following example shows how to acquire a token using curl:
curl --request POST 'https://id.imply.io/auth/realms/{organization_name}/protocol/openid-connect/token' \
--header 'Content-Type: application/x-www-form-urlencoded' \
--data-urlencode 'client_id={client_id}' \
--data-urlencode 'client_secret={client_secret}' \
--data-urlencode 'grant_type=client_credentials'
Replace:
{organization_name}with the name of your organization in Imply Hybrid Auth.{client_id}with the name of the client you configured.{client_secret}with the generated secret for the client.
Revoking tokens
To revoke a token:
- Select the OAuth client you want to revoke access for.
- Go to the Revocation tab.
- In the Not Before field, click Set to now or enter a date in the following format:
Mon Jul 19 2021 16:22:05 GMT-0700 (Pacific Daylight Time).
Removing OAuth clients
Revoke all long-lived tokens before removing the client.
To delete an OAuth client, follow these steps:
- Click OAuth Clients from the navigation menu.
- Find the ID of the client you want to remove.
- Click Delete next to the name of the client.
- Confirm when prompted.
Modifying OAuth client access
To modify an existing OAuth client, for example, by changing its secret, click Edit next to the client ID in the OAuth Clients page.
Modify the general settings, roles, or other properties as needed. To change the secret, click Regenerate Secret under the Credentials tab.