Local users
To enable Imply Hybrid (formerly Imply Cloud) Auth for your organization, contact your Imply account representative.
You can create users in Imply through an external identity provider, such as Okta or an LDAP directory, or directly as local users.
Local user accounts are created entirely within Imply. In contrast, when you have integrated an external identity provider, user accounts are created based on data stored in the external system when the user first attempts to log in. Imply Hybrid Auth enables you to use the same email and password to access all environments.
View all local users
To view all local users in the organization, select the Users tab from the left menu of the User management console. To view information pertaining to an individual user, you can either select a user by user ID or search for a specific person using such credentials as username or email.
Create a local user
When you create an Imply user, you can either assign a temporary password or prompt the user to create a password upon first login.
To create a local user and assign a temporary password, follow these steps:
- If the User management console is not already open, click the User management link from your profile menu to open it.
- From the left menu, click Users.
- Click Add User.
- In the Add user page, enter a name in the Username field. This is the only required field. Other fields are optional; you can leave them empty and require users to provide the information.
- If desired, set the email verification option to require the users email to be verified. The user will not be able to log in until they confirm by email.
- Configure user actions. Options are as follows:
- Configure OTP: Create a one-time password for the user. The user will need to change their password at first log in.
- Update Profile: Requires users to update their profiles, for instance, to add first and last names.
- Verify Email: Requires the user to verify the email associated with their account.
- Update User Locale: Prompts users to update their locale. English is the default language.
- Click Save. This creates a user without any permissions. To assign user permissions, continue to the next step.
- In the Role Mappings subtab, select from the available organization roles (apply across multiple environments) and environment roles (apply within the selected environment only). To learn more about assigning roles, see User roles.
At this point, the user is created in the system but no communication has been sent. To complete the invitation process, proceed to the next step.
Set a password for a user
To set a user password, follow these steps:
-
From the left menu, click Users.
-
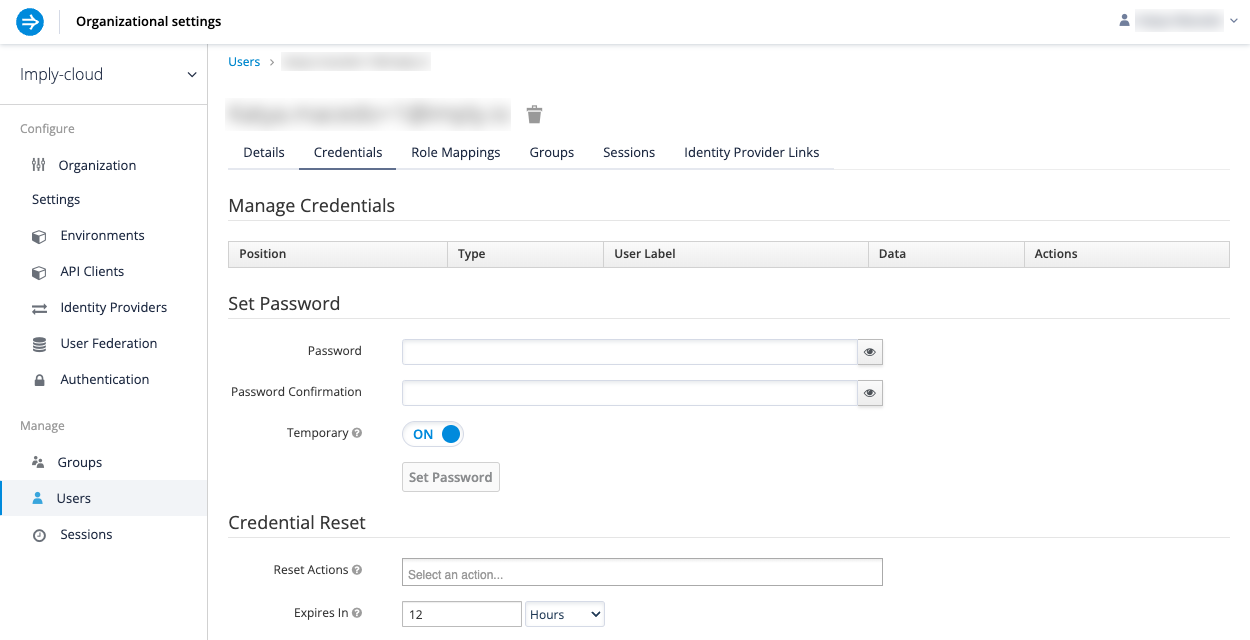
Select the user and click the Credentials subtab.
-
Type a new password and confirm it.
-
Toggle the Temporary switch ON to prompt the user to change the password on next login. Toggling the Temporary switch OFF makes the new password permanent.

-
Click Set Password.
Reset credentials
You can prompt a user to reset profile credentials by selecting one or more actions from the Reset Actions field of the Credential Reset section. Enabling Reset Actions Email sends an email to the user with an embedded link prompting the user to execute reset actions.
The following are the available reset actions:
- Configure OTP: requires the user to setup a mobile password generator.
- Update Profile: requires the user to enter new personal information.
- Update Password: requires the user to enter a new password.
- Update User Locale: requires the user to update language preferences.
- Verify Email: requires the user to verify their email address.
Reset user password
To allow users to reset forgotten passwords, select Organization Settings from the left menu of the User management console. In the Login subtab, toggle the Forgot password switch.
Enable user self-registration
Self-registration is a setting that lets anyone with a link to your Imply cluster sign up for Imply Hybrid. Once enabled, it applies to all of the organization's environments.
You can enable self-registration for local user accounts. If enabled, a Register link appears on the login page prompting users to set up an account. Note that the created accounts are local accounts that are not associated with any integrated third-party identity providers.
To enable self-registration:
- Go to the Organization Settings in the left menu.
- In the Login subtab, toggle the User registration option.
Manage local users with groups
Groups let you assign roles to a set of users and administer those users collectively. For information on using groups to manage local users, see Managing users with groups.