Search events with AI agents
AI summary
About AI summaries.
Imply Lumi integrates with AI agents that support the Model Context Protocol (MCP). Once you connect an agent to the Lumi MCP server, you can query Lumi events using natural language from your desktop app, CLI, browser, or code editor. The agent translates your prompts into Lumi queries, runs them, and returns results.
This topic explains how to connect each supported agent to Lumi. If your agent isn't listed, see Other MCP clients.
Prerequisites
To query Lumi events with an AI agent, you need the following:
- Access to Lumi with the Data manager role or higher. For information on roles and permissions, see Use roles to control access.
- To authenticate with an IAM key, a Lumi IAM key. You can select an existing key or create one on the MCP integration page. For details, see Create an IAM key.
- An installed AI agent that you're logged in to. See the agent's own documentation for installation details.
Choose an authentication method and AI agent
You can authenticate your agent with Lumi in one of two ways:
- OAuth: Your agent guides you through signing in to Lumi. The agent provisions an IAM key on your behalf. We recommend OAuth when you query Lumi yourself.
- IAM key: You add an IAM key to your agent's configuration manually. The agent queries Lumi with the IAM key's permissions. Use an IAM key for automated workflows that run without user interaction, or for agents or plans that don't support OAuth. Most agents store the IAM key token in plain text in their configuration file. Don't share or commit the file.
Claude.ai supports OAuth only.
The instructions on this page use tabs for each authentication method. When you select a tab, all sections on the page switch to that method.
Supported agents
Lumi supports the following AI agents. The table shows how you configure each one and where the configuration goes.
| Agent | Configuration method | Configuration location |
|---|---|---|
| Antigravity CLI | JSON configuration file | ~/.gemini/config/mcp_config.json |
| Claude Code | claude mcp add command | Claude Code CLI |
| Claude Desktop and Claude.ai | Custom connector or desktop extension with an IAM key | Claude connector settings |
| Codex | TOML configuration file | ~/.codex/config.toml |
| Cursor | JSON configuration file | ~/.cursor/mcp.json |
| VS Code | JSON configuration file | .vscode/mcp.json in your workspace |
| Other MCP clients | JSON configuration file | Your agent's MCP configuration file |
Get the configuration from Lumi
Lumi generates the configuration for each agent. To get it:
- From the Lumi navigation menu, click Integrations > Model Context Protocol (MCP).
- Under Select an authentication method, select OAuth or IAM key.
- If you selected IAM key, click Select or create key and select or create the IAM key for your agent.
- Under Select an AI agent, select your agent.
- Follow the instructions for your agent in the Lumi UI or in the following sections.
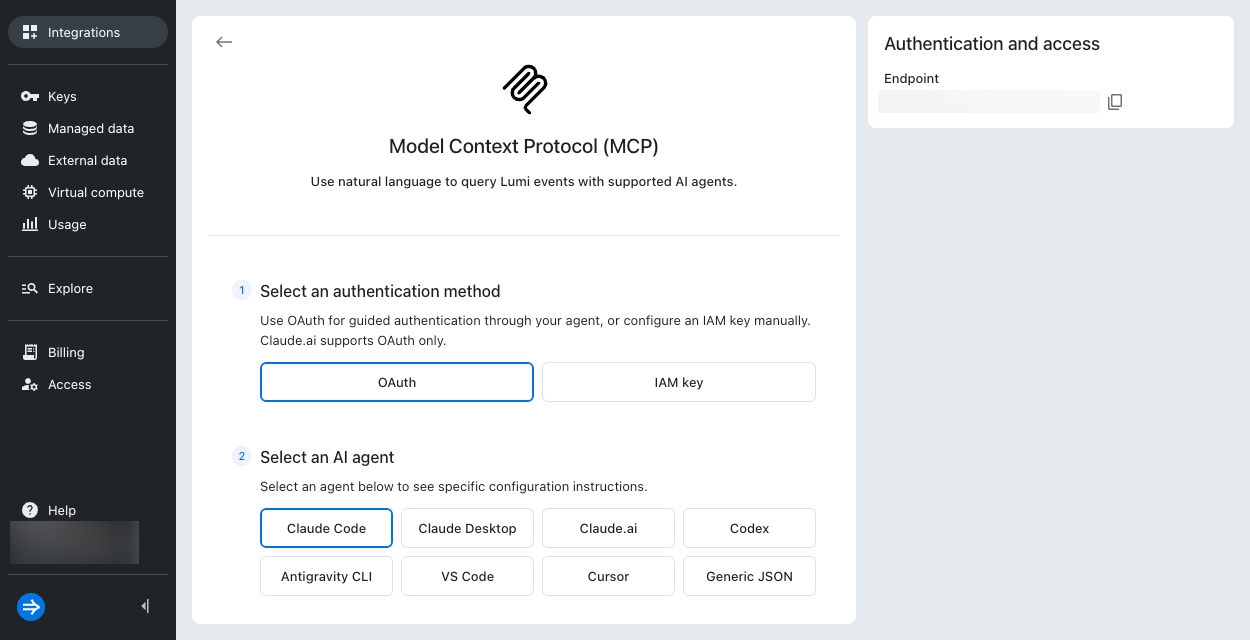
All agents except the Claude Desktop extension connect to the Lumi MCP server at https://lumi.imply.io/mcp/v1.
This URL appears in each configuration on this page.
Connect your agent
Follow the instructions for your agent. Select the OAuth or IAM key tab to match the authentication method you chose in Lumi.
Antigravity CLI
Antigravity CLI reads MCP servers from ~/.gemini/config/mcp_config.json.
It uses serverUrl rather than url for the server address.
To connect Antigravity CLI to Lumi:
- OAuth
- IAM key
-
Add the
imply-lumiserver to~/.gemini/config/mcp_config.json. If the file doesn't exist, create it with the following content:{"mcpServers": {"imply-lumi": {"serverUrl": "https://lumi.imply.io/mcp/v1"}}} -
Restart Antigravity CLI.
-
Run
/mcpto open the MCP manager. -
Select
imply-lumiand sign in to Lumi when prompted.
-
Add the
imply-lumiserver to~/.gemini/config/mcp_config.json. If the file doesn't exist, create it with the following content. Replace<IAM key token>with your IAM key token.{"mcpServers": {"imply-lumi": {"serverUrl": "https://lumi.imply.io/mcp/v1","headers": {"Authorization": "Basic <IAM key token>"}}}} -
Restart Antigravity CLI.
-
Run
/mcpto confirmimply-lumiis connected.
Antigravity CLI stores the IAM key token in plain text in its configuration file. Don't share or commit the file.
For more information, see MCP in the Google Antigravity docs.
Claude Code
By default, Claude Code adds MCP servers to the current project only.
To make Lumi available in all your projects, include --scope user in the command.
To connect Claude Code to Lumi:
- OAuth
- IAM key
-
Run the following command to add the Lumi MCP server:
claude mcp add -t http --scope user imply-lumi https://lumi.imply.io/mcp/v1 -
In Claude Code, run
/mcpto open the MCP manager. -
Select
imply-lumi, then select Authenticate. -
Sign in to Lumi when prompted.
-
Run the following command to add the Lumi MCP server. Replace
<IAM key token>with your IAM key token.claude mcp add -t http --scope user imply-lumi \https://lumi.imply.io/mcp/v1 \--header "Authorization: Basic <IAM key token>" -
Run
claude mcp listto confirmimply-lumiis connected.
Claude Code stores the IAM key token in plain text in its configuration file. Don't share or commit the file.
For more information, see Connect Claude Code to tools via MCP.
Claude Desktop and Claude.ai
To connect Claude to Lumi:
- OAuth
- IAM key
How you add the Lumi connector depends on your Claude plan:
- Team and Enterprise plans: An organization owner adds the custom connector for the organization. Members then find the Imply Lumi connector in their connector settings and connect it.
- Free, Pro, and Max plans: You add the custom connector yourself.
To add and connect the Lumi connector:
- Add Lumi as a custom connector using the URL
https://lumi.imply.io/mcp/v1. On Team and Enterprise plans, an organization owner does this step. - In a conversation, enable the Imply Lumi connector.
- Sign in to Lumi when prompted.
- Before you query Lumi, enable Imply Lumi in the conversation.
If you can't add a custom connector on your plan, use an IAM key with the Claude Desktop extension instead.
For more information, see Get started with custom connectors using remote MCP.
IAM key authentication is available for Claude Desktop only. Claude.ai supports OAuth only.
To connect Claude Desktop with an IAM key:
- From the Lumi navigation menu, click Integrations > Model Context Protocol (MCP), then click Download extension.
- Open the downloaded file to install the extension in Claude Desktop.
- When prompted to configure the extension, enter the following details:
- API key: Your IAM key token.
- URL:
https://lumi.imply.io - Query timeout (seconds): How long to wait for a query to complete. The default is 45 seconds.
- Make sure the extension is enabled. The extension runs on your computer and connects to Lumi directly, so it uses your Lumi URL rather than the MCP server URL.
- Before you query Lumi, enable Imply Lumi in the conversation.
For more information, see Getting Started with Local MCP Servers on Claude Desktop.
Codex
Codex shares the configuration file ~/.codex/config.toml across the Codex CLI, IDE extension, and desktop app.
To connect Codex to Lumi:
- OAuth
- IAM key
-
Add the following to
~/.codex/config.toml:[mcp_servers.imply-lumi]url = "https://lumi.imply.io/mcp/v1" -
Run the following command to authenticate with the Lumi MCP server:
codex mcp login imply-lumi -
Sign in to Lumi when prompted.
-
Start a Codex session and run
/mcpto confirmimply-lumiis connected.
-
Add the following to
~/.codex/config.toml. Replace<IAM key token>with your IAM key token.[mcp_servers.imply-lumi]url = "https://lumi.imply.io/mcp/v1"http_headers = { Authorization = "Basic <IAM key token>" } -
Start a Codex session and run
/mcpto confirmimply-lumiis connected.
Codex stores the IAM key token in plain text in ~/.codex/config.toml.
Don't share or commit the file.
For more information, see Model Context Protocol in the Codex docs.
Cursor
To connect Cursor to Lumi:
- OAuth
- IAM key
-
Add the following to
~/.cursor/mcp.json. Create the file if it doesn't exist.{"mcpServers": {"imply-lumi": {"url": "https://lumi.imply.io/mcp/v1"}}} -
Restart Cursor.
-
Sign in to Lumi when prompted.
-
Add the following to
~/.cursor/mcp.json. Create the file if it doesn't exist. Replace<IAM key token>with your IAM key token.{"mcpServers": {"imply-lumi": {"url": "https://lumi.imply.io/mcp/v1","headers": {"Authorization": "Basic <IAM key token>"}}}} -
Restart Cursor.
Cursor stores the IAM key token in plain text in ~/.cursor/mcp.json.
Don't share or commit the file.
For more information, see Installing MCP servers in the Cursor docs.
VS Code
You query Lumi from VS Code through GitHub Copilot Chat, so you need an active GitHub Copilot subscription.
To connect VS Code to Lumi:
- OAuth
- IAM key
-
In your VS Code workspace, create a file named
.vscode/mcp.jsonwith the following content:{"servers": {"Imply Lumi": {"url": "https://lumi.imply.io/mcp/v1"}}} -
Click Start above the
Imply Lumientry inmcp.json. -
Sign in to Lumi when prompted.
-
Confirm the server status changes to
Running.
-
In your VS Code workspace, create a file named
.vscode/mcp.jsonwith the following content:{"inputs": [{"type": "promptString","id": "imply-lumi-key","description": "Imply Lumi API Key","password": true}],"servers": {"Imply Lumi": {"url": "https://lumi.imply.io/mcp/v1","headers": {"Authorization": "Basic ${input:imply-lumi-key}"}}}} -
Click Start above the
Imply Lumientry inmcp.json. -
Enter your IAM key token when prompted. VS Code stores the key securely, so it doesn't appear in
mcp.json. -
Confirm the server status changes to
Running.
Open GitHub Copilot Chat and set the mode to Agent, so Copilot can call the Lumi MCP server.
For more information, see Add MCP servers in VS Code.
Other MCP clients
Many agents accept the standard mcpServers JSON format.
If your agent isn't listed on this page, you can add Lumi to your agent's MCP configuration file, as long as your agent supports remote HTTP MCP servers.
Check your agent's documentation for the file location and any differences in format.
For example, some agents use serverUrl instead of url, or require "type": "http" in the server entry.
If the file already lists other servers, add the imply-lumi entry under mcpServers.
To connect your agent to Lumi:
- OAuth
- IAM key
OAuth requires an agent that supports MCP authentication. If your agent doesn't, use the IAM key method instead.
-
Add the following to your agent's MCP configuration file:
{"mcpServers": {"imply-lumi": {"url": "https://lumi.imply.io/mcp/v1"}}} -
If your agent is running, restart it.
-
Sign in to Lumi when prompted.
-
Add the following to your agent's MCP configuration file. Replace
<IAM key token>with your IAM key token.{"mcpServers": {"imply-lumi": {"url": "https://lumi.imply.io/mcp/v1","headers": {"Authorization": "Basic <IAM key token>"}}}} -
If your agent is running, restart it.
Most agents store the IAM key token in plain text in the configuration file. Don't share or commit the file.
Query Lumi
Once your agent is connected, ask questions about your Lumi events in natural language. For example:
- "What are the top 10 sources this week?"
- "Show me the top 10 most requested URLs in the past hour."
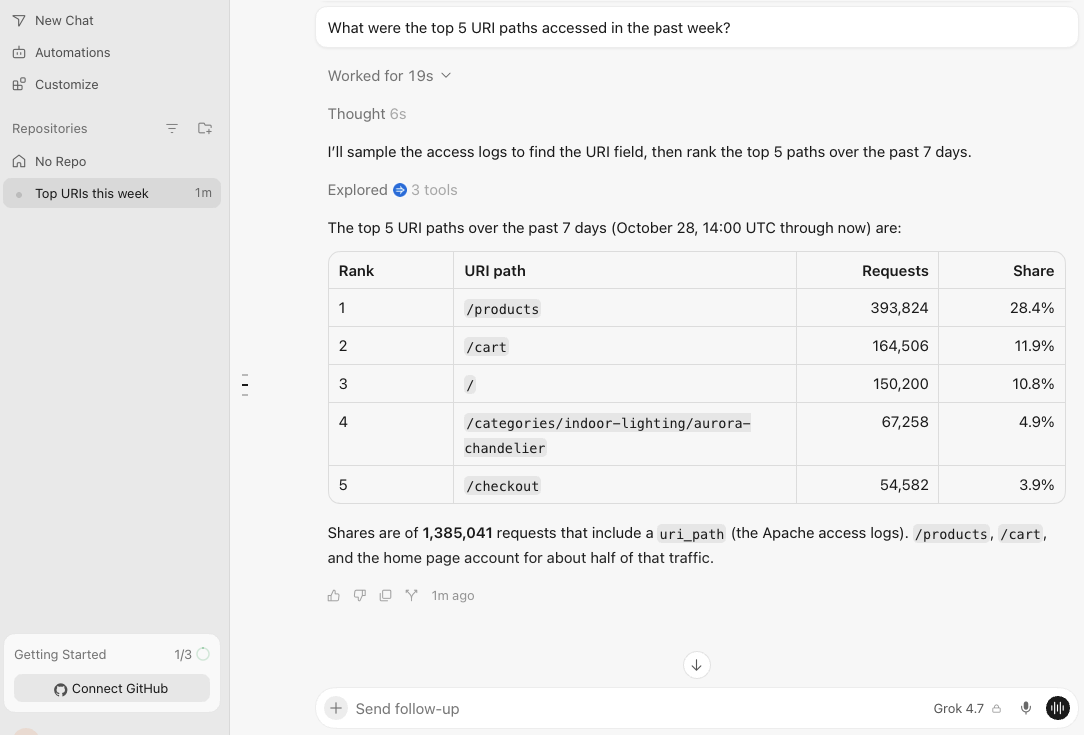
- "What were the top 5 URI paths accessed in the past week?"
The agent translates your prompt into a Lumi query, runs it, and returns the results. Most agents also show the query they ran. If your agent asks for permission to use the Lumi tools exposed by the MCP server, allow it. If your agent doesn't use the Lumi tools, mention Lumi in your query, for example "Use Imply Lumi to find the top 5 URI paths this week."
For example, here's a sample query and response in Cursor:
Learn more
See the following topics and third-party documents for more information:
- Search Lumi events for all options to search events.
- Create an IAM key for details on IAM keys.
- Model Context Protocol for more on MCP.