Send events with S3 pull
AI summary
About AI summaries.
You can send events from an Amazon Simple Storage Service (Amazon S3) bucket to Imply Lumi using the S3 pull integration.
The S3 pull integration supports the following types of ingestion jobs:
- Recurring: For sending real-time data. Lumi continuously listens for event notifications from AWS and automatically ingests new objects as they arrive. For details, see Recurring ingestion.
- Backfill: For sending historical data. You manually specify which objects to ingest, and Lumi ingests them once. For details, see Backfill ingestion.
Both job types require you to configure AWS access and create a Lumi IAM key before creating an ingestion job. This topic covers the initial setup. For a tutorial on configuring recurring jobs with S3 pull, see How to send events with S3 pull.
The instructions in this topic reflect AWS configurations as of October 2025.
Prerequisites
To send events from an S3 bucket to Lumi, you need the following:
- Access to Lumi with the Data manager role or higher. For information on roles and permissions, see Manage roles.
- Amazon IAM permissions to create roles, create policies, and attach policies to roles. For more information, see Allow users and groups to create and modify roles in the AWS documentation.
- Amazon S3 bucket, including the ARN of the bucket. For information on how to find the ARN of an S3 bucket, see Find ARNs in the AWS documentation.
- S3 objects in plain text, CSV, or JSON format. For more information, see Event formats.
Configure AWS access
Before you can load data from an S3 bucket into Lumi, you need to configure AWS access. This involves setting up the necessary AWS permissions and identity, including a permissions policy and an IAM role.
Create an AWS permissions policy
Create a permissions policy that grants access to the S3 bucket:
-
In the AWS console, go to the IAM dashboard.
-
Click Policies in the left sidebar, then click Create policy.
-
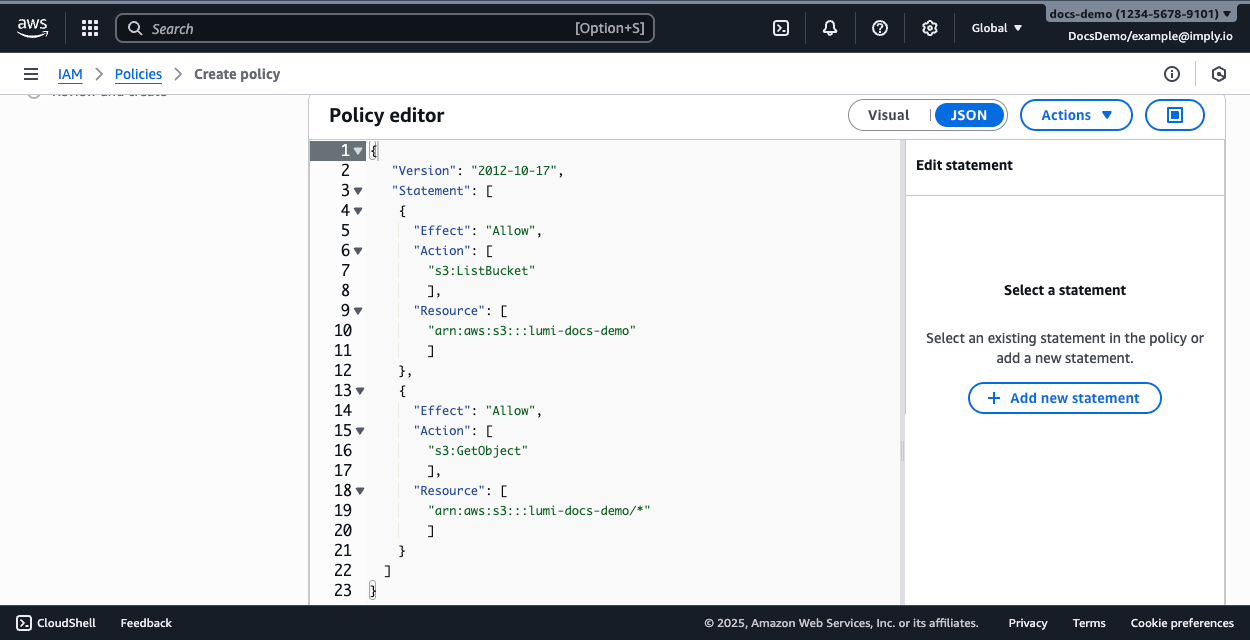
In the Policy editor section, click JSON.
-
Replace the contents in the policy editor with the following policy. Replace both instances of
S3 ARNwith the ARN of your S3 bucket.{"Version": "2012-10-17","Statement": [{"Effect": "Allow","Action": ["s3:ListBucket"],"Resource": ["S3 ARN"]},{"Effect": "Allow","Action": ["s3:GetObject"],"Resource": ["S3 ARN/*"]}]}The policy editor should resemble the following:
-
Optionally, click Actions and select Optimize for readability to format the JSON.
-
Click Next.
-
Enter a name for the policy, then click Create policy.
Handling objects encrypted with SSE-KMS
If your S3 bucket uses server-side encryption with AWS Key Management Service (AWS KMS) keys (SSE-KMS), whether with customer managed keys or AWS managed keys, the IAM role you use for Lumi must include the kms:Decrypt permission.
For more information, see the AWS documentation on SSE-KMS encryption.
To grant this permission, add the following statement to the permissions policy:
{
    "Effect": "Allow",
    "Action": "kms:Decrypt",
    "Resource": "arn:aws:kms:REGION:ACCOUNT_ID:key/KMS_KEY_ID"
}
Replace REGION, ACCOUNT_ID, and KMS_KEY_ID with your AWS region, account ID, and the ARN of the specific KMS key used to encrypt the data.
Create an AWS IAM role
Lumi provides a trust policy template that allows Lumi to assume an IAM role in your AWS account.
Start by obtaining the trust policy from Lumi:
- From the Lumi navigation menu, click Integrations > S3 pull.
- In the Configure AWS access section, click Show instructions.
- Scroll down to the Create an AWS IAM role step and copy the trust policy. You'll use it to create an IAM role in AWS.
Create an IAM role with the trust policy:
-
In the AWS console, go to the IAM dashboard.
-
Click Roles in the left sidebar, then click Create role.
-
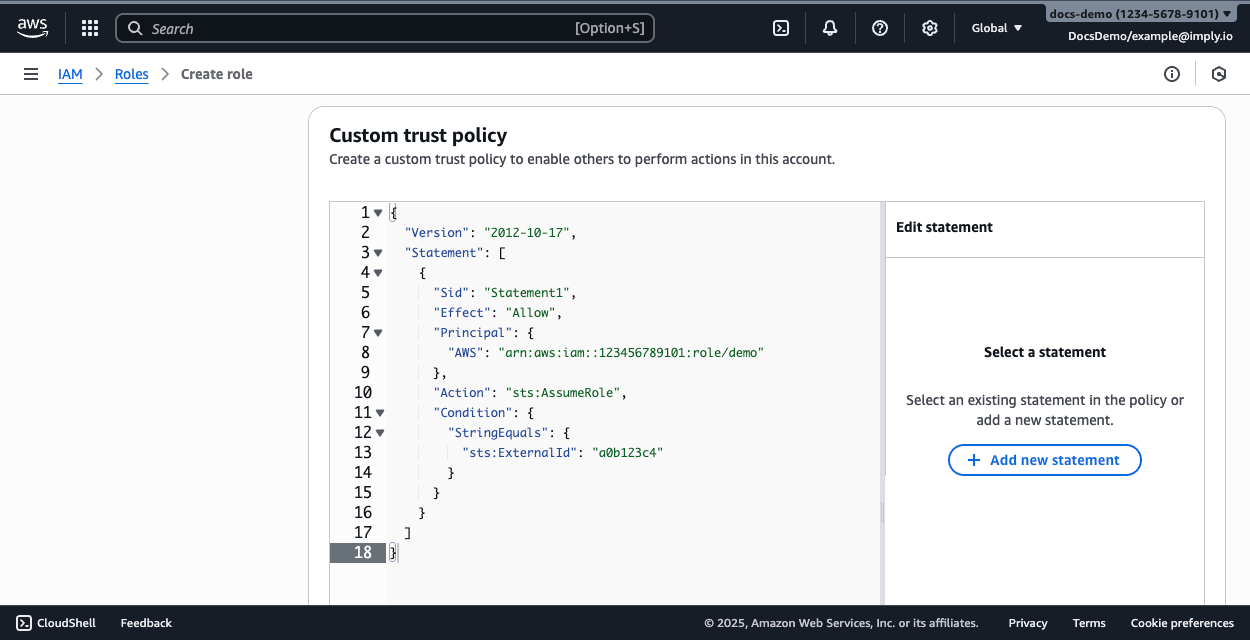
In the Trusted entity type section, select Custom trust policy.
-
Replace the contents in the policy editor with the trust policy you copied from Lumi.
The policy editor should resemble the following:
-
Click Next.
-
Search for and select the permissions policy you created in the previous step.
-
Click Next.
-
Enter a name for the role, then click Create role.
-
Search for and select your role to view its details. Save the ARN of the role. You'll need it in a later step.
Configure a Lumi IAM key
Configure a Lumi IAM key using the Amazon Resource Name (ARN) of the IAM role you created:
- From the Lumi navigation menu, click Integrations > S3 pull.
- Select or create an IAM key.
- If you create a new key, enter a name, optional description, and global attributes.
- Configure the S3 pull attributes:
- Provide the ARN of your AWS IAM role.
- Optionally, enter default values for the source, source type, and index. Lumi doesn't store the user attributes if null.
- Optionally, select the format of your events, such as CSV. Lumi auto-detects the format by default. Learn more about manual specification.
- Save your changes.
As part of this process, Lumi provides an endpoint to receive notifications about new objects.
Once you configure access to AWS and Lumi, you can create a recurring or backfill ingestion job to start sending events to Lumi.
S3 pull attributes
An event sent to Lumi through the S3 pull integration stores attributes for Splunk® default fields (configurable on your IAM key) and metadata related to the ingestion.
IAM key attributes
IAM key attributes for S3 pull configure access management and user attribute defaults.
The user attributes represent Splunk fields, source, sourcetype, and index.
You can set the following attributes:
- AWS role ARN (required)
- Source
- Source type
- Index
- Format
For more details on S3 pull attributes, see IAM key attribute reference.
Ingestion metadata
Lumi stores the following attributes for events sent through S3 pull:
| Name | Type | Description | Example |
|---|---|---|---|
filename | User attribute | URI of the object that contained the event | s3://my-test-bucket/empty.json |
correlationId | System attribute | Unique ID of a backfill job (not assigned for recurring jobs) | 01KBE5V2VFA9PKWDRBRK6N51VV |
Learn more
See the following topics for more information:
- Send events to Lumi for other options to send events.
- Transform events using pipelines for information on how to transform events in Lumi.