Manage pipelines and processors
AI summary
About AI summaries.
Pipelines transform events you send to Imply Lumi. A pipeline contains one or more processors that define the data processing tasks. Pipelines don't process events already stored in Lumi, and they don't create or delete events.
This topic walks you through the process to create and manage pipelines and processors. You'll learn how to:
- Create a pipeline and define conditions for events to enter the pipeline
- Add processors to perform operations such as parsing text or assigning user attributes
- Update pipelines and processors to reorder, disable, or delete them
- View the pipelines that processed an event
In addition to your own custom processing rules, Lumi offers several predefined pipelines. A predefined pipeline has a preset list of processors tailored to a specific event type, such as Windows event logs. Predefined pipelines are enabled by default. For more information, see Work with predefined pipelines.
To follow along with a tutorial, see How to transform events with pipelines.
Prerequisites
To create and manage pipelines in Lumi, you need the Data manager role or higher. For information on roles and permissions, see Manage roles.
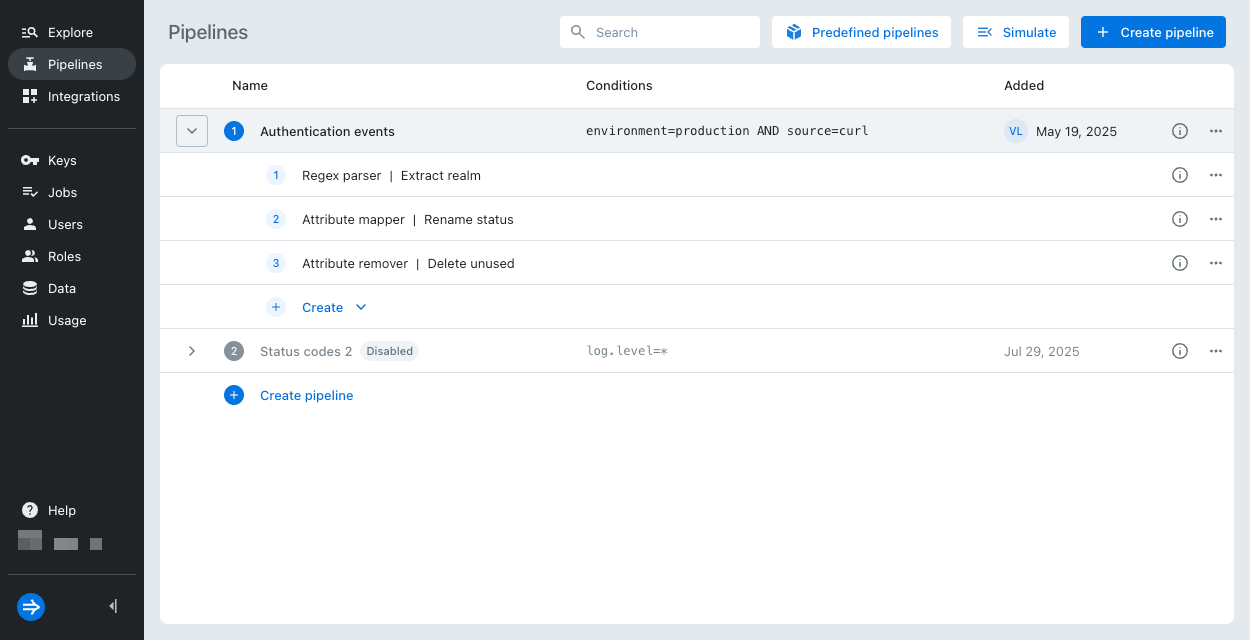
View pipelines
The Pipelines page shows a list of all pipelines. Expand any pipeline to see the processors in the pipeline. Click the information icon next to a pipeline or processor to view its description and the date it was last modified.
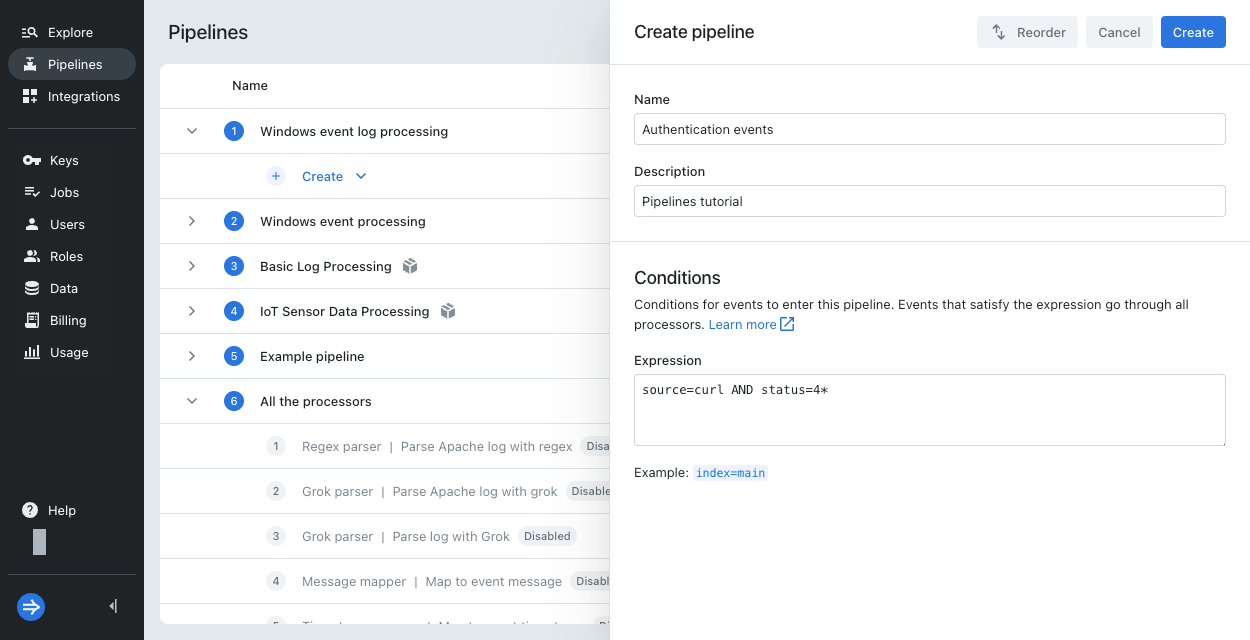
Create a pipeline
To create your own pipeline:
- Click Pipelines from the navigation menu.
- Click + Create pipeline.
- Enter pipeline details:
- Name: Name to identify the pipeline.
- Description: Optional description for the pipeline.
- Expression: Query that qualifies events for the pipeline. For more details and examples, see Pipeline conditions.
- Click Create.
- Optionally, update the pipeline to reorder its position.
- Create one or more processors to define the pipeline functionality.
Create a processor
To create a processor in a pipeline:
- Click Pipelines from the navigation menu.
- Select a pipeline, then click Create > Processor.
- Select the processor type.
- Enter a name and optional description for the processor.
- Fill in the processing rules. The available fields depend on the processor type.
- For guidance on how to specify attributes, see Processor settings.
- For a reference on all available processors, see Processors.
- Optionally, try out the processor.
- Click Create.
- Optionally, update the processor to reorder its position.
Before sending events to Lumi, you can check how the pipeline, or the entire set of pipelines, will operate on your events. See Simulate pipelines and processors for more information.
Update a pipeline or processor
To update a pipeline or processor:
- Click Pipelines from the navigation menu.
- For the processor you want to update, click the ellipsis and select Edit.
- Make the desired changes then click Save.
From the ellipsis menu, you can also take the following actions:
- Reorder
- Duplicate
- Simulate
- Enable or disable
- Delete
- Create processor (for pipelines)
When you create a new pipeline or processor, Lumi enables it by default. Disabled elements appear dimmed in the pipelines list.
View pipelines for a processed event
To view the pipelines that processed an event:
- Go to the explore view and find the event.
- Select the event to open its event details pane.
- If the event was processed, Lumi displays a tab called Pipelines. The list displays pipelines in order of processing.
- Click a pipeline to view it in the Pipelines page. Lumi expands the specific pipeline you selected.
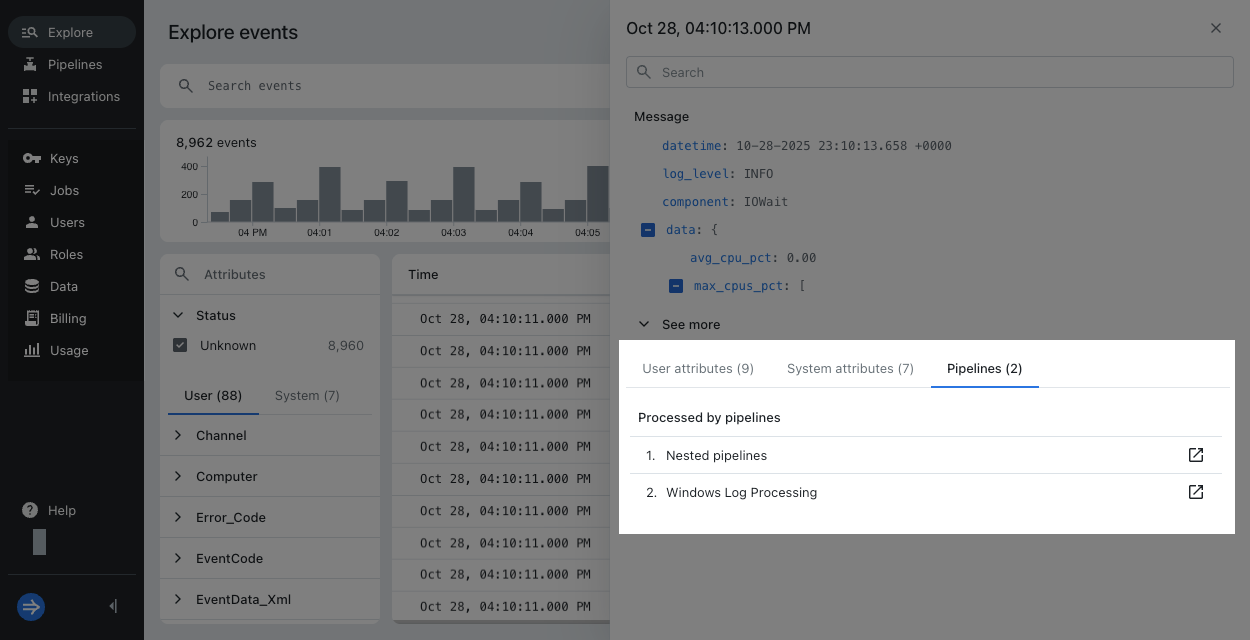
After you delete a pipeline, Lumi retains the pipeline ID. If an event was processed by a deleted pipeline, the list shows the pipeline ID and its deleted status. You can't view the conditions and processors for a deleted pipeline.
Learn more
See the following topics for more information:
- Transform events using pipelines for an overview of pipelines and processors.
- How to transform events with pipelines for a tutorial on using pipelines.
- Processors reference for the types of processors available in Lumi.
- Predefined pipelines for curated pipelines for specific data sources.
- Nested pipelines for organizing pipelines using nesting.