Work with predefined pipelines
AI summary
About AI summaries.
Predefined pipelines are built-in pipelines that Imply Lumi provides for processing specific event formats. They apply standard parsing and enrichment rules so your data is structured and ready to use as soon as it’s ingested. This saves you from creating custom processors for common event structures. You can use predefined pipelines as they are, or duplicate and customize them to fit your requirements.
In this topic, you’ll learn how to use and manage predefined pipelines.
For a list of all predefined pipelines, see Predefined pipelines reference.
How predefined pipelines work
A predefined pipeline has a fixed definition of conditions and processors to process specific log types. You can't change a predefined pipeline, but you can use it as a template to create a copy and customize it.
Predefined pipelines are automatically ready to process events. When Lumi detects a matching event based on its source type, it activates the corresponding pipeline and adds it to the Pipelines page. To prevent automatic processing, manually disable the predefined pipeline.
Note that there can be a slight delay for Lumi to activate a predefined pipeline across all event collectors, which can cause some initial events to skip processing. If you prefer that all initial events get processed, manually add the pipeline before sending events.
Lumi manages predefined pipeline definitions and automatically applies system updates to your active pipelines. Updates can include additions such as expanded support for expression functions to better align with Splunk® technology add-on transformations. If you don't want to automatically apply system updates to your predefined pipelines, then duplicate the pipeline and use the copy. See the release notes for details on recent updates.
Source type assignment
Each predefined pipeline has a condition based on an incoming event's source or source type attribute.
For example, sourcetype=aws:cloudtrail.
Lumi reads an event's sourcetype attribute from the following sources:
- Metadata on incoming events that you assign from a forwarding agent, such as in
fieldsfor a Splunk HEC request.
For file upload, you can set source and source type in the UI. - Default value you set on the IAM key. Only for the integrations Splunk HEC or S3 pull.
- Pipeline you create in Lumi. Order this pipeline before the predefined pipeline, so that the value is in place when Lumi evaluates the pipeline condition.
To learn how to use these approaches to assign the source type, see Assign Splunk default fields.
Choose an approach based on whether the incoming source type matches the pipeline condition and if you need to retain its original value:
| Incoming source type | Keep original value | Approach |
|---|---|---|
| Match | N/A | No action needed. The predefined pipeline works as is. |
| None | N/A | Set a default value using the IAM key attribute. When you use an event source integration, Lumi configures the key for you. |
| Doesn't match | No | Create a pipeline to overwrite the value, ordered before the predefined pipeline. |
| Doesn't match | Yes | Duplicate the pipeline and change the condition to match your value. |
Workflows
Predefined pipelines work as is, so you can use them without interruption in your event forwarding workflows. For example:
- Check that your events match the predefined pipeline conditions, such as assigning the correct
sourcetype.
To see pipeline details, see View predefined pipelines. - Send events to Lumi. For details, see Send events to Lumi.
- Explore events. For details, see Search events in Lumi.
- From the explore view, click an event to view pipelines that processed it.
The following sections describe additional example workflows for using predefined pipelines.
Simulate pipeline
To preview how a predefined pipeline operates:
- On the **Pipelines tab of the Managed data page, find the predefined pipeline, marked with a box icon.
If you don't see the predefined pipeline, manually add it to the list. - Follow the steps to simulate a pipeline.
You can also send a test event, such as with the HEC API, and view the processed event in the explore view.
Change order
Pipelines operate in the order displayed. A newly added predefined pipeline goes to the bottom of the list.
To update the pipeline order:
- On the Pipelines tab of the Managed data page, find the predefined pipeline, marked with a box icon.
If you don't see the predefined pipeline, manually add it to the list. - On the Pipelines page, click the ellipsis next to the predefined pipeline, and select Reorder.
Customize processing
The predefined pipeline is a template for processing events. You can't make changes to the predefined pipeline itself, but you can duplicate and update the copy. For example, you might want to:
- Change the pipeline conditions to match your forwarding setup.
- Customize processors to add or remove fields.
- Create two versions of the same pipeline with different conditions to handle similar events for different use cases.
To customize processing from a predefined pipeline:
-
Create a pipeline copy:
- If you see the predefined pipeline on the Pipelines tab, click the ellipsis menu and select Duplicate.
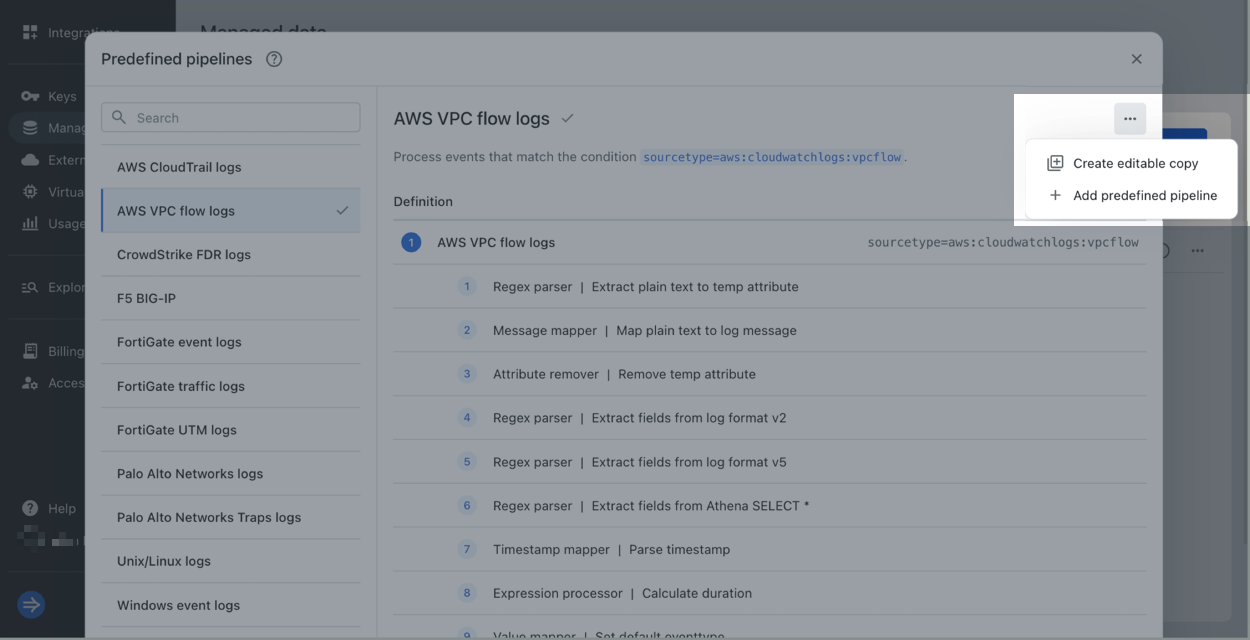
- Otherwise, view the predefined pipeline in the library, click the ellipsis menu, and select Create editable copy.
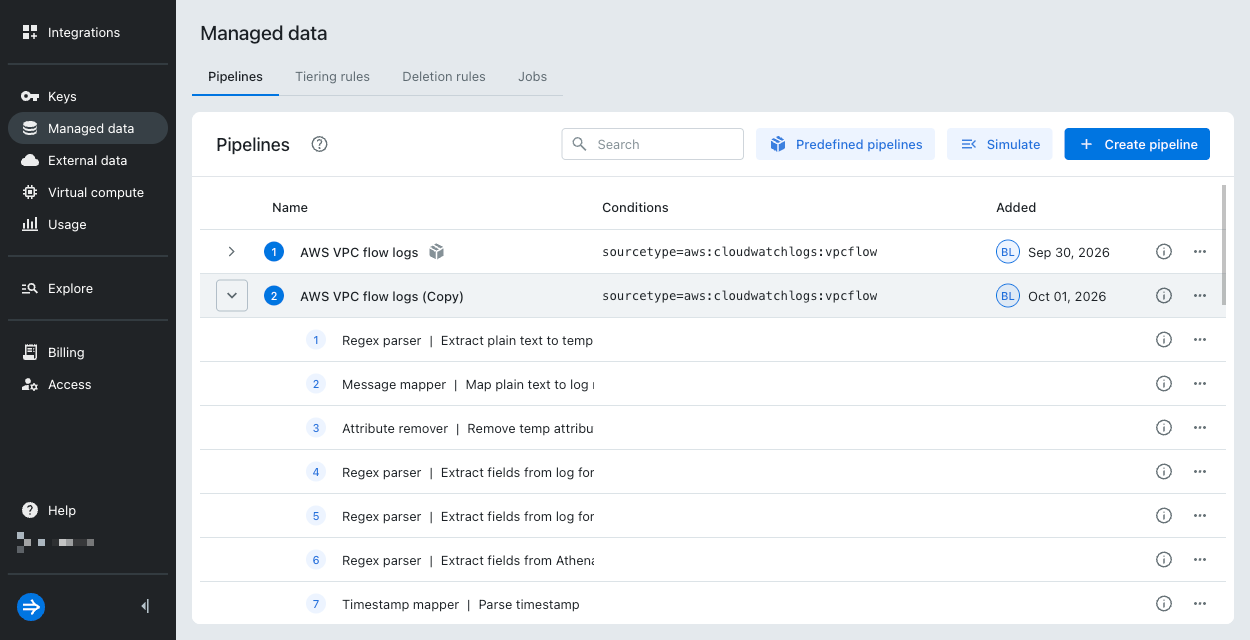
The pipeline copy appears in the list with (Copy) appended to the name. The original predefined pipeline is marked with a box icon.
-
Click the ellipsis next to the pipeline copy and select Edit. You can:
- Edit the name and description.
- Update the pipeline condition for how Lumi determines events to process.
- Change the pipeline order. Pipelines operate in sequential order.
-
Customize the processors:
- To add a processor, click the ellipsis and select Create processors.
- To edit a processor, expand the pipeline and click the ellipsis next to the processor. You can reorder, edit, duplicate, disable, or delete it.
-
To verify your transformations, simulate the pipeline.
-
To prevent duplicate processing, disable the predefined pipeline.
The following example shows a VPC flow log processing pipeline and a duplicate:
To learn more about updating pipelines, see Update pipelines and processors.
View predefined pipelines
To view predefined pipelines:
-
In the Lumi navigation menu, click Managed data > Pipelines.
-
Click Predefined pipelines.
-
In the Predefined pipelines dialog, select a predefined pipeline to view its details. A gray checkmark indicates that Lumi identified matching events and activated the predefined pipeline.
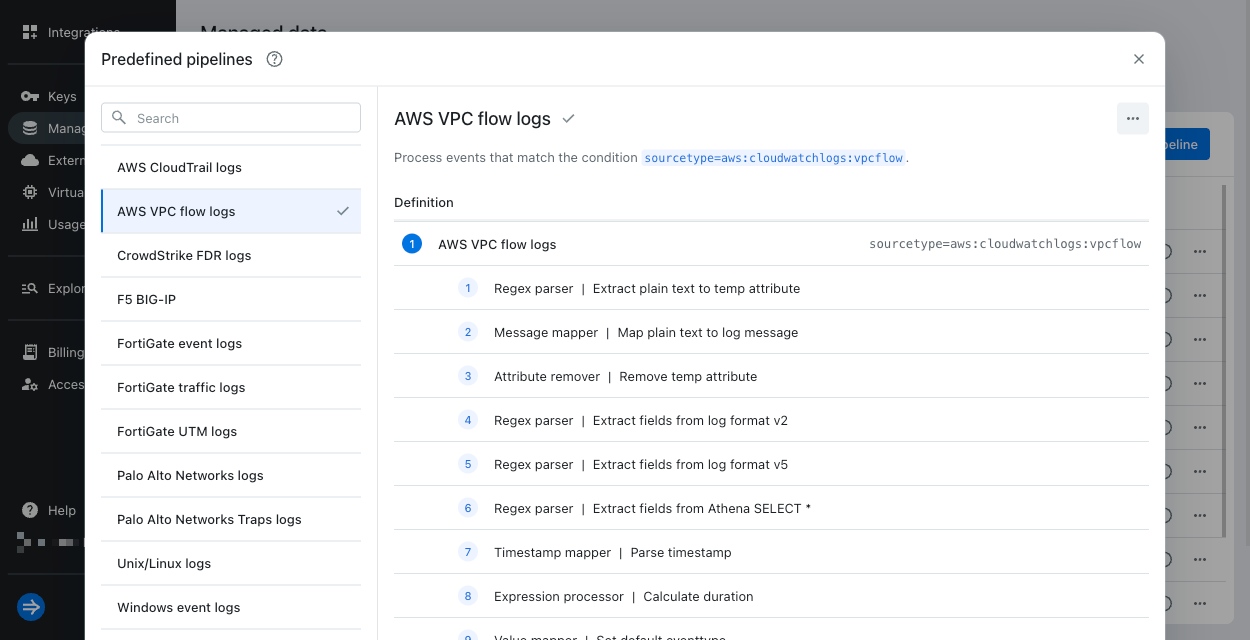
You can also view details for a predefined pipeline on the Pipelines page. Lumi adds it to the page when it detects matching events, or you can add it yourself. A predefined pipeline is denoted with a box icon next to the pipeline name. For more details, see View pipelines.
Add a predefined pipeline
Since predefined pipelines are enabled by default, you typically don't need to add it manually. You can choose to add a predefined pipeline when you want to control its ordering or in case of an activation delay.
To add a predefined pipeline:
-
In the Lumi navigation menu, click Managed data > Pipelines.
-
Click Predefined pipelines.
-
Find the predefined pipeline you want to add. You can use the search function in the Predefined pipelines dialog.
-
Click the ellipsis, and select Add predefined pipeline.
Disable a predefined pipeline
You might need to disable a predefined pipeline if you duplicate and update the copy, so you don't have two sets of processing.
To disable a predefined pipeline:
- In the Lumi navigation menu, click Managed data > Pipelines.
- Find the predefined pipeline, marked with a box icon.
If you don't see the predefined pipeline, manually add it to the list. - Click the ellipsis and select Disable.
You can't delete predefined pipelines.
Learn more
See the following topics for more information:
- Transform events using pipelines for an overview of pipelines and processors.
- Manage pipelines and processors for how to create and manage pipelines and processors.
- Predefined pipelines reference to see the available predefined pipelines in Imply Lumi.
- How to backfill VPC flow logs from S3 to learn how to transform Amazon VPC flow logs with a predefined pipeline.