Embed a visualization in a web app
You can share visualizations from Imply Polaris with users outside Polaris by creating a link to the data cube or dashboard. You can then share the link directly or embed the visualization in a third-party app.
Embedding links can be public (unrestricted) or restricted (secure).
This guide walks you through the process to create a restricted link to a dashboard using the Embedding links v1 API, then create a simple web app to embed the dashboard.
The process in this guide involves the following steps:
- Create a restricted embedding link in Polaris, which generates a secret key.
- Create a client-side app to display the link.
- Create a server-side app with the ability to sign the link.
- Generate a signed link.
- Fetch the link when a user attempts to access it.
- Apply data cube and access filters to the link.
The following diagram shows the components both inside and outside of Polaris.
Prerequisites
Before you complete the steps in this guide, ensure that you have the following:
-
A Polaris API key with the
AdministerEmbedLinkspermission.In the API requests in this guide, the API key is stored in the variable named
POLARIS_API_KEY. For information on how to obtain an API key and assign permissions, see Authenticate with API keys. For information on permissions, visit Permissions reference. -
The ID of a data cube or dashboard in Polaris that you want to embed in the sample web app. Retrieve the ID from the Polaris UI, or by sending a GET request to the Data cubes v1 API or Dashboards v1 API.
About the sample dashboard
The sample dashboard in this guide displays US Geological Survey earthquake summary data.
The data contains details of seismic activity including the place where the activity occurred, geographical coordinates, the type of activity, and details including depth, intensity, and alert status.
The Guide for analyzing data walks through the process to ingest a day's earthquake summary data into Polaris and use the Dashboards v1 API to create the following dashboard:
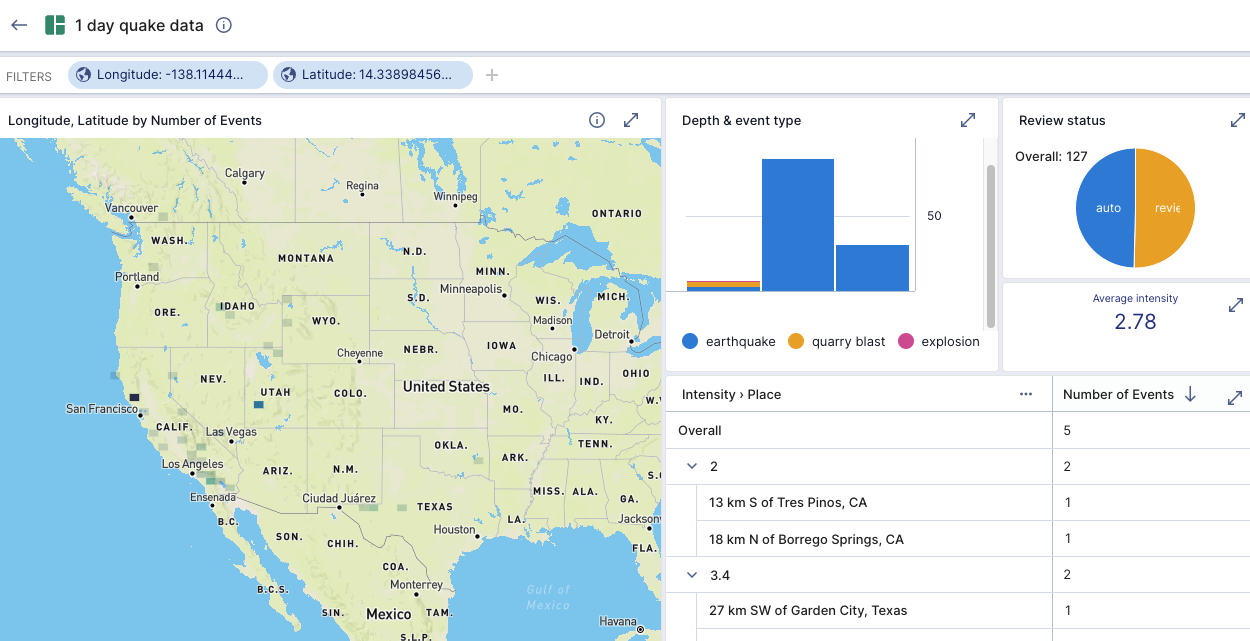
Follow the guide if you want to create the same dashboard to display in this guide's sample web app. Otherwise you can display any dashboard of your choice.
Create an embedding link in Polaris
The following diagram summarizes the process followed in this guide. The first step is to create an embedding link in Polaris.
Public and restricted links
A link to an embedded visualization can be public or restricted. A public link is simple to set up, but insecure. Once you create a public link and share or embed it in a third-party app, anyone can access it and view all of its underlying data.
This guide shows how to generate a restricted embedding link.
Restricted links can only be accessed when a signature created with a secret key is attached to the URL, for a configurable time to live (ttl).
Submit a POST request to the Embedding links v1 API with "restricted": true and pass the visualization configuration as a payload to the request.
Sample request
The following example creates a restricted embedding link to the dashboard with ID 7dfe.
Replace the dashboard ID with your own if you copy the request.
The request body contains the following properties:
layouthides the dashboard's navigation panel and header bar.restrictedcreates a restricted link and generates a secret key in the response.nonFilterableDimensionsprevents users from changing theLatitudeandLongitudesettings on the map.nonShowableDimensionsexcludesUrlfrom the show bar of the embedded dashboard.ttlis the link's time to live and determines how long the signature is valid for after it’s generated—it controls the maximum length of a session. After the signature is first exchanged for a cookie, the signature becomes unusable for 10 hours.
See the Embedding links v1 API documentation for a description of all API properties.
Use the verbose option -v to include the header information in the response.
Polaris returns the embedding link in the location header.
Show sample request
- cURL
- Python
curl --location -v --request POST "https://ORGANIZATION_NAME.REGION.CLOUD_PROVIDER.api.imply.io/v1/projects/PROJECT_ID/embedding-links" \
--header "Authorization: Basic $POLARIS_API_KEY" \
--header "Content-Type: application/json" \
--data-raw '{
    "name": "Quake dashboard API",
    "description": "1 day quake data dashboard including map",
    "layout": "visualization-only",
    "restricted": true,
    "ttl": 3600000,
    "nonFilterableDimensions": [
        "Latitude",
        "Longitude"
    ],
    "nonShowableDimensions": [
        "Url"
    ],
    "viewDescription": {
        "dashboard": "7dfe"
    }
}'
import os
import requests
import json

url = "https://ORGANIZATION_NAME.REGION.CLOUD_PROVIDER.api.imply.io/v1/projects/PROJECT_ID/embedding-links -v"

apikey = os.getenv("POLARIS_API_KEY")

payload = json.dumps({
  "name": "Quake dashboard API",
  "description": "1 day quake data dashboard including map",
  "layout": "visualization-only",
  "restricted": True,
  "ttl": 3600000,
  "nonFilterableDimensions": [
    "Latitude",
    "Longitude"
  ],
  "nonShowableDimensions": [
    "Url"
  ],
  "viewDescription": {
    "dashboard": "7dfe"
  }
})
headers = {
  'Authorization': f'Basic {apikey}',
  'Content-Type': 'application/json'
}

response = requests.request("POST", url, headers=headers, data=payload)

print(response.text)
Sample response
The following example shows a response to successful embedding link creation. When you run your request, make a note of the following. You'll need them later in the process.
- The embedding link contained in the
Locationheader. - The
SECRET_KEYin theembeddingSecretproperty.
Show sample response
> Content-Type: application/json
> Content-Length: 404
>
< HTTP/1.1 201 Created
< Access-Control-Allow-Credentials: true
< Content-Type: application/json; charset=utf-8
< Date: Wed, 16 Apr 2024 13:13:46 GMT
< ETag: W/"20e-aWHxc74IO20n+Ylj2AWPTg+C3kA"
< Location: https://ORGANIZATION_NAME.REGION.CLOUD_PROVIDER.api.imply.io/embedding-links/66151f5a68c7a3f002
< Vary: Accept-Encoding
< vary: Origin
< Content-Length: 526
< Connection: keep-alive

{
    "createdAt": "2024-04-16T13:13:46.932Z",
    "createdBy": "f35c9fe5-8ec4-4d9a-8222-c03a06fb3552",
    "updatedAt": "2024-04-16T13:13:46.932Z",
    "updatedBy": "f35c9fe5-8ec4-4d9a-8222-c03a06fb3552",
    "name": "Quake dashboard",
    "description": "1 day quake data dashboard including map",
    "layout": "visualization-only",
    "apiCreated": true,
    "restricted": true,
    "ttl": 3600000,
    "nonFilterableDimensions": [
        "Latitude",
        "Longitude"
    ],
    "nonShowableDimensions": [
        "Url"
    ],
    "viewDescription": {
        "dashboard": "7dfe"
    },
    "id": "acf22f9751be622ad1",
    "embeddingSecret": "SECRET_KEY"
}
Tip for creating embedding links via API
This guide uses the Embedding Links v1 API to create a restricted link to a dashboard.
If you create a link to a data cube, you'll need to include measure and dimension definitions. See the Data cubes v1 API for details of the required parameters.
The JSON in API requests can be complex.
To make things easier, you can create an embedding link in the Polaris UI, then send a GET request to the API to retrieve the JSON and adapt it if necessary. For example:
- Create an embedding link in the Polaris UI.
- To embed the link via API without modifying the JSON, click API call in the embedding link's edit view and copy the API request. Complete the rest of the steps if you want to modify the JSON first.
- Locate your link
id: you can see it when viewing the link in the UI, or send aGETrequest to/v1/projects/PROJECT_ID/embedding-linksto list all embedding links. - Send a
GETrequest to/v1/projects/PROJECT_ID/embedding-links/LINK_IDto retrieve the JSON that defines the link. - Use the API documentation to modify the JSON as needed.
- Send a
POSTrequest to/v1/projects/PROJECT_ID/embedding-linkswith your JSON in the request body to create a new embedding link.
Create a client-side app
First, you'll create a simple JavaScript web application to display the dashboard visualization. You'll create a React application using the following:
- TypeScript: An open-source language that adds syntax to JavaScript.
- Blueprint: A React-based UI toolkit.
Create a web app
To create the app, run the following commands:
-
Create a React app with a typescript template:
npx create-react-app polaris-embedding-example --template typescript -
Navigate to the app directory:
cd polaris-embedding-example -
Install Blueprint:
npm install --save @blueprintjs/core -
Start the app:
npm start -
Open your browser and navigate to
http://localhost:3000to see the app running:
-
Stop the app.
Create a users component
Now you'll create a component to allow us to simulate switching between users. In this example you'll hardcode the users. In a real world situation you'd likely map to another system to handle user authentication, using roles instead of users.
Note that the payload to create the signed link must include the cubeAccessFilter and linkAccessFilter properties.
To keep the example simple for now, you'll set these properties to undefined. You'll apply filters later.
In polaris-embedding-example/src, create a new file named UsersMenu.tsx with the following content:
import '@blueprintjs/core/lib/css/blueprint.css';
import { Button, Menu, MenuItem, Popover } from "@blueprintjs/core";

// Export the user details
export interface User {
  userName: string;
  cubeAccessFilter?: string;
  linkAccessFilter?: string;
}

interface UserMenuProps {
  userId: number;
  onUserIdChange: (user: number) => void;
}

export const USERS = [
  // Set the username, cube access filter, and link access filter
  {
    userName: "Research user 1",
    cubeAccessFilter: undefined,
    linkAccessFilter: undefined,
  },

  // Set the username, cube access filter, and link access filter
  {
    userName: "Research user 2",
    cubeAccessFilter: undefined,
    linkAccessFilter: undefined,
  },

  // Set the username, cube access filter, and link access filter
  {
    userName: "Research user 3",
    cubeAccessFilter: undefined,
    linkAccessFilter: undefined,
  },
];
// Set up the users drop-down list
function UsersMenu({ onUserIdChange, userId }: UserMenuProps) {
  const usersMenuItems = USERS.map((user, i) => (
    <MenuItem
      key={user.userName}
      text={user.userName}
      onClick={() => onUserIdChange(i)}
    />
  ));
  return (
    <Popover content={<Menu>{usersMenuItems}</Menu>}>
      <Button
        alignText="left"
        icon="user"
        rightIcon="caret-down"
        text={USERS[userId].userName}
      />
    </Popover>
  );
}

export default UsersMenu;
Add an iFrame for the embedded dashboard
The next step is to add an iFrame for the visualization, import UsersMenu for switching between users, and add a component state for storing the current user and the embedding link URL.
-
Open the file
polaris-embedding-example/src/App.tsx -
Replace the contents of the file with the following, and save:
import { useState } from "react";import "./App.css";import UsersMenu from "./UsersMenu";// Add a component state for the current user and embedding linkfunction App() {const [link, setLink] = useState("");const [userId, setUserId] = useState(0);// Set up the iFrame for the visualizationreturn (<div className="App"><iframewidth="80%"height={450}src={link}title="Embedded visualization"/><div><UsersMenu onUserIdChange={setUserId} userId={userId} /></div></div>);}export default App; -
Restart the app. In your browser at
http://localhost:3000you should now see a blank iFrame and a drop-down selection of users: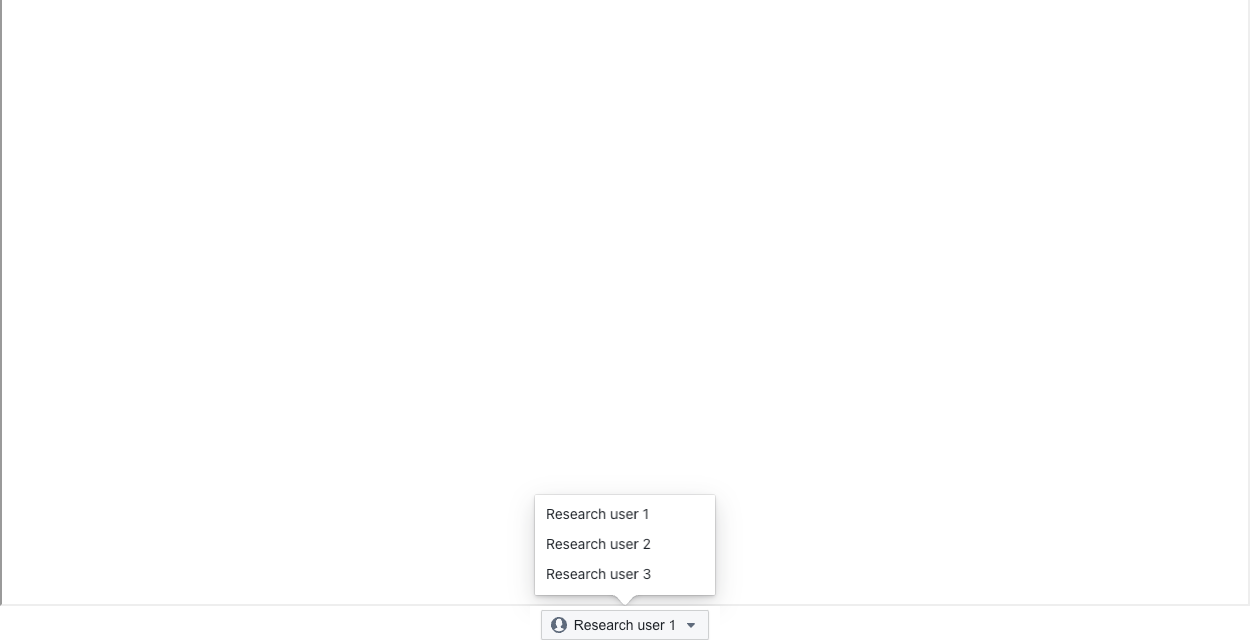
Generate a signed link
Generating the link involves three steps:
- Importing the secret key
- Creating the payload
- Signing the payload
Now you'll create a router file that performs these steps.
In polaris-embedding-example/src/routes, create a new file named embed.ts with the following content.
Replace SECRET_KEY and MY_LINK with the key and link you saved from your embedding link creation response.
import { Router } from "express";
import { Buffer } from "buffer";
// Import webcrypto for generate signature
// See: https://nodejs.org/api/webcrypto.html
import { webcrypto as crypto } from "crypto";

const embed = Router();
const KEY = 'SECRET_KEY';
const LINK = 'MY_LINK';

// Set up the URL
embed.post("/", async (request, response) => {
   const { cubeAccessFilter, linkAccessFilter } = request.body;
   const url = new URL(LINK);

   // Import secret key using ECDSA and P-256
   const privateKey = await crypto.subtle.importKey(
      "pkcs8",
      Buffer.from(KEY, "base64"),
      { name: "ECDSA", namedCurve: "P-256" },
       true,
       ["sign"],
   );

   // String value of the time the link was created, in milliseconds
   const date = Date.now().toString();
   const data = Buffer.from(
      JSON.stringify({
        cubeAccessFilter: cubeAccessFilter,
        linkAccessFilter: linkAccessFilter,
        created: date,
      }),
      "utf8",
   );
   // Generate a signature format using ECDSA P-256
   const signature = await crypto.subtle.sign(
     { name: "ECDSA", hash: { name: "SHA-256" } },
       privateKey,
       data,
     );

   // Build the restricted link from the signed parameters,
   // in the order cubeAccessFilter, linkAccessFilter, created
   const searchParams = new URLSearchParams();
   searchParams.append("signature", Buffer.from(signature).toString("base64"));
   if (cubeAccessFilter) {
      searchParams.append("cubeAccessFilter", cubeAccessFilter);
   }
   if (linkAccessFilter) {
      searchParams.append("linkAccessFilter", linkAccessFilter);
   }
   searchParams.append("created", date);

   url.search = searchParams.toString();

   response.status(200).send({ signedLink: url.toString() });
});

export default embed;
Create a server-side app
Now you'll create a server-side app containing an endpoint to sign the link. The server will run on your localhost port 3001.
-
Run the following commands to install Express and Cross-origin resources sharing (CORS) to allow your localhost sites to communicate with each other:
npm install --save express cors @types/express @types/corsnpm install --save-dev ts-node -
In
polaris-embedding-example/src, create a file namedserver.tswith the following content:import express, { Application, Request, Response } from "express";import cors from "cors";import embed from "./routes/embed";import bodyParser from "body-parser";const app = express();// Allow communication from the app on port 3000const allowedOrigins = ["http://localhost:3000"];const options: cors.CorsOptions = {origin: allowedOrigins,};// Set port 3001 for the serverconst PORT: number = 3001;app.use(cors(options));app.use("/embed", bodyParser.json(), embed);// Print the server status and portapp.listen(PORT, (): void => {console.log("Server is up on port:", PORT);});
Fetch the link for users
Now you'll create a function to fetch the link for the appropriate users, and call the function from App.tsx.
-
In
polaris-embedding-example/src, create a new file namedgetSignedLink.tswith the following content:const EMBED_API_URL = "http://localhost:3001/embed";// Assemble the signed linkexport async function getSignedLink(cubeAccessFilter?: string,linkAccessFilter?: string,): Promise<string> {const response = await fetch(EMBED_API_URL, {method: "POST",headers: {"Content-Type": "application/json",// Add any other headers if needed},body: JSON.stringify({ cubeAccessFilter, linkAccessFilter }),});if (!response.ok) {throw new Error(`Response not ok: ${response.status}`);}const data = await response.json();// Return the signed linkreturn data.signedLink;} -
Edit the file
polaris-embedding-example/src/App.tsxand replace the contents with the following:import "./App.css";import { useEffect, useState } from "react";import { getSignedLink } from "./getSignedLink";import UsersMenu, { User, USERS } from "./UsersMenu";function App() {const [link, setLink] = useState("");const [userId, setUserId] = useState(0);// Generated the signed link for the useruseEffect(() => {async function generateLink() {const user: User = USERS[userId];try {setLink(await getSignedLink(user.cubeAccessFilter, user.linkAccessFilter),);} catch (error) {console.error("Error generating signed link:", error);}}generateLink();}, [userId]);// Set up the iFrame for the visualizationreturn (<div className="App"><iframewidth="80%"height={450}src={link}title="Embedded visualization"/><div><UsersMenu onUserIdChange={setUserId} userId={userId} /></div></div>);}export default App;
Start the server and app
To start up the app and view the embedded dashboard:
-
Start the server:
npx ts-node -O '{"module":"commonjs"}' src/server.ts -
Start the app:
npm start -
View the app in your browser at
http://localhost:3000: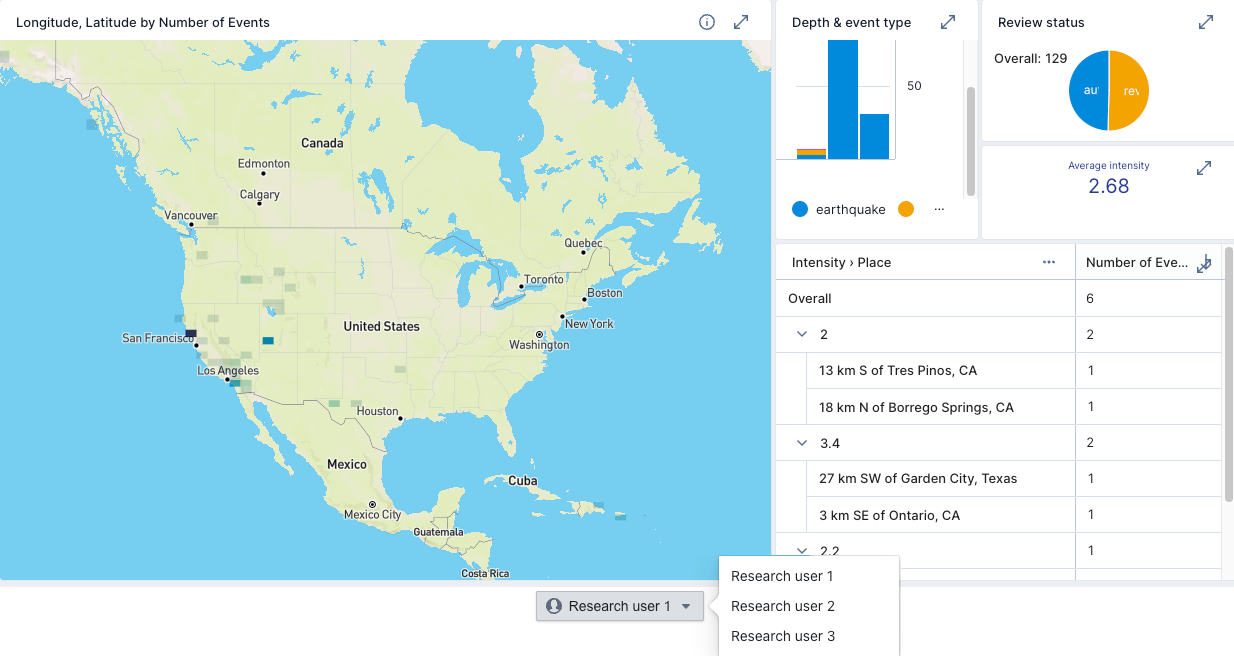
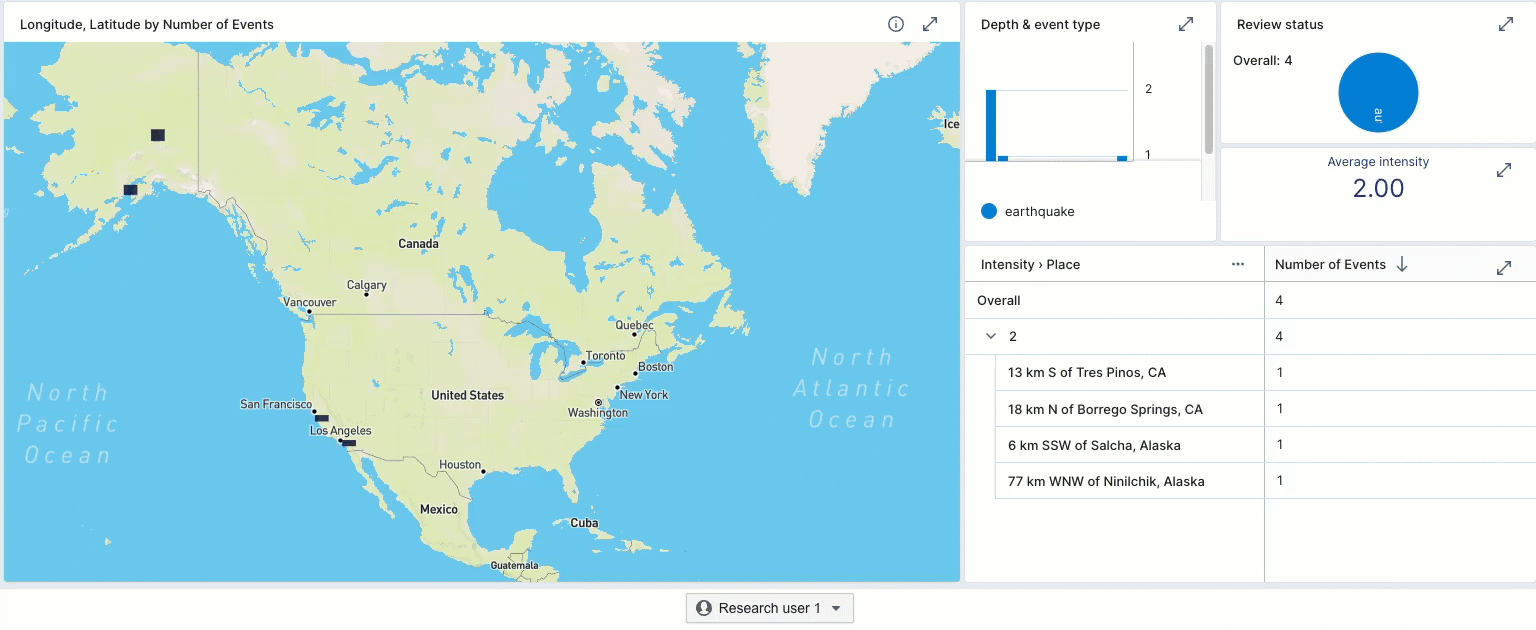
Note that changing the user in the drop-down displays exactly the same dashboard for each. In the final steps you'll apply data cube and access filters to change the display for each user.
Apply filters to the link
You can apply two types of filter to an embedding link:
- Data cube access filters allow you to apply a SQL expression to a specific Polaris data cube's underlying data. You then assign the access filter to a user group, so that members of the group view the filtered data.
- Link filters are SQL filter expressions applied to a link that can be used on any data cube.
Apply data cube access filters
Our embedded dashboard is built on a Polaris data cube named Earthquake sample day. For this example you'll simulate access for three users with three different data cube access filters.
-
In the UI, create access filters on the data cube underlying the embedded dashboard, for example:
- Intensity 2: Only show events with an intensity of 2.
- Quarry blasts: Only show events with type 'quarry blast'.
- Reviewed events: Only show events with review status 'reviewed'.
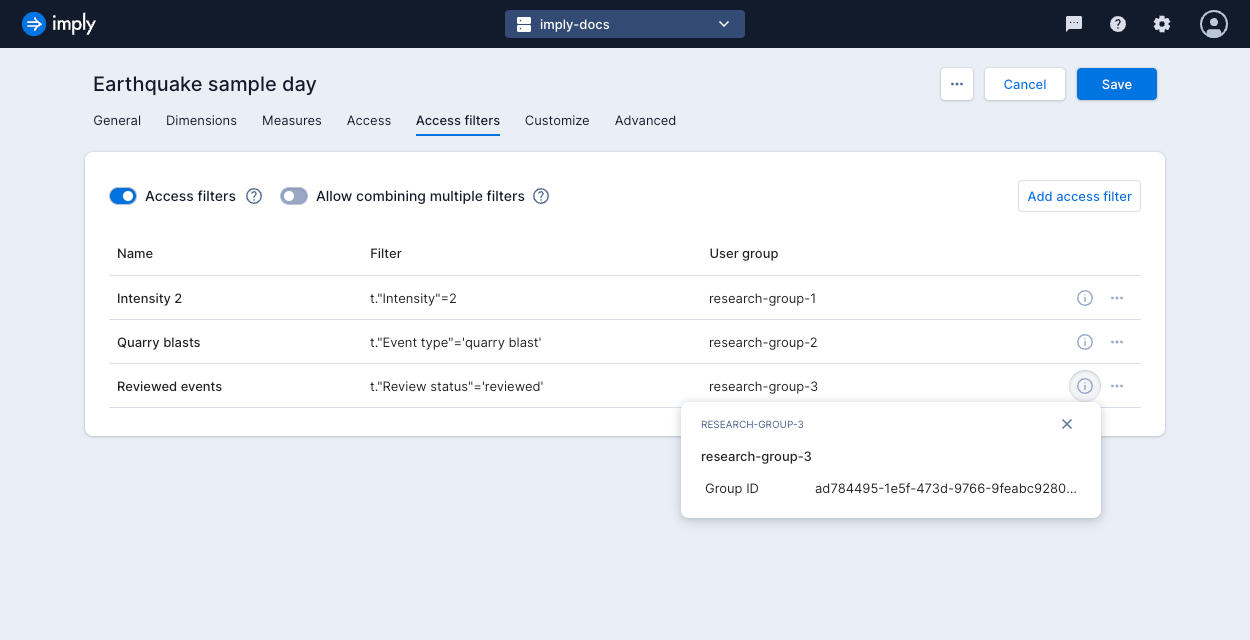
-
Make a note of each access filter's ID. You can view this in the Polaris UI (hover over the ID to see it in full and double-click it to copy) or by sending a GET request to the Data cubes v1 API.
-
Edit the
UsersMenu.tsxfile inpolaris-embedding-example/srcto include the access filter IDs in thecubeAccessFiltervariables. Replace the contents of the file with the following, then replaceDATA_CUBE_ACCESS_FILTER_ID1,DATA_CUBE_ACCESS_FILTER_ID2, andDATA_CUBE_ACCESS_FILTER_ID3with each of your access filter IDs:import '@blueprintjs/core/lib/css/blueprint.css';import { Button, Menu, MenuItem, Popover } from "@blueprintjs/core";// Export the user detailsexport interface User {userName: string;cubeAccessFilter?: string;linkAccessFilter?: string;}interface UserMenuProps {userId: number;onUserIdChange: (user: number) => void;}export const USERS = [// Set the username, cube access filter, and link access filter{userName: "Research user 1",cubeAccessFilter: "DATA_CUBE_ACCESS_FILTER_ID1",linkAccessFilter: undefined,},// Set the username, cube access filter, and link access filter{userName: "Research user 2",cubeAccessFilter: "DATA_CUBE_ACCESS_FILTER_ID2",linkAccessFilter: undefined,},// Set the username, cube access filter, and link access filter{userName: "Research user 3",cubeAccessFilter: "DATA_CUBE_ACCESS_FILTER_ID3",linkAccessFilter: undefined,},];// Set up the users drop-down listfunction UsersMenu({ onUserIdChange, userId }: UserMenuProps) {const usersMenuItems = USERS.map((user, i) => (<MenuItemkey={user.userName}text={user.userName}onClick={() => onUserIdChange(i)}/>));return (<Popover content={<Menu>{usersMenuItems}</Menu>}><ButtonalignText="left"icon="user"rightIcon="caret-down"text={USERS[userId].userName}/></Popover>);}export default UsersMenu; -
View the app at
http://localhost:3000.
As you change the user selection in the drop-down, the dashboard view now applies the appropriate data cube access filter to each user.
Apply a link filter
Now you'll apply a link filter to one user, in addition to the data cube access filter.
-
Edit the
UsersMenu.tsxfile inpolaris-embedding-example/srcto define a link filter forResearch user 1. In the example below, the filter ist."Place"='13 km S of Tres Pinos, CA'. Make sure you surround the filter with backticks.import '@blueprintjs/core/lib/css/blueprint.css';import { Button, Menu, MenuItem, Popover } from "@blueprintjs/core";export interface User {userName: string;cubeAccessFilter?: string;linkAccessFilter?: string;}interface UserMenuProps {userId: number;onUserIdChange: (user: number) => void;}export const USERS = [// Set the username, cube access filter, and link access filter{userName: "Research user 1",cubeAccessFilter: "DATA_CUBE_ACCESS_FILTER_ID",linkAccessFilter: `t."Place"='13 km S of Tres Pinos, CA'`,},// Set the username, cube access filter, and link access filter{userName: "Research user 2",cubeAccessFilter: "DATA_CUBE_ACCESS_FILTER_ID",linkAccessFilter: undefined,},// Set the username, cube access filter, and link access filter{userName: "Research user 3",cubeAccessFilter: "DATA_CUBE_ACCESS_FILTER_ID",linkAccessFilter: undefined,},];// Set up the users drop-down listfunction UsersMenu({ onUserIdChange, userId }: UserMenuProps) {const usersMenuItems = USERS.map((user, i) => (<MenuItemkey={user.userName}text={user.userName}onClick={() => onUserIdChange(i)}/>));return (<Popover content={<Menu>{usersMenuItems}</Menu>}><ButtonalignText="left"icon="user"rightIcon="caret-down"text={USERS[userId].userName}/></Popover>);}export default UsersMenu; -
View the app at
http://localhost:3000.
Research user 1 already had a data cube access filter applied, that limited the data to events with an intensity of 2.
Adding the link filter has restricted the data further—the dashboard now shows events that occurred at place 13 km S of Tres Pinos, CA with an intensity of 2.
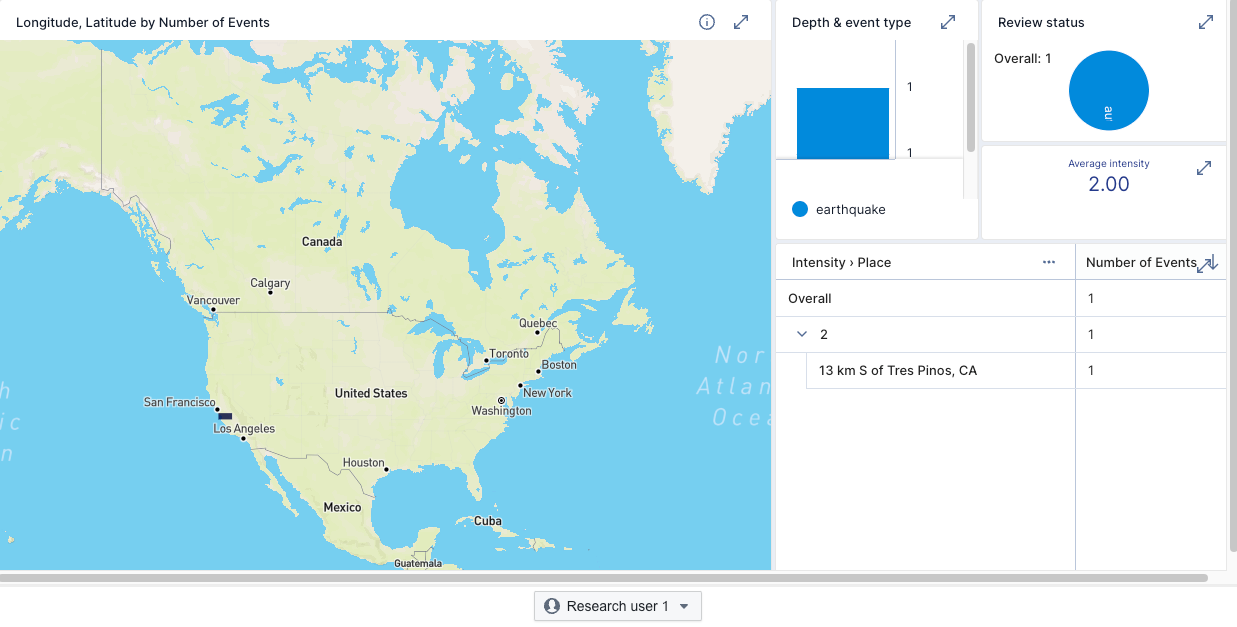
Note that you can use either filter method to apply these restrictions. The difference is that data cube access filters are assigned to a user group. Link filters apply to anyone viewing the link.
Learn more
See the following topics to learn more about the Polaris features explored in this guide:
- Embed visualizations for an introduction to the embedding links feature.
- Restrict an embedding link for details on how to create restricted embedding links.
- Embedding links API for the API documentation.
- Manage data cubes for information on creating data cubes, including the use of access filters.
- Dashboards overview for information on creating dashboards, including the use of access filters.