Enable SSO
Single sign-on (SSO) is an identity verification method that enables you to authenticate to multiple applications using the same set of credentials. Imply Polaris supports SSO through identity providers (IdPs) that adhere to the Security Assertion Markup Language (SAML) 2.0 and OpenID Connect (OIDC) 1.0 protocols. You can configure and broker any IdP compliant with these open standards.
With IdP-initiated SSO, you don't need to create users in Polaris or assign them to groups. User creation and group assignment happen automatically based on the data provided by the IdP when a user logs in.
When you configure IdP-initiated SSO to authenticate to Polaris, a button for the IdP appears on the login screen. Users can choose to authenticate with their Imply username and password or with the configured third-party IdP.
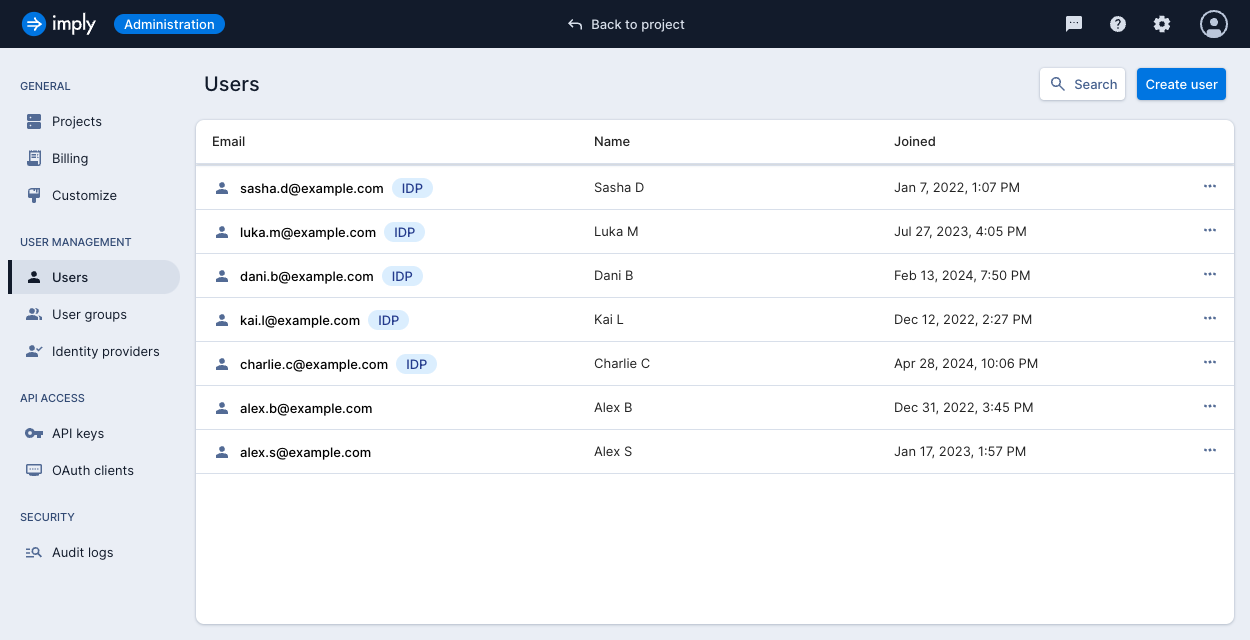
When a user account is managed by an IdP, Polaris displays the IDP tag next to the user email on the Users page. The following screenshot shows the IDP tag displayed next to the emails of IdP-managed users.

Prerequisites
To configure SSO, you need the AdministerUsers permission.
This permission is assigned to the Organization Admin group by default. For information on permission, see Permissions reference.
Configure SSO
You enable SSO at the organization level.
The following is a general flow to configure SSO using an IdP metadata document:
- Configure the Polaris application in the IdP.
- Export the IdP metadata document.
- Add the identity provider to Polaris.
- Set up group mapping from the IdP to Polaris. Until you set up group mapping, new users logging in will have no access to Polaris. For more information, see Map IdP groups to Polaris groups.
Configure the Polaris application
Configure the Polaris application in the identity management software you use. Most types allow you to export the IdP metadata file, which you can then import into Polaris. The metadata document includes the issuer's name, expiration, and keys to validate responses from the IdP.
The following example shows a SAML 2.0 metadata file from Okta:
<?xml version="1.0" encoding="UTF-8"?>
<md:EntityDescriptor entityID="http://www.okta.com/<default or custom id>" xmlns:md="urn:oasis:names:tc:SAML:2.0:metadata">
<md:IDPSSODescriptor WantAuthnRequestsSigned="false" protocolSupportEnumeration="urn:oasis:names:tc:SAML:2.0:protocol">
<md:KeyDescriptor use="signing">
<ds:KeyInfo xmlns:ds="http://www.w3.org/2000/09/xmldsig#">
<ds:X509Data>
<ds:X509Certificate>ThisIsNotARealCert</ds:X509Certificate>
</ds:X509Data>
</ds:KeyInfo>
</md:KeyDescriptor>
<md:NameIDFormat>urn:oasis:names:tc:SAML:1.1:nameid-format:emailAddress</md:NameIDFormat>
<md:NameIDFormat>urn:oasis:names:tc:SAML:2.0:nameid-format:unspecified</md:NameIDFormat>
<md:SingleSignOnService Binding="urn:oasis:names:tc:SAML:2.0:bindings:HTTP-POST" Location="https://yourcompany.okta.com/app/app_name/your_okta_id/sso/saml"/>
<md:SingleSignOnService Binding="urn:oasis:names:tc:SAML:2.0:bindings:HTTP-Redirect" Location="https://yourcompany.okta.com/app/app_name/your_okta_id/sso/saml"/>
</md:IDPSSODescriptor>
</md:EntityDescriptor>
For instructions on how to obtain the metadata file, refer to the official documentation for your IdP.
Okta integrations
Polaris supports service provider-initiated SSO, which allows users to initiate their login from Polaris without having to log into their IdP first.
Because Polaris offers service provider-initiated login, you cannot add Polaris as an app integration to your Okta Dashboard.
Instead, create an Okta Bookmark App integration with the URL set to the login page https://ORGANIZATION_NAME.app.imply.io. Replace ORGANIZATION_NAME with the name of your organization.
For instructions on how to create a Bookmark App integration, refer to the official Okta documentation.
Add the identity provider
To add a new IdP, follow these steps:
-
In the top right corner of the page, click the Administration gear icon.
-
In the left sidebar, click Identity providers.
-
Click Manage identity providers.
-
Click the Add provider drop-down and select from the list of available providers. Polaris displays the configuration page for the IdP you selected.
-
Enter information into the mandatory fields marked with an asterisk. You need to expand the Show metadata expander to reveal all the fields.
- Alias: Unique identifier for the IdP. Polaris uses the alias to build redirect URIs for protocols that require a redirect URI or a callback URL to communicate with the IdP. Every IdP must have an alias. Alias examples include
facebook,google, andidp.acme.com.
The following fields are required for the OIDC protocol:
- Authorization URL: Authorization endpoint that accepts authentication requests. Through this endpoint, you can interact with the resource owner and obtain an authorization grant.
- Token URL: Token endpoint required to obtain an access token.
- Environment Authentication: Environment authentication method. In the case of JWT signed with a private key, Polaris uses the organization private key. In other cases, you must define a client secret. See Client Authentication specifications for more information.
- Environment ID: Environment identifier registered within the IdP.
- Client Secret: Environment secret registered within the IdP.
The following fields are required for the SAML protocol:
- Service Provider Entity ID: Unique identifier used to identify requests from a service provider. By default, this setting is set to the realm's base URL
<root>/auth/realms/<realm_name>. - SAML Entity descriptor: URL to an external configuration file with IdP metadata.
- Single Sign-On Service URL: Endpoint that starts the authentication process. The value of this field is specified by your SAML IdP, if they publish an entity descriptor.
- Alias: Unique identifier for the IdP. Polaris uses the alias to build redirect URIs for protocols that require a redirect URI or a callback URL to communicate with the IdP. Every IdP must have an alias. Alias examples include
-
Click Save.
After you configure the IdP in Polaris, the next step is to set up group mapping. This ensures that users logging into Polaris using the IdP are automatically provisioned to the corresponding groups. For more information, see Map IdP groups to Polaris groups.