Alerts
You can set up alerts for Pivot to monitor events in your data. An alert monitors for when one or more measures match configurable conditions. You can choose how you want to be notified when an alert gets triggered, and set the recipients for these notifications.
Pivot uses the alert configuration to query the specified data cube and filter the data. It then evaluates your specified conditions against the query results to determine when to trigger the alert.
Alerts are based on your own data—for example, you can trigger an alert when revenue drops by a specified percentage.
Create an alert
Follow these steps to create an alert:
- Click Alerts on the navigation bar then click the alert creation icon in the top right corner:

In a classic data cube you can also click the ellipsis then click Set up alert. Pivot populates some of the alert's configurable fields with values from the data cube. - Configure alert options, then click Delivery options.
- Configure delivery options for the alert, then click Create alert.
Configure alert options
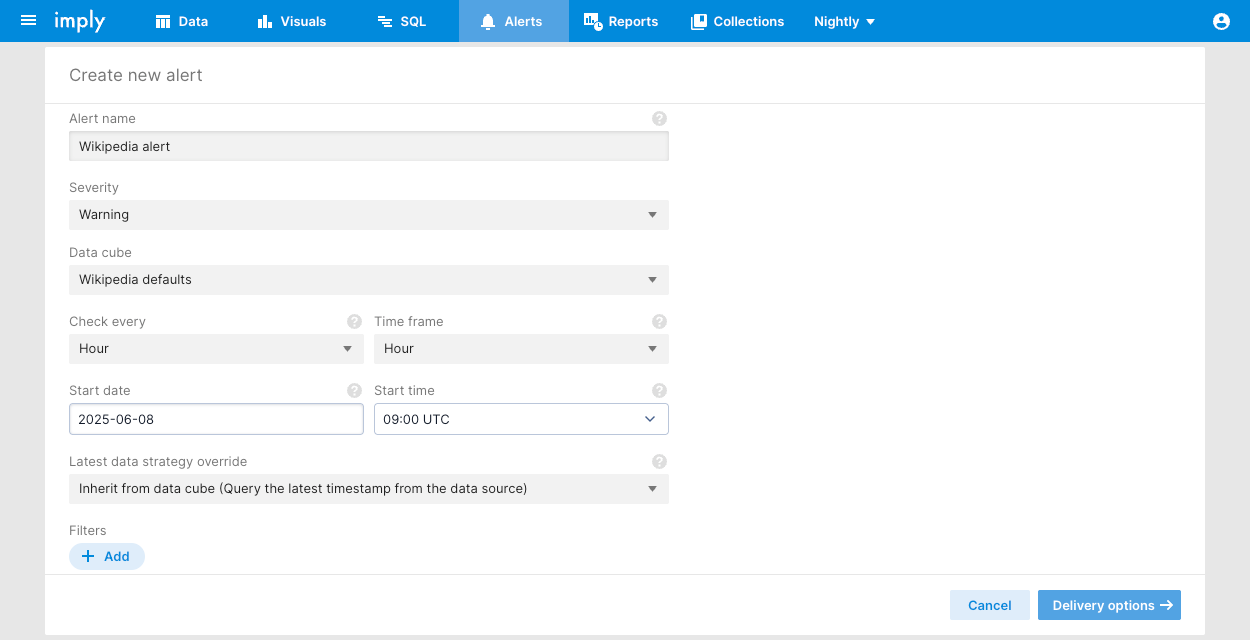
The following table lists all of the options you can configure for an alert:
| Field | Description |
|---|---|
| Alert name | Enter a name for your new alert. This name is also the alert's title in the alerts view. The name also appears in emails and webhook notifications. |
| Severity | The severity you select affects the alert's color and icon in the UI. Supported values are Info, Warning, Error, OK. |
| Data cube | Specify the data cube that has the data you want the alert to monitor. |
| Check every | Defines how often Pivot evaluates alert criteria. You can select a predefined length of time—for example, Minute, Hour, Day—or enter a custom value. Pivot uses the ISO 8601 duration format to describe time intervals. For example, you can define a 12-hour period with the string PT12H or a 2-month period with the string P2M. You can restrict the options available to most users by setting a Minimum alert frequency in the data cube's properties. |
| Time frame | Controls the amount of data Pivot considers when evaluating the alert criteria based upon a time interval. Setting this field to Day, for instance, results in the alert querying data for the previous day (defined from the moment the alert is evaluated). It's best practice to make Time frame greater than or equal to Check every, so that your alert doesn't skip events. By default, Time frame and Check every are equal. You can restrict the options available to most users by setting a Minimum alert timeframe in the data cube's properties. |
| Start date | Date to start evaluating the alert. |
| Start time | Time to start evaluating the alert. |
| Latest data strategy override | Overrides the latest data strategy setting for the Data cube and determines how Pivot calculates the latest data time for the alert:
|
| Filters | You can define one or more filters to delimit the alert data gathered during the alert evaluation. You cannot define a static time filter. |
| Look at | Determines the data Pivot evaluates the alert criteria against.
|
| Comparison | Select None for the alert to trigger based on an absolute condition, such as when a certain measure is greater than a certain value. For a relative condition, such as when a measure changes by a certain value, select a comparison period or set a custom period. |
| Conditions | When the conditions you specify here are true, your alert is triggered. You can specify one or more conditions. If you specify more than one, you can select whether one or all conditions must be true to trigger the alert. |
| Measure | Specify the measure to which your conditions apply. |
| Condition | If you set the Comparison field to None, you can trigger the alert when the condition is greater than or less than a specified value. If you set a comparison period and enable the Enhanced alert conditions editor feature flag, you can trigger the alert when the condition grows or drops by an absolute value or percentage. |
Preview shows how many times the alert would have triggered on your data in the previous time frame. The active alert may trigger more or less often depending on your live data. For minute-level alerts, the frequency may fall below the expected value due to query latency.
Configure delivery options
If you're running Pivot in
default-usermode, and you don't support email or webhooks, the Delivery options view is hidden.
To enable delivery options for alerts, you must first set mailTransportOptions in your Pivot server configuration. See Pivot server config for details.
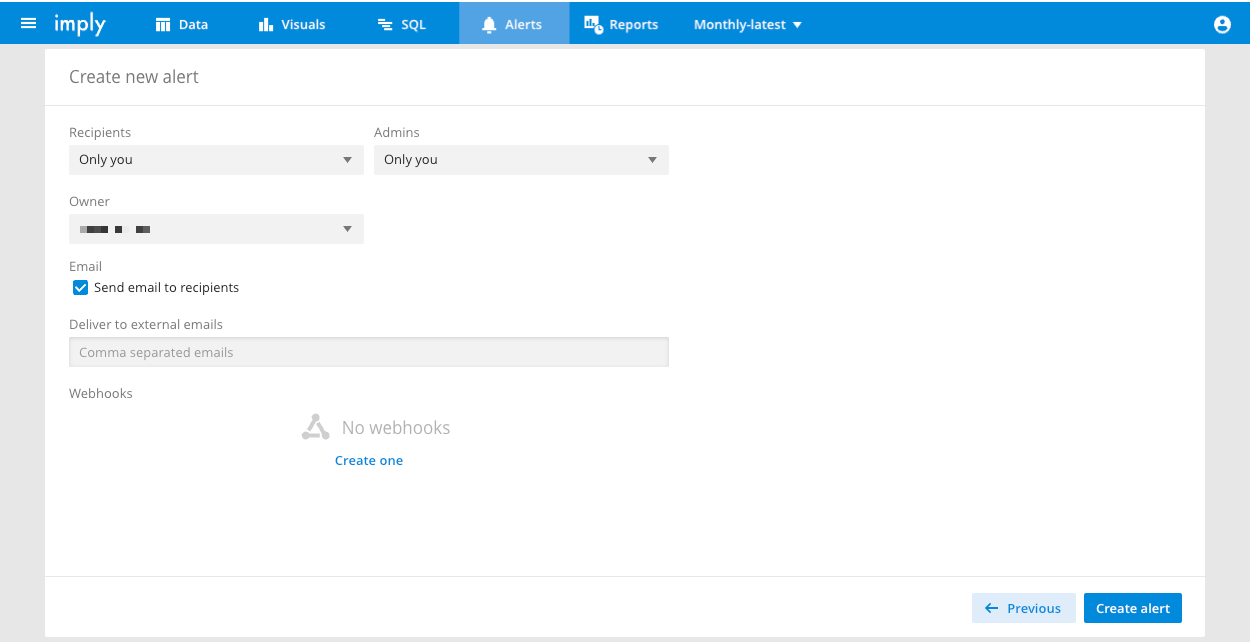
To specify alert recipients and notification methods, click Delivery options on the Create new alert page:

Complete the following fields:
| Field | Description |
|---|---|
| Recipients | Select one or more users and roles to have read access to the alert. These users can view an alert in the Pivot UI and receive alert emails if the Email option is checked. |
| Admins | Select one or more users and roles to have admin access to the alert. These users can view and edit the alert, and receive alert emails if the Email option is checked. |
| Owner | The alert's owner. |
| If checked, Pivot sends alert emails to the alert's Recipients and Admins. | |
| Deliver to external emails | You can optionally enter a comma-separated list of external email addresses to receive alert emails. |
| Webhooks | Webhooks enable notifications about triggered alerts by a third-party service. Configure a webhook to be notified about triggered alerts by a third-party service. Pivot supports Slack and custom webhooks. See Configure a webhook for more information. |
Configure an alert email in on-prem Pivot
You can send an email to an alert's chosen recipients when an alert is triggered. To send an email, you must first configure Pivot to send emails You can send both default and custom alert emails.
The default template for an alert email is in the Pivot configuration file. The default subject line is as follows:
subject: '[{{{severity}}}] {{{title}}} was triggered on {{{triggerDate}}}
The default markup is as follows:
Show the markup
<!doctype html>
  <html>
    <head>
      <meta name="viewport" content="width=device-width">
      <meta http-equiv="Content-Type" content="text/html; charset=UTF-8">
      <title>{{title}}</title>
      <style>
        html {
          font-family: sans-serif;
        }

        h2 {
          font-weight: initial;
          color: #1c1c1c;
        }

        dt {
          float: left;
          clear: left;
          width: 100px;
          color: #969696;
        }

        dd {
          margin: 0 0 0 100px;
          padding: 0 0 0.5em 0;
          height: 18px;
        }

        a {
          text-decoration: none;
          color: white;
          background-color: #258bdd;
          padding: 11px 16px 9px 16px;
          font-size: 13px;
        }

        table {
          border-collapse: collapse;
          font-size: 0.8rem;
        }

        td, th {
          border-bottom: 1px solid rgb(232, 232, 232);
          padding: 10px 20px;
        }

        th {
          color: #969696
        }

        td {
          text-align: left;
        }

        tr:nth-child(even) td {
          background-color: rgb(250,250,250);
        }

        tr:nth-child(odd) td {
          background-color: rgb(245,245,245);
        }

      </style>
    </head>
    <body>
      <dl>
        <dt>Data cube</dt>
        <dd>{{dataCubeTitle}}</dd>

        <dt>Time frame</dt>
        <dd>{{timeFrame}}</dd>

        <dt>Check frequency</dt>
        <dd>{{checkFrequency}}</dd>

        <dt>Filter</dt>
        <dd>{{filter}}</dd>

        <dt>Condition</dt>
        <dd>{{condition}}</dd>
        {{^summaries.1}}
          <dt>Event</dt>
          <dd>{{summaries.0.event}}</dd>
        {{/summaries.1}}
      </dl>

      {{#summaries.1}}
        <table>
          <thead>
            <td scope="col">{{splitTitle}}</td>
            <td scope="col">Event</td>
          </thead>
          <tbody>
            {{#summaries}}
            <tr>
              <td>{{value}}</td>
              <td>{{event}}</td>
            </tr>
            {{/summaries}}
          </tbody>
        </table>
      {{/summaries.1}}


      {{#link}}
      <p>
        <a href="{{link}}">View</a>
      </p>
      {{/link}}
    </body>
  </html>
You can use the following interpolation properties in both the email's subject and body:
title: The alert's title.link: Link to a Pivot data cube view for the report instance. Before you can use this you must setlinkHostNamein the Pivot configuration file.
Configure Imply Hybrid to send alert emails
Before you can send an email alert in Imply Hybrid (formerly Imply Cloud), you must configure Imply Hybrid to send email.
To configure Imply Hybrid to send email using Amazon Simple Email Service (Amazon SES):
- Verify your email address. See Verifying email addresses in Amazon SES for more information.
- Move out of the Amazon SES sandbox. See Moving out of the Amazon SES sandbox for more information.
- Add the
ses:SendRawEmailpermission to yourimply-cloud-instance-pocIAM role for permission to call the Amazon SES API.
Set up a webhook
Webhooks enable notifications about triggered alerts by a third-party service. Pivot supports Slack and custom webhooks. You can set up a webhook when you create or edit an alert.
To set up or modify an alert's webhooks, you need the ManageAlertsWebhooks permission assigned to your user profile.
Webhook properties
You can define the following properties in an alert webhook:
title: Name of the alert.triggerDate: Date and time at which the alert triggered.checkFrequency: Frequency of the alert at the time it triggered.timeFrame: Period of time the alert covers.severity: Severity level of the alert.color: Color associated with the alert's severity level, expressed as an HTML color code.link: Link to a data cube showing the alert criteria at the time the alert triggered.summary: Summary of the alert details as a single string.summaryData: Summary of the alert details as an array ofalertEvaluationSummaryDataobjects containing:summary: Description of the alert evaluation.currentValue: Value that triggered the alert.previousValue: Value from the previoustimeFrame—used indeltaandpercent-deltacalculations.rawDelta: Difference betweencurrentValueandpreviousValue.percentDelta: Percentage change between the current and previous values, if there is a previous value.dimensionName: Column name from the table if the alert is configured to look at dimension values.dimensionValue: Row value that triggered the alert if the alert is configured to look at dimension values.measureTitle: Name of the measure that triggered the alert.conditionTriggerValue: Value used by the condition to check againstcurrentValue.type:valuefor evaluation against an absolute value,deltafor evaluation against a change in the absolute value, orpercent-deltafor evaluation against a percentage change in the measure value.condition:lessThanorgreaterThanto indicate if the alert triggered when the measure value was less than or greater than the expected value.triggered: Boolean flag to indicate whether the evalution was triggered.
footer: Optional footer, intended for use in Slack integrations.
Configure a Slack webhook
You can configure a Slack webhook with a predefined payload or configure a custom payload. To customize the payload for a webhook, follow the steps in Configure a custom webhook.
Use the predefined payload
Follow these steps to create a Slack webhook URL for Pivot alerts with a predefined payload:
-
Follow steps 1-3 of the Getting started with incoming webhooks Slack doc to generate a webhook URL.
-
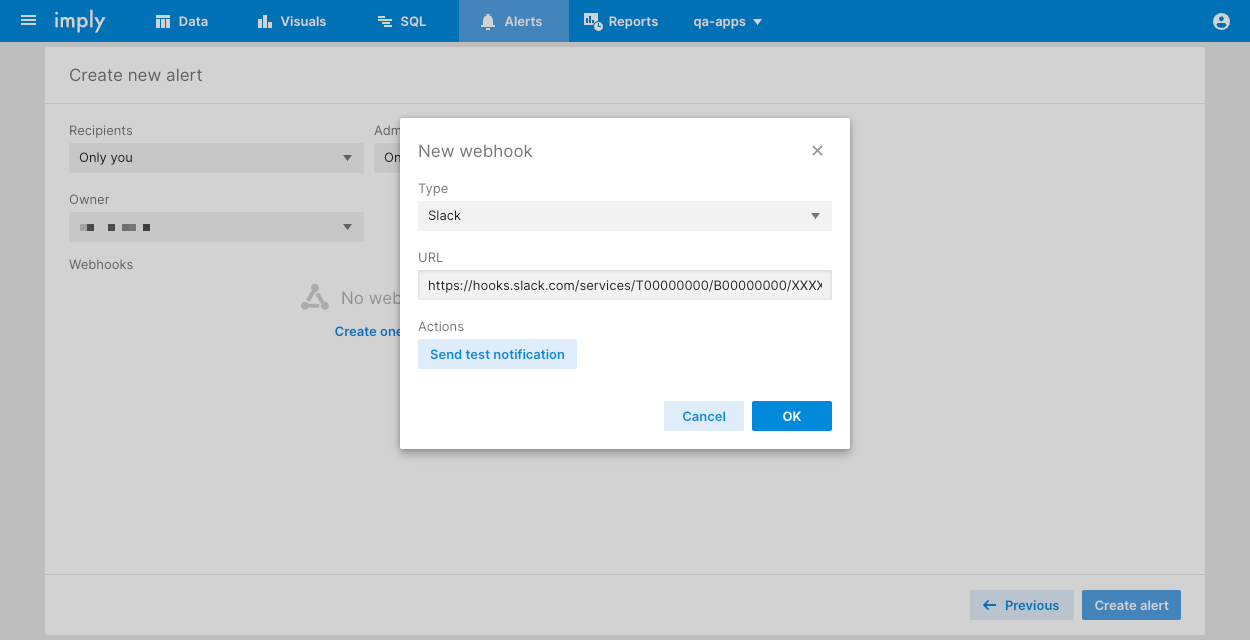
In your alert configuration, click Create one in the Webhook section and select Slack as the Type.
-
Copy and paste your Slack webhook URL into the URL field:

-
Click Send test notification to test the connection, then click OK to save.
The default Slack payload is as follows:
{
  "attachments": [
    {
      "fallback": "Alert was triggered",
      "color": "#038ADC",
      "title": "Alert was triggered",
      "title_link": "/pivot/d/6e7aacc0d0cf2644d8",
      "text": "Hourly alert",
      "ts": 1683557493
    }
  ]
}
Configure a custom webhook
Follow these steps to create a custom webhook for a Pivot alert:
- In your alert configuration, click Create one in the Webhook section and select Custom as the Type.
- Enter your webhook integration URL in the URL field (you must generate this in your third-party application).
- If you want to use an Authorization Header, check the box and enter your authorization string. Pivot outputs the header in the following format:
Authorization: [your webhook auth header definition] - Modify the payload as required. See the webhook properties and example payload below.
- Click Send test notification to test the connection, then click OK to save.
You can define a webhook as custom and customize its payload. This payload contains a variety of keys that are interpolated as follows:
Example custom webhook
An example custom webhook payload is as follows:
{
  "attachments": [
    {
      "fallback": "\"Wikipedia\" alert was triggered",
      "color": "#038ADC",
      "title": "\"Wikipedia\" was triggered",
      "title_link": "/pivot/d/6e7aacc0d0cf2644d8/Wikipedia",
      "text": "Hourly Wikipedia alert",
      "summaryData": [{"summary":"Hourly Wikipedia alert","currentValue":"2","previousValue":"1","rawDelta":"1","percentDelta":"100%","measureTitle":"Number of Events","conditionTriggerValue":1,"type":"percent-delta","condition":"greaterThan","triggered":true}],
      "ts": 1683557493,
      "footer": "Sent by Imply",
      "footer_icon": "https://example.imply.io/favicon/my-icon.png",
      "checkFrequency": "Hour",
      "timeFrame": "Hour ending at May 8th 2024, 2:51 pm"
    }
  ]
}
Manage alerts
Click the ellipsis next to the alert on the Alerts page to manage it. Select the corresponding option to edit, duplicate, or delete the alert. You can also toggle the alert's active status.
Alert error notifications
Pivot can send alert errors by email or webhook if the alert owner has the SeeErrorMessages permission.
Users with the SeeErrorMessages permission can view alert errors in the UI, and recipients of alerts they own can receive alert errors via email and webhook.
See User management in Pivot for more information.
View alert history
Click the name of an alert on the Alerts page to view its history.
The alert history page shows when the alert was triggered, alert conditions, and the value of the data. You can also analyze the alert data in a data cube.
Unmet evaluations
You can view the history of times Pivot evaluated alert criteria but didn't trigger the alert because not all critera were met.
Before you can view unmet evaluations, you must enable the Unmet alert occurrences feature flag. See Feature flags for more information.
Click Show x unmet alert evaluations on an alert's history page and click More info next to an unmet evaluation.
The following example shows that Example alert triggered at 2.08 AM. The number of events was 282 which met the alert criteria of more than 250 events. The alert was also evaluated at 2.07 AM but the number of events was 214 so the alert didn't trigger.

Learn more
See the following topics for more information:
- Manage data cubes for creating and editing data cubes.
- Reports for scheduling reports based on your data.