Druid API access
The Druid API includes endpoints for loading data, querying data, performing operation tasks, and more. In addition, the Druid API lets you manage user access to the Druid console and APIs, as described in the following sections.
API connection information
For unmanaged Imply, such as an on-prem quickstart instance, you can follow the instructions in the Druid documentation to access the Druid API directly.
For managed Imply, you can view API access settings for clusters in the cluster's API tab in the Imply Manager. For Imply Enterprise (formerly Imply Private), the API tab shows the internal endpoint and access credentials for the built-in admin account. The API tab is populated when the cluster is running.
For Imply Hybrid (formerly Imply Cloud), the page additionally shows a public endpoint and the Manager certificate:
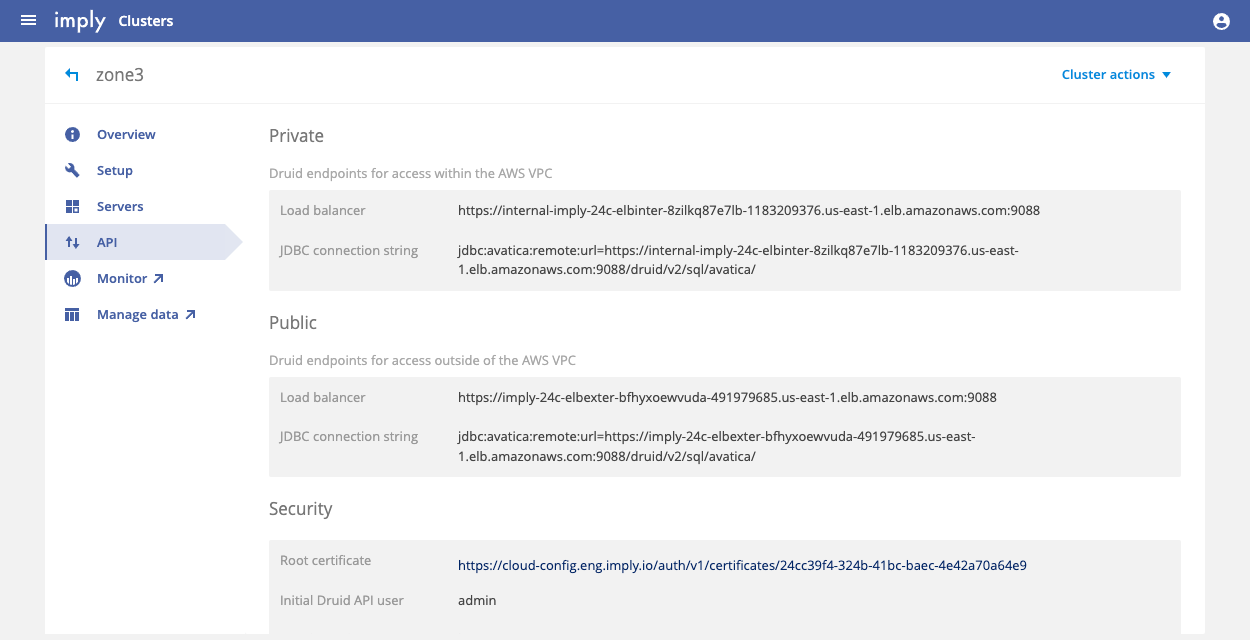
The username and initial password for the default admin account are located in the Security section of a cluster's API view, contained in the Initial Druid API user and Initial Druid API pass fields, respectively.
To reach the private endpoint, you need to access the cluster by VPN or a VPC peering connection.
While the API page shows a public API endpoint as well, we do not recommend exposing a Druid cluster on the public internet. If you need to use the public endpoint, however, you need to open access to the public IP address using an ingress rule for the "Imply Hybrid ELB Unmanaged" security group. We further recommend permitting traffic only on port 9088 and only allowing access from the source IP of the computer used to access the API.
Trying out the API
To test the API, try out a simple status request. Imply Hybrid includes a built-in admin user that you can use to access the API. For Imply Enterprise, you can use any user with Administer Cluster permissions.
With site-to-site AWS VPN enabled, as recommended, you can send a request to the internal load balancer as follows:
curl -u admin:Re+A******A== --cacert f1503f07-f919-47f5-942f-e6a5f42b2d57.crt https://some-load-balancer.us-east-1.elb.amazonaws.com:9088/status
The response should be similar to the following:
{"version":"2021.09.0-iap","modules":[...],"memory":{"maxMemory":209715200,"totalMemory":209715200,"freeMemory":122470008,"usedMemory":87245192,"directMemory":209715200}}
f1503f07-f919-47f5-942f-e6a5f42b2d57.crt is the root certificate downloaded from this cluster's API view, specified with the --cacert flag. You can download the Manager certificate from the cluster API tab.
Druid API users
You administer user access to Druid separately from Imply Manager. Typically, access to the Druid data layer is controlled by firewall rules rather than role-based access control (RBAC) rules. However, you can create users in Druid through the Druid API or the Druid web console.
To control access to Druid, you must first configure authentication and authorization. After enabling the basic auth extension, you can add users and roles, and assign user permissions through roles.
Note that Imply includes the modules required to implement Druid user authentication and authorization.
Also note that the Druid User API for Imply Hybrid is addressed through the router, which requires use of the Coordinator path prefix /proxy/coordinator. For example, to get a list of users, use the following endpoint:
https://{internal_lb}:9088/proxy/coordinator/druid-ext/basic-security/authentication/db/basic/users
For example:
curl -k -u admin:Re+A*******A== --cacert 8807c002-****-4182eba1a744.crt https://internal-imply-880-elbinter-3ni9xey30jbh-1714040709.us-east-1.elb.amazonaws.com:9088/proxy/coordinator/druid-ext/basic-security/authentication/db/basic/users
The router directs the request to the coordinator service, removing proxy/coordinator. See Management Proxy Routing for more information.
The following sections take you through the work flow for setting up authentication and authorization for Druid users.
For unmanaged Imply, you can omit proxy/coordinator from the path and address the coordinator directly, as described in Enable authorizers.
Create a user
To create a new user, send a POST request to https://{internal_lb}:9088/proxy/coordinator/druid-ext/basic-security/authentication/db/basic/users/<username>.
The following curl command creates a user named tutorial. Be sure to replace <coordinator-ip> with the private or public address of the coordinator, as shown in your cluster's API view.
curl -u admin:password -XPOST https://{internal_lb}:9088/proxy/coordinator/druid-ext/basic-security/authentication/db/basic/users/tutorial
List all users
To verify that the new user was created, send a GET request to https://{internal_lb}:9088/proxy/coordinator/druid-ext/basic-security/authentication/db/basic/users.
For example, the following curl command:
curl -u admin:password https://{internal_lb}:9088/proxy/coordinator/druid-ext/basic-security/authentication/db/basic/users
This command returns the following output on a new cluster, indicating that the tutorial user was created:
["admin","tutorial"]
Show a user
You can also verify that the new user was created by requesting information for a specific user.
To do so, send a GET request to https://{internal_lb}:9088/proxy/coordinator/druid-ext/basic-security/authentication/db/basic/users/<username>
The following curl command retrieves information for the tutorial user:
curl -u admin:password https://{internal_lb}:9088/proxy/coordinator/druid-ext/basic-security/authentication/db/basic/users/tutorial
It should return the following output:
{"name":"tutorial","credentials":null}
Note that the tutorial user does not have any credentials information set. The next step demonstrates how to assign a password for the tutorial user.
Set a user password
To assign a password to the tutorial user, send a POST request to https://{internal_lb}:9088/proxy/coordinator/druid-ext/basic-security/authentication/db/basic/users/<username>/credentials
The following example request body shows the format of the JSON password update object:
{"password": "foobar123"}
The following curl command assigns a password to the tutorial user, where pass.json contains JSON data in the format shown above.
curl -u admin:password -H'Content-Type: application/json' -XPOST --data-binary @pass.json https://{internal_lb}:9088/proxy/coordinator/druid-ext/basic-security/authentication/db/basic/users/tutorial/credentials
If you retrieve the tutorial user's information now, you should see the assigned credentials:
curl -u admin:password https://{internal_lb}:9088/proxy/coordinator/druid-ext/basic-security/authentication/db/basic/users/tutorial
{"name":"tutorial","credentials":{"salt":"O1777dLwNzgZVNkNBTbnl6nQxi60nmGawb9E33qernE=","hash":"02pH8/wZ8rUGv8GdokAkxbIXGad5bxRMbX9fd54EeeN5AdwWAV31FF54V0p3cBSWqQZhm/6cw14T9/bwxSgsUA==","iterations":10000}}
You've now configured a user that can authenticate with your Druid cluster. The next section explains how to define roles and permissions for the new user.
Create a role
To create a new role, send a POST request to https://{internal_lb}:9088/proxy/coordinator/druid-ext/basic-security/authorization/db/basic/roles/<rolename>.
curl -u admin:password -XPOST https://<coordinator-ip>:8281/druid-ext/basic-security/authorization/db/basic/roles/tutorial_role
List all roles
To verify that the new role was created, send a GET request to https://{internal_lb}:9088/proxy/coordinator/druid-ext/basic-security/authorization/db/basic/roles.
For example, the following curl command:
curl -u admin:password https://{internal_lb}:9088/proxy/coordinator/druid-ext/basic-security/authorization/db/basic/roles
should return the following output on a new cluster, indicating that the tutorial_role role was created:
["admin","tutorial_role"]
Show a role
To verify that the new role was created , send a GET request to https://{internal_lb}:9088/proxy/coordinator/druid-ext/basic-security/authorization/db/basic/roles/<rolename>
The following curl command retrieves information for the tutorial_role role:
curl -u admin:password https://{internal_lb}:9088/proxy/coordinator/druid-ext/basic-security/authorization/db/basic/roles/tutorial_role
It should return the following output:
{"name":"tutorial_role","permissions":[]}
Set role permissions
To set permissions for a role, send a POST request to https://{internal_lb}:9088/proxy/coordinator/druid-ext/basic-security/authorization/db/basic/roles/<roleName>/permissions, where the request body contains a JSON list of permission definitions.
Permission definitions example:
[
{
  "resource": {
    "name": ".*",
    "type": "STATE"
  },
  "action": "READ"
},
{
  "resource": {
    "name": ".*",
    "type": "STATE"
  },
  "action": "WRITE"
}
]
This list of permission definitions grants a role READ and WRITE access to all resources of type STATE. For more details on permission definitions, refer to Defining permissions
The following curl command assigns permissions to tutorial_role, where perms.json contains the JSON list of permissions shown above.
curl -u admin:password -H'Content-Type: application/json' -XPOST --data-binary @perms.json https://{internal_lb}:9088/proxy/coordinator/druid-ext/basic-security/authorization/db/basic/roles/tutorial_role/permissions
Retrieving information about the tutorial_role should now show that it has the newly assigned permissions:
curl -u admin:password https://<coordinator-ip>:8281/druid-ext/basic-security/authorization/db/basic/roles/tutorial_role
{
  "name": "tutorial_role",
  "permissions": [
    {
      "resourceAction": {
        "resource": {
          "name": ".*",
          "type": "STATE"
        },
        "action": "READ"
      },
      "resourceNamePattern": ".*"
    },
    {
      "resourceAction": {
        "resource": {
          "name": ".*",
          "type": "STATE"
        },
        "action": "WRITE"
      },
      "resourceNamePattern": ".*"
    }
  ]
}
Assign a role to a user
Now that you have set permissions for tutorial_role, assign tutorial_role to the tutorial user that you previously created.
To assign a role to a user, send a POST request to https://{internal_lb}:9088/proxy/coordinator/druid-ext/basic-security/authorization/db/basic/users/<username>/roles/<rolename>
The following curl command assigns the role tutorial_role to the tutorial user:
curl -u admin:password -XPOST https://{internal_lb}:9088/proxy/coordinator/druid-ext/basic-security/authorization/db/basic/users/tutorial/roles/tutorial_role | jq
Retrieving the information for tutorial now shows that the user has tutorial_role.
curl -u admin:password https://{internal_lb}:9088/proxy/coordinator/druid-ext/basic-security/authorization/db/basic/users/tutorial
{"name":"tutorial","roles":["tutorial_role"]}