Install Imply Enterprise on Linux
This document describes how to install the binary distribution of Imply on Linux. This is a basic, self-hosted deployment that leaves the provisioning and bootstrapping of the cluster nodes to you.
If you have Kubernetes expertise and infrastructure, we recommend deploying Imply Enterprise (formerly Imply Private) on Kubernetes. Use the installation described here if you cannot use Kubernetes or Imply Hybrid (formerly Imply Cloud).
Overview
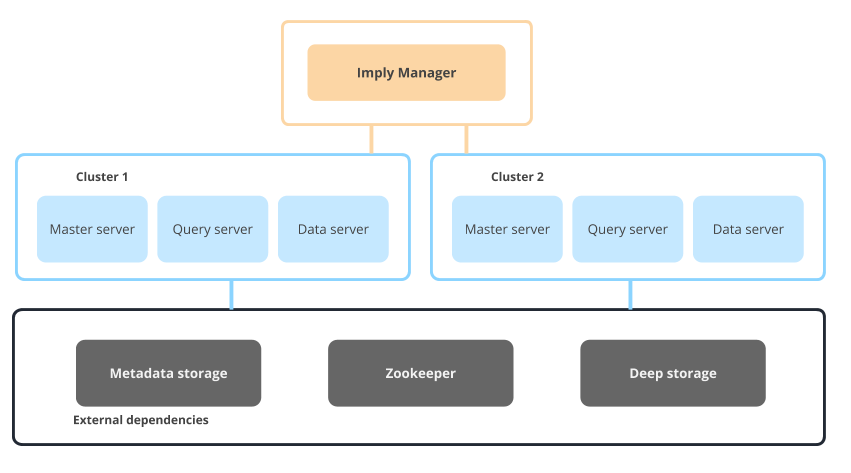
To deploy Imply Enterprise on Linux, start by installing an Imply Manager and Imply Agent. Imply Agents become the master, query, and data nodes in your cluster, as administered by Imply Manager. For information about cluster nodes, see Design.
If you want to run Imply Enterprise on machines shared with other services, Imply recommends that you either use Kubernetes or some form of virtualization.
In addition to Imply Enterprise, Manager, and Agent, a complete Imply deployment includes the following components as depicted in the image:
-
MySQL or PostgreSQL for metadata storage. Imply recommends that you use a version that supports instant ADD COLUMN semantics, such as MySQL 8. MariaDB and other MySQL-compatible or PostgreSQL-compatible databases aren't supported. The metadata store user requires
ALLprivileges:GRANT ALL PRIVILEGES ON druid.* TO druid; -
A ZooKeeper ensemble for server coordination
-
A distributed storage system to serve as Druid's deep storage—for example S3, GCS, HDFS, NFS
Imply supports ZooKeeper version 3.5. For information about ZooKeeper version 3.5, see ZooKeeper 3.5 Release Notes.
Distribution archive versioning
The distribution consists of two independently versioned archives:
- Imply Manager distribution:
imply-manager-2025.04.2 - Imply Agent distribution:
imply-agent-v8
There are a few points to note regarding this versioning:
- While the Manager archive version corresponds to the Imply software it is distributed with, the Manager distribution archive is not bound to that version. That is, you can typically upgrade the Imply cluster to a later version without updating the Manager version.
- Occasionally, a change in a subsequent version of the Imply software may necessitate an update to the Imply Manager software, as installed here. You may wish to upgrade to access new features in the Manager as well. However, it is not typically required for a routine update of a cluster with the latest Imply software version.
- Imply agents follow a simple versioning scheme, such as
v1,v2, and so on. Like the Manager, agent versions are not necessarily bound to an Imply software version; that is, you can update the cluster to a later version without updating the agent. However, it is possible, although relatively rare, that an update to a new Imply version will first require an update to a particular Imply agent version.
Imply Enterprise on Ubuntu is supported by Imply Agent v2 and above.
Supported architectures and Linux distributions
Starting with Imply Manager 2024.09 and Imply Agent v7, Imply Enterprise supports both x86 and ARM architectures. Previous versions only support x86 architecture.
Imply Enterprise supports the following Linux distributions on both x86 and ARM architectures:
- Ubuntu 20.04 and 22.04
- Amazon Linux 2
- RHEL 8.x
Newer versions of these operating systems may work with Imply but are untested.
Software dependencies
To install Imply Manager and each Imply Agent successfully, verify that you have the following software packages:
- Java 17 or Java 11—we recommend the Java 17 Zulu OpenJDK
- Python 3 (3.8 or higher)
- Perl 5 (5.26 or higher)
The Imply installer checks for these dependencies and will fail if they are not found.
Networking
You must configure Imply Manager and each Imply Agent machine with a hostname unique within your network infrastructure. Each hostname needs to have a corresponding entry in the Domain Name System (DNS) for Imply services to connect to each other using the hostname. The Fully Qualified Domain Name (FQDN), which is used in DNS, includes the hostname and the entire domain name. The hostname and the domain name labels are separated by dots, in the following format: hostname.domain.
When deploying a cluster, Imply Manager attempts to download the latest version of the cluster software over the internet. However, Imply Manager in Imply Enterprise on Linux does not need to be connected to the internet to complete the installation. In air-gapped environments, if Imply Manager cannot reach Imply servers to retrieve version information, it deploys the cluster software that it bundles, which is the same as its own version.
Installation steps
Before starting, verify the availability of the following external dependencies: a relational database, ZooKeeper, and deep storage. Imply Manager and cluster both rely on external databases to store metadata. You can either use the same or different databases for Imply Manager and the cluster.
You will need sudo privileges on the target machines to run the installers.
Step 1: Install Imply Manager
On the machine that will serve Imply Manager, follow these steps:
Download the imply-manager-2025.04.2.tar.gz archive to the target directory.
Extract the distribution archive:
tar -xvf imply-manager-2025.04.2.tar.gzTo run the installer:
sudo imply-manager-2025.04.2/script/install -u <imply-user> -g <imply-user-group>The user and group arguments are optional. If you do not specify a custom user or group under which Imply will run, the installer creates a default user and group named
imply.As it runs, the installer checks the environment for software dependencies. It raises an error message if they are not found.
Configure Imply Manager by editing
/etc/opt/imply/manager.conf. Specify the connection settings for the manager store database, ZooKeeper, the Imply metadata storage database, and deep storage, as appropriate for your environment. For example:IMPLY_MANAGER_LICENSE_KEY=<license (trial if not set)> IMPLY_MANAGER_STORE_TYPE=<[mysql, postgresql]> IMPLY_MANAGER_STORE_HOST=<db_host> IMPLY_MANAGER_STORE_PORT=3306 IMPLY_MANAGER_STORE_USER=<user> IMPLY_MANAGER_STORE_PASSWORD=<password> IMPLY_MANAGER_STORE_DATABASE=imply_manager IMPLY_MANAGER_STORE_CA_CERT_PATH=</path/to/tls.crt>
# These can be set here or through Imply Manager when creating the cluster imply_defaults_zkType=external imply_defaults_zkHosts=<zk_host>:2181 imply_defaults_zkBasePath=imply imply_defaults_metadataStorageType=<[mysql, postgresql]> imply_defaults_metadataStorageHost=<db_host> imply_defaults_metadataStoragePort=3306 imply_defaults_metadataStorageUser=<user> imply_defaults_metadataStoragePassword=<password> imply_defaults_deepStorageType=<[azure, google, hdfs, local, s3]> imply_defaults_deepStoragePath=<s3://bucket-name/path> imply_defaults_deepStorageUser=<user> imply_defaults_deepStoragePassword=<password>
See Enabling TLS, below, for how to configure TLS in the cluster.
Start Imply Manager:
sudo systemctl start imply-manager(Optional) Ensure Imply Manager is running.
Ensure all services starting with
imply-, such asimply-grove-server.servicehave a green dot:systemctl list-dependencies --reverse imply-manager
The Imply Manager UI should now be accessible on port 9097.
Step 2: Log in and create the cluster
Follow these steps to create a cluster:
- From a browser, access Imply Manager at:
http://<hostname>:9097. - Create the administrator account and click Login to proceed.
- From the dashboard, click + New cluster.
- The default values are appropriate for a small-scale deployment. If you did not provide the
imply_defaults_*configurations in themanager.conffile, you must set them at this time. - In the Schema field, type a distinguishing name for the Imply Manager database schema, such as
imply_manager. - Click Create cluster to proceed.
- Click OK to confirm cluster creation. Note the Cluster ID indicated in the cluster status page. You will use it in the next step to configure the agents.
Step 3: Install agents
Install the agent on each node that will be part of this cluster. You need at least one master, one query, and one data node.
The Imply agent must have read and write permissions to the
/mnt/varand/mnt/tmpdirectories. If the/mnt/varand/mnt/tmpdirectories do not exist, the installer creates them and sets appropriate permissions. If the directories exist but theimplyuser does not have read and write permissions, the install will fail.
Download
imply-agent-v8to the target directory.Extract the archive:
tar -xvf imply-agent-v8.tar.gzRun the installer:
sudo imply-agent-v8/script/installConfigure the agent by editing
/etc/opt/imply/agent.conf:# NODE_TIER_VALUE = "<integer>" # Tier number assigned to the node when you use more than 3 data tiers.
# You must also set IMPLY_MANAGER_AGENT_NODE_TYPE todata.
IMPLY_MANAGER_HOST=MANAGER_HOST
IMPLY_MANAGER_AGENT_CLUSTER=CLUSTER_ID
IMPLY_MANAGER_AGENT_NODE_TYPE= [master, query, data, dataTier2, dataTier3]# Optional settings used for generating TLS certificates. These are only required
if you use custom DNS entries for the agent servers.
# IMPLY_AGENT_FQDN=<Fully qualified domain name for the agents>
# IMPLY_AGENT_IP_ADDRESS=<External IP address for the agentsIMPLY_MANAGER_HOST: The host for Imply Manager. Don't include the protocol (http:// or https://) for the URL value.IMPLY_MANAGER_AGENT_CLUSTER: The cluster ID for your Imply cluster. You can get the value from the cluster status page in Imply Manager.IMPLY_MANAGER_AGENT_NODE_TYPE: The type of node for this agent. Usemasterorqueryfor their respective nodes. For data nodes, the value depends on how many data tiers you are using:- For the first tier, use
data. - For tiers 2 and 3, use
dataTier2anddataTier3respectively. - For tiers 4 and higher, create an environment variable that assigns an integer value to
NODE_TIER_VALUE. The integer value corresponds to the tier number you want to set. Each time you want to create an additional tier, increment the value forNODE_TIER_VALUEby one. Usedatafor the value ofIMPLY_MANAGER_AGENT_NODE_TYPE.
- For the first tier, use
Start the agent:
sudo systemctl start imply-agent(Optional) Ensure Imply Agent is running.
Ensure all services starting with "imply-" are running:
systemctl list-dependencies --reverse imply-agent
imply-agent.service
The command returns the following where a green dot indicates that the service is running:
● ├─imply-grove-agent.service

● ├─imply-runsvdir.service
Repeat this step for each server in the cluster, specifying the appropriate node type for each.
You can view status or stop the agent by running
systemctl status imply-agentandsudo systemctl stop imply-agent, respectively.
Step 4: Accessing Imply
Once the nodes in the cluster have been configured, they should appear on the Servers list. Ensure that all of the nodes have joined the cluster, and then locate the IP / hostname for a query node. Access the Pivot UI from your browser at: http://<query_hostname>:9095.
A typical deployment would consist of multiple master, query, and data nodes for high availability. Instead of directly accessing the query node, you would route your requests through a load balancer for resiliency.
Reinstalling
You can re-install the agent or manager by re-running the installer. The installer detects an existing installation and prompts you to remove the instance. Like installation, root access is required to reinstall Imply.
Existing configuration files are removed during the reinstall. To ensure you don't lose your configuration, backup the manager.conf or agent.conf files to a directory that does not include /opt/imply/agent.
Imply Manager
cp /etc/opt/imply/manager.conf ~/manager.conf.bkp
Imply Agent
cp /etc/opt/imply/agent.conf ~/agent.conf.bkp
Enabling TLS
See the TLS Docs for information on how to generate certificates and general TLS information.
By default, Imply Manager looks for the certificate files in the following locations:
- Signing certificate:
/run/secrets/imply-ca.crt - Signing key:
/run/secrets/imply-ca.key
The
implyuser must have read permissions to the CA Key and Certificate files.
To enable TLS, follow these steps:
-
Copy the certificate and key to the above location on the cluster nodes, or specify a custom location in the following configuration files.
-
Add the following configurations:
-
For the manager, add the following lines to
/etc/opt/imply/manager.conf:IMPLY_MANAGER_CA_KEY_PATH=/run/secrets/imply-ca.key
IMPLY_MANAGER_CA_CERT_PATH=/run/secrets/imply-ca.crt -
For the agent, add the following line to
/etc/opt/imply/agent.conf:IMPLY_MANAGER_CA_CERT_PATH=/run/secrets/imply-ca.crt
-
-
Optionally, to enable TLS between the manager and the metadata store, add the following configuration to
manager.confas well:IMPLY_MANAGER_STORE_CA_CERT_PATH=/path/to/tls.crtReplace
/path/to/tls.crtwith the path to the client certificate for the metadata database. -
Restart the cluster.
If successfully enabled, TLS: Enabled appears in the logs at Imply Manager and agent startup.
Authentication
This section explains how to enable authentication. For more information on Imply Manager security, see Imply Manager security.
The authentication token can either be loaded from a file or set in Imply Manager and agent configuration files.
Load from file
By default, Imply Manager looks for the authentication token in /run/secrets/imply-auth-token. To load the token from a custom file location, set IMPLY_MANAGER_AUTH_TOKEN_PATH in the manager and agent configuration files.
-
For the manager, add the following line to
/etc/opt/imply/manager.conf:IMPLY_MANAGER_AUTH_TOKEN_PATH=/run/secrets/imply-auth-token -
For the agent, add the following line to
/etc/opt/imply/agent.conf:IMPLY_MANAGER_AUTH_TOKEN_PATH=/run/secrets/imply-auth-token
Set in configuration file
-
For the manager, add the following line to
/etc/opt/imply/manager.conf:IMPLY_MANAGER_AUTH_TOKEN=<authentication token text> -
For the agent, add the following line to
/etc/opt/imply/agent.conf:IMPLY_MANAGER_AUTH_TOKEN=<authentication token text>
Logging
If you have trouble installing or starting, be sure to check the log for error messages. Imply Manager and agents write logs to the system log, /var/log/syslog on Ubuntu.
Advanced configuration
Adding custom user files
For general information on custom user files, see Add custom user files.
Place files that you want to be available from the Manager in the /var/opt/imply/grove/user folder on the machine running the Manager. You can then reference the file from the Imply Manager UI, as described in the Imply Manager documentation.
Using custom versions
To deploy a custom build of Imply using Imply Manager, make the tar.gz file that contains the custom build available to Imply Manager. See Adding custom user files for instructions on how to add custom user files to Imply Manager. Once this is accomplished, you can update your /etc/opt/imply/manager.conf as follows:
imply_defaults_customImplyVersions=[{"version": "2021.01-hdp-2.7.3.2.6.5.0-292"}]
In the above example, the file name of the custom build that we have loaded onto our container is imply-2021.01-hdp-2.7.3.2.6.5.0-292.tar.gz. When using custom files, the format of the file name needs to follow the imply-<version>.tar.gz convention, where <version> matches the version number used in the values.yaml file.
Setting machine specific runtime properties
You can set machine-specific Druid runtime properties (such as druid.host) as environment variables in the agent.conf file.
The environment variables must follow the naming format druid_{service}_runtime_{prop}_{name}.
In the variable name:
serviceis the Druid service name, such ascoordinatororoverlord. Alternatively, usecommonfor properties that apply across Druid services on the machine.{prop}_{name}is the Druid runtime property, replacing all periods with underscores.
For example, to set the druid.host property in the common runtime properties file with the environment variable druid_common_runtime_druid_host.
Examples prefixes for each service without property names are:
druid_common_runtime_{property}druid_coordinator_runtime_{property}druid_overlord_runtime_{property}druid_broker_runtime_{property}druid_router_runtime_{property}druid_historical_runtime_{property}druid_middlemanager_runtime_{property}
Machines with multiple network interfaces
If the machines running Druid services have multiple network interfaces, you can configure which interface Druid should use to announce itself for service discovery purposes.
To do so, add the druid_common_runtime_druid_host variable to the /etc/opt/imply/agent.conf file on each machine, and set the value to the IP or hostname of the interface to use. For more information about using environment variables in agent.conf, see Setting machine specific runtime properties.