Install Imply Enterprise on Google Kubernetes Engine
The installation mode described here is deprecated. Please use the enhanced installation mode for Google Cloud Platform (GCP) instead. The enhanced installation automates much of the setup.
This document describes how to deploy a highly available, distributed Imply cluster on Google Cloud Platform, with Google Kubernetes Engine (GKE) acting as the underlying orchestration engine.
While this document takes you through the steps for setting up Imply with the Google Cloud Platform, it does not constitute a complete guide for GKE or Google Cloud. For more information, see the Google Kubernetes Engine documentation. Also, for general information on deploying Imply on Kubernetes, see Deploy with Kubernetes.
Google Cloud components and sample architecture
This guide takes you through the steps for creating a Google Cloud deployment depicted in the following diagram:
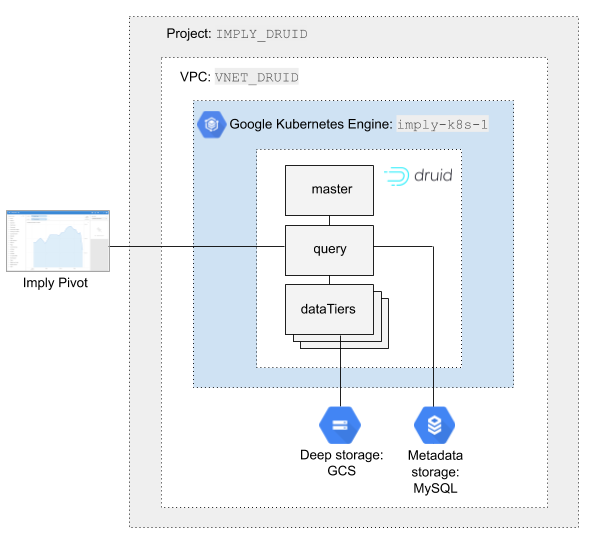
As shown, the Imply cluster deployments are deployed to Kubernetes pods.
For external dependencies, we'll use MySQL (powered by Google Cloud Managed RDS: CloudSQL) for metadata storage and Google Cloud storage for deep storage. All components will be in a single GCP project.
We recommend running all components in a dedicated, private network VPC. Thus, if you want to rely on an existing CloudSQL RDS store, make sure you create the GKE cluster in the same VPC. Otherwise, be sure to create the new MySQL instance in the same VPC as the GKE cluster.
The machines in the private VPC will need to be able to connect to the Internet. The following instructions include minimal steps for configuring firewall rules required rules for a private cluster, but you can find detailed instructions in Example GKE Setup in the Google documentation.
Requirements
- Access to a Google Cloud Platform account.
- The GCP Cloud SDK
- A license key from Imply.
- Helm 2.16.0 or 3.2.0, or later
Step 1. Set up Google Kubernetes Engine (GKE)
- From the Google Cloud Platform home, create or select the project in which you want to deploy the GKE cluster.
- Click Kubernetes Engine from the left navigation pane. It may take a moment for the
Kubernetes Engine API to be enabled.
The Kubernetes configuration page appears:
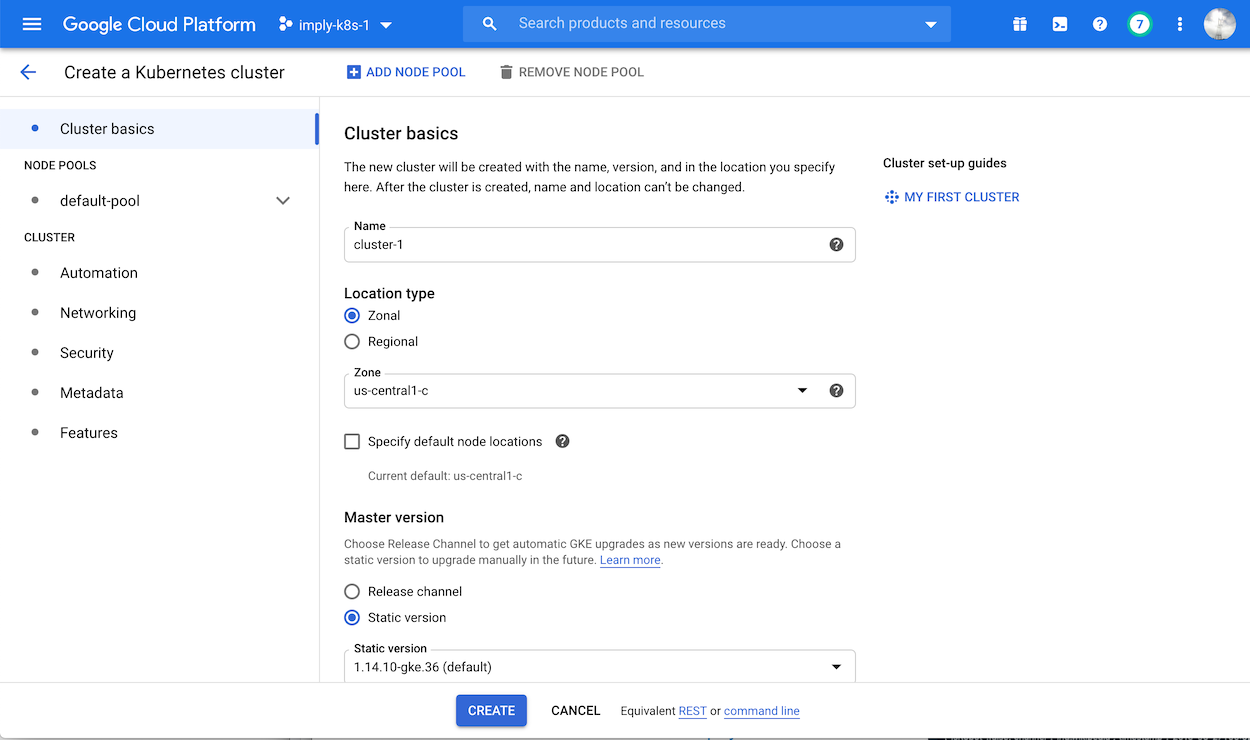
- In the Cluster basics page, enter a name for the Kubernetes cluster.
- Choose the desired location type for the cluster, zonal or regional. Regional (multiple zones) is recommended for production deployments requiring high availability, whereas zonal (single zone) is usually sufficient for experimental or testing environments.
- Click default-pool from the left pane, and click the Enable autoscaling option to enable it.
- Under Nodes, for the machine type, choose one of the high memory machines, such as
n2-highmem-8. The default image type, Container-Optimized OS, is acceptable. - For Node security, Metadata, and Automation settings, you can keep the defaults.
- For Networking, choose whether the cluster should be public or private (recommended). If you choose a private network, you'll need to configure Cloud NAT for the Kubernetes cluster, as described in the next step, in order to reach the Imply servers and download the software.
- Click Create to create the cluster.
After a moment, the new cluster should appear in the Kubernetes cluster list with a green check mark, indicating that it is running.
Note that you can check the status of the cluster by clicking Connect next to your new cluster, and then Open Workloads dashboard.
Step 2. Configure Open NAT if using a private cluster
If you chose to use a private cluster in the network settings in the previous step, configure Open NAT as described here. If you chose public, you can skip this step.
The steps below summarize the steps described by steps 3 through 7 from Example GKE setup in the Google documentation. Refer to that document for complete instructions.
- Create a firewall rule for your VPC allowing SSH as described in Step 3.
- Create IAP SSH permissions on one of your nodes as described in Step 4.
- Log into the node as described in Step 5.
- Create a NAT configuration using Cloud Router as described in Step 6.
- Confirm you can now connect to the Internet from the node.
Step 3. Set up MySQL metadata store
- From the console home, go to SQL and click Create instance.
- Choose MySQL for the database type.
- Enter a password for the instance and enter an instance ID.
- For Region, choose the same region as you chose for the GKE cluster.
- Click show configuration options.
- Choose private IP and under Associated networking choose the VPC used for the Kubernetes cluster.
- Click Create.
- Give the MySQL database full IAM permission scope in the project. For more information, see Project Access Control in the Google documentation.
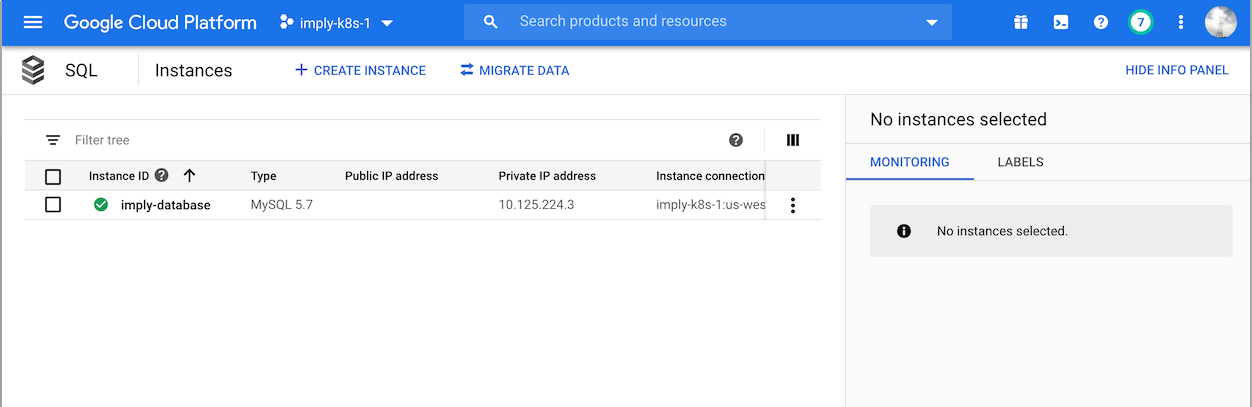
When the instance finishes deploying, note the address shown in the Private IP address column. You will need to enter this in the YAML configuration file later.
Step 4. Configure Storage Account
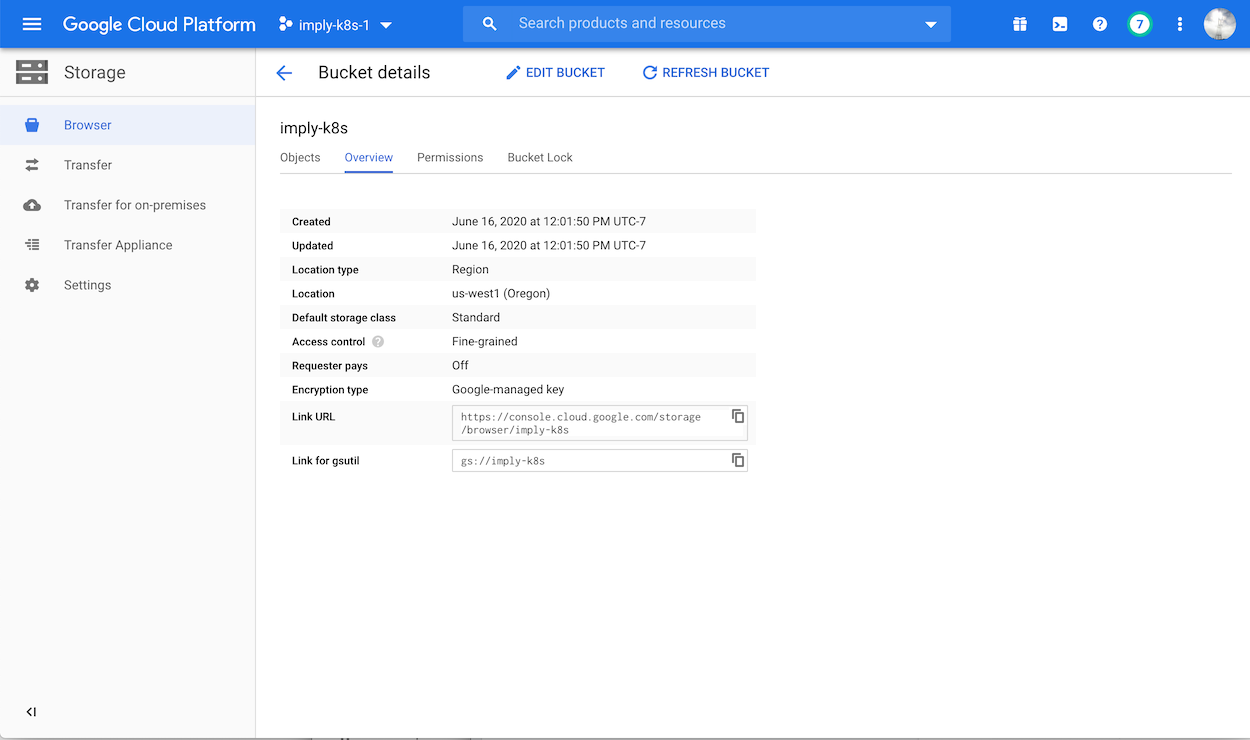
- Go to the Storage browser and click CREATE BUCKET.
- Be sure to select the same region for the new bucket as you chose for the Kubernetes cluster.
- Give the storage full IAM permission scope in the project. For more information, see Project Access Control in the Google documentation.
The following shows the remaining configuration settings, which can remain at their default values:
Step 5. Connect to the GKE Cluster
In the cluster page, click Connect next to the new cluster.
Get credentials for the GKE cluster by copying the command shown and running in the Google Cloud client. The command should be similar to the following:
gcloud container clusters get-credentials imply-k8s-1 --region us-central1 --project possible-router-145522Where
imply-k8s-1is the GKE cluster name,possible-router-145522is the project ID.
Step 6: Install Druid
You can now follow the instructions in the Kubernetes deployment guide to complete the installation using Helm:
Add the Imply repository to Helm by running:
helm repo add imply https://static.imply.io/onprem/helm
helm repo update
See Deploy with Kubernetes for introductory information on using Helm with Imply.
Create a
values.yamlfile, populating it with the downloaded contents of the latest Helm chart from Imply:helm show values imply/imply > values.yamlIn values.yaml, change the deployments configuration of minIO and mySQL to false, since you're using Google Cloud storage and the MySQL instance.
...
deployments:
  manager: true
  agents: true

  zookeeper: true
  mysql: false
  minio: false
...
Create a Kubernetes Secret key from the Imply license key:
- Create a file named
IMPLY_MANAGER_LICENSE_KEYand paste your license key as the content of the file. - Create a K8s secret named
imply-secretsby running:kubectl create secret generic imply-secrets --from-file=IMPLY_MANAGER_LICENSE_KEY
- Create a file named
Configure the metadata store for the Manager in values.yaml:
Specify the MySQL database name, IP, username, and password.
The default name in the Imply Helm chart has a hyphen in the database name, which is not permitted in CloudSQL database names. Be sure to replace the name with the name of the database you created in Step 2 above, or change the default name.
For example:
manager:

  ...
  metadataStore:
    type: mysql
    host: <private_IP_address>
    port: 3306
    user: root
    password: imply
database: imply-manager- If you want to only allow SSL, add the certificate.
Configure the same settings for the Druid metadata store configuration.
Configure Google Cloud Storage as the
deepStorageresource by setting the Path togs://imply-k8s. (No username or password is required, since the storage lives in the same project.)druid:
...
deepStorage:
type: google
path: gs://<bucket/path>
...See other Google deep storage settings for more information.
Install Imply from the shell by running:
helm install {release-name} imply/imply -f values.yamlWhere
{release-name}is the deployment name you chose.Follow the instructions printed to the screen when the helm installation finishes. For GCP, you'll need to configure your local Google Cloud SDK installation to connect to the Project and Cluster and then run port forwarding locally to open the Manager, Pivot or Druid UIs in a browser pointed at localhost.
For more general information on adapting the Helm chart for your deployment, see Deploy with Kubernetes.
Next steps
That's it! You now have a cluster running on GKE. If you are getting to know Imply, learn about who to load data in the quickstart.
For ongoing administration and maintenance, see Deploy with Kubernetes and Using the Imply Manager.