Imply Enterprise on Google Kubernetes Engine
This document describes how to deploy and manage Imply Enterprise (formerly Imply Private) on Google Kubernetes Engine (GKE) using the enhanced installation mode. This solution improves setup and management processes for running Imply on Google Cloud Platform (GCP).
Google Cloud components and sample architecture
The following diagram shows the resources resulting from this deployment mode:
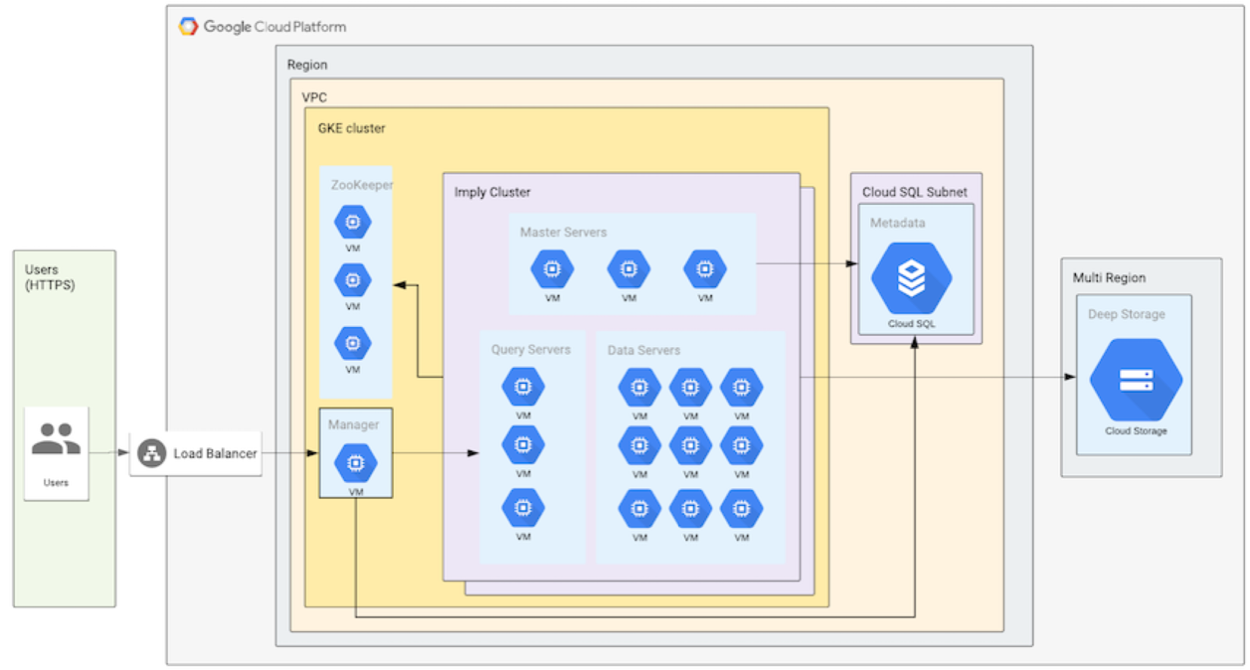
The architecture includes these components:
- VPC - The network that resources will communicate over. An existing VPC can be used, or Imply will create one for you.
- GKE cluster - The Kubernetes cluster in which all compute resources run. Several node pools are created for the cluster to use when deploying Druid deployments. An existing cluster cannot be used; the cluster will be created by Imply.
- Cloud SQL instance - The data store used as the default metadata store for Druid deployments, as well as for the Imply control plane. An existing Cloud SQL instance can be used, or Imply will create one for you.
- Cloud Storage bucket - The storage bucket used as the default Deep Storage for all Druid deployments. An existing cloud storage bucket can be used, or Imply will create one for you.
- Load balancer - The load balancer that routes requests for the Imply control plane.
Google Cloud machine types
This section lists the Google Cloud machine types available for Imply cluster server instances in GCP, by node type.
Master nodes
- n2-standard-2: 2 vCPU / 8 GB RAM
- n2-standard-8: 8 vCPU / 32 GB RAM
- n2-standard-16: 16 vCPU / 64 GB RAM
Query nodes
- c2-standard-4: 4 vCPU / 16 GB RAM
- c2-standard-8: 8 vCPU / 32 GB RAM
- c2-standard-16: 16 vCPU / 64 GB RAM
- c2-standard-30: 30 vCPU / 120 GB RAM
- n1-standard-16: 16 vCPU / 60 GB RAM
Data nodes
For the data nodes, you have the option of using SSD persistent disks for each tier. Using persistent disks can improve stability by making pod rescheduling more streamlined.
- n2-highmem-4: 4 vCPU / 32 GB RAM / 750 GB disk
- n2-highmem-8: 8 vCPU / 64 GB RAM / 1500 GB disk
- n2-highmem-16: 16 vCPU / 128 GB RAM / 3000 GB disk
- n1-highmem-32: 32 vCPU / 208 GB RAM / 6000 GB disk
- n1-highmem-32-highcpu: 32 vCPU / 200 GB RAM/ 3000 GB disk
- n2-highmem-48: 48 vCPU / 384 GB RAM / 9000 GB disk
- n2-highmem-80: 80 vCPU / 640 GB RAM / 3000 GB disk
Note that for each machine type you choose, the installer creates two node pools: the destination node pool and a second node pool with -pool-2 appended to the pool name. The second node pool is intended for use when upgrading the GKE nodes. For more information, see Updating node pools.
Requirements
Before proceeding please ensure the following requirements are fulfilled.
GCP resource requirements
You will need the following Google Cloud resources:
- A Google Cloud account
- A Google Cloud project
- A GCP user with sufficient permissions, with these options:
- Option 1. User with
OwnerBasic Role - Option 2. A minimally privileged user with all permissions of the following GCP predefined roles:
- Cloud SQL Admin
- Compute Network Admin
- Kubernetes Engine Admin
- Storage Admin
- DNS Administrator (if configuring ingress)
- Option 1. User with
- A Monitoring workspace containing the respective project. Allow Google to create the workspace with the same name as your project.
Enable the following APIs before starting:
- Compute Engine API
- Kubernetes Engine API
- Service Networking API
- Cloud DNS API (if configuring ingress)
To enable these APIs, navigate to the APIs & Services section of the Google Cloud Web Console, search for them, and enable them.
Tool dependencies
The setup script depends on the following tools:
These tools are included by default in the Google Cloud shell, and for that reason we recommend running the setup script from there.
Internet access
The Imply Manager installer requires internet connectivity to complete the installation. After installation, the Imply deployment continues to require internet access, for example, to download assets from https://hub.docker.com and https://static.imply.io.
If your policies prevent such access, we recommend using Imply Manager on Kubernetes instead.
Ingress ports
By default, a Kubernetes-based installation of Imply requires the following externally accessible ingress ports:
- Imply Manager requires port
80(or443if TLS is enabled) - Pivot requires port
9095 - Druid requires port
8888
Data encryption
By default, data for the following GCP resources are encrypted using the default keys for the resources:
- Google Kubernetes Engine (GKE) Node pools, for boot disk
- Google Cloud Storage (GCS) Buckets
- Cloud SQL Instances
Alternatively, you can configure encryption based on your own Customer Managed Encryption Keys.
To use this feature, you need to enable key management service (KMS) in the GCP project, create a key ring, and create the key. See the KMS quickstart for more information.
You also need to configure Service Accounts for Cloud SQL, GCS, and GKE. For more information, see the following documentation:
- Cloud SQL: https://cloud.google.com/sql/docs/mysql/configure-cmek
- GCS: https://cloud.google.com/storage/docs/encryption/customer-managed-keys
- GKE: https://cloud.google.com/kubernetes-engine/docs/how-to/using-cmek
With KMS enabled for the project, you will be prompted to supply the key information by the setup script, as described in the following section.
Creating an Imply deployment
The Imply GKE setup script guides you through the deployment process.
Download the setup script
Running the setup script in the Google Cloud shell is recommended, since the shell environment contains all dependencies used by the script, by default.
To download the setup script from the Google Cloud shell, run the following command:
curl -O https://static.imply.io/onprem/setup
Authorize with Google Cloud
Authorize gcloud to access the Cloud Platform with Google user credentials. To do so, run the command gcloud auth login and follow the prompts shown. Ensure that you are authorized as a user with sufficient permissions.
If you are running the setup script from the Google Cloud shell, you are prompted to authorize cloud shell when you start the script.
Start the script
To start the script, run sh setup. You will see output similar to the following:
Welcome to the Imply GCP Installer. (build 50aa6b9)

This installer will guide you through setting up the required Google
Cloud Platform resources for running a managed Imply install in GCP
on Kubernetes.
Select project
Next, select the Google project to work in.
1) golden-bonbon-283506
2) pure-episode-234323
Select the Google Project ID [pure-episode-234323]:
Enter the number corresponding to the project that you want to use and press enter, or press enter with no value to use the default value.
Enter a custom encryption key
If KMS is enabled for the project, you are prompted to choose keys for the project, as follows:
KMS is enabled for your project. You can choose
to use the default keys setup for [the project]
or use Customer Managed Encryption Keys.

Note: When using CMEK, the project's service accounts
      have to be authorized for using KMS keys before
      running setup. Refer to GCP's documentation for
      more information.
The following prompts may appear:
- If asked whether you want to use the default key for the resources, choose yes or no to specify another key.
- If you choose no, you are prompted to select a key ring in the project and key.
- If you are updating an existing project and it uses CMEK, you can choose whether you want to use a ring that already exists in the project. Choose yes or no to specify another key.
Enter license
Next you are prompted to enter a license key.
Enter your Imply License (blank for trial):
Enter your Imply license here and press enter, or press enter with no value to use a trial license. The trial license allows you to use the product for 30 days. If using a trial license, you can update the deployment later with a replacement license if needed.
Select region
Next you are prompted for the deployment region. This is the region that Imply will be deployed to. The following regions are supported:
asia-east1asia-east2asia-northeast1asia-northeast2asia-northeast3asia-south1asia-south2asia-southeast1australia-southeast1europe-north1europe-west1europe-west2europe-west3europe-west4europe-west6northamerica-northeast1southamerica-east1us-central1us-east1us-east4us-west1us-west2us-west3us-west4
Enter the number corresponding to the region that you want to use for the deployment, and press enter.
Select network
Next you are asked whether to create a new VPC or to use an existing VPC. This is the network that the Imply deployment will use when deploying resources.
Having the script create and manage a VPC is recommended,
but if you require the Imply cluster to run in an existing VPC (to
access resources that could not otherwise be accessed) you can
select an existing VPC.

Note: When using an existing VPC, please ensure that private
      service networking is enabled to allow the Imply cluster
      to communicate with GCP services.
Manage VPC automatically? [yes]:

CIDR Range for the Imply Cluster to use [10.128.0.0/16]:
Press enter to take the default of creating a new VPC with the default CIDR range specified, or specify your own. If you want to use an existing VPC, enter no and follow the prompts. Ensure that the CIDR range that you provide is available for use.
Configure TLS
Next, you can enable TLS between the services created by the install as well as clusters created after the installation is complete:
By default data exchanged between Imply services in the created
VPC is not encrypted. The network is private by default and only
runs Imply and GKE pre-installed software. If you have a requirement
for the in-flight data to be encrypted you can enable it below.
Enable TLS between Imply services? [no]:
You can use a certificate generated by the installer, which has a 20 year expiry, or provide a certificate and signing key you want to use. See Imply Manager security for more information how TLS is used and how to create your own key.
Note that changing this value after the install requires restarting any running clusters, leading to downtime. It will also change the ports that Druid listens on and are exposed through the default Load Balancers. See Imply Manager security's section on ports for more information.
Select deep storage bucket
Choose whether to create a Deep Storage bucket or to use an existing bucket. This bucket is used as the default deep storage for all Imply deployments.
Choose a GCS bucket to store your data (deep storage). If you
want the setup script can create and manage the bucket for you.
Type 'Managed' (or leave the input blank) to have the script
automatically manage the bucket for you. If you wish to use an
existing bucket, use the form: gs://my-bucket-1.
Existing GCS bucket or Managed [Managed]:
Press enter to take the default of creating a new storage bucket, or enter a bucket URL to use an existing bucket.
Then select the region or multi-region (us, eu, asia) location for the bucket. A multi-region location will ensure high availability. If you are not using a multi-region location, place the bucket in the same region as your initial deployment selection to reduce latency when accessing these objects. The following regions are supported for buckets:
useuasiaasia-east1asia-east2asia-northeast1asia-northeast2asia-northeast3asia-south1asia-south2asia-southeast1australia-southeast1europe-north1europe-west1europe-west2europe-west3europe-west4europe-west6northamerica-northeast1southamerica-east1us-central1us-east1us-east4us-west1us-west2us-west3us-west4
Enter the number corresponding to the region that you want to use for your bucket, and press enter.
Select the node image type
You can choose between CoreOS or Ubuntu for the operating system of your image. Note that if you change the operating system from the one that's currently being used, the node pools get updated. This can cause partial queries while data is reloaded.
Select IAM service accounts
Choose whether to create an IAM service account or to use existing service accounts. These service accounts are attached to the VMs to enable access to GCS storage.
Supply existing IAM Service Account emails for the Kubernetes node
pools to use or allow the script to create and manage these IAMs for you.

Managing the IAMs yourself will require them to be created ahead of
time. Allowing the script to create and manage them requires that
the user running this script has the ability to create/modify IAMs.
Manage IAM automatically? [yes]:
Select metadata store
Choose whether to create a Cloud SQL store for storing metadata about your Imply deployment or to use an existing database.
Choose a MySQL database to serve as the metadata store. It is
recommended that you create a new database for use by Imply.
This can be automatically managed by the installer or created
manually. If you require Imply to use an existing MySQL database
or you want to manage the database yourself, you may enter those
details here instead.

Note: Your SQL connection information may be stored in plaintext
      in a GCS bucket in your account by Terraform.

Note: If a database is created for you, it will be removed on uninstall.
      ALL DATA WILL BE REMOVED AS WELL.
Manage MySQL database automatically? [yes]:
Press enter to take the default of creating a new Cloud SQL instance, or enter no to use an existing database, and follow the prompts to give details to identify the database.
About Cloud SQL sizing
Imply enables disk autoscaling for this metadata store instance. Disk autoscaling is a GCP feature described in Automatic storage increase of the Google Cloud documentation.
The Imply configuration does not itself impose a limit on the disk size. However, in practice, the disk size is limited by the size of the default instance type used by Imply for the metadata store, which is db-n1-standard-2.
The disk size automatically starts scaling up in 6 GB increments initially, and scales up linearly to 25 GB increments for disk sizes above 500 GB. The increment sizes determine when scaling is needed, that is, when the amount of free space reaches 6 GB or less, the autoscaling system scales up disk by 6 GB.
Note that storage does not scale down, other than by manually changing the underlying instances.
Select ingress
Choose whether to set up GKE Ingress for the Imply cluster, allowing secure connections to the Imply Manager. This requires that you have at least one Cloud DNS managed zone configured.
Ingress can be automatically configured using Cloud DNS
and Google Managed Certificates to allow secure connections
to the Imply Manager. This feature requires that a Cloud DNS
managed zone already exist. For more information on setting
up a Cloud DNS zone see: https://cloud.google.com/dns/docs/zones
Note: Security Policy changes may take a few minutes to be reflected and
access to the Imply Manager may be interrupted. It will not affect
any running clusters.
Automatically setup ingress? [no]: yes
Determining available Cloud DNS Managed Zones
1) gcp-imply-io
Select a zone: 1
If you do not have Cloud DNS managed zones configured, press enter to take the default selection, no, as this feature is not supported without Cloud DNS managed zones. Otherwise, to use this feature, enter yes and enter the number corresponding to the Cloud DNS zone that you want to use for the deployment, and press enter. This results in the control plane being hosted in a subdomain of the Cloud DNS zone that you selected.
Attach Cloud Armor policy
Next, choose whether to apply a Google Cloud Armor policy to the services in the cluster. If you select yes, a list of existing Cloud Armor policies is displayed. Select one to apply. For more information on Cloud Armor policies, refer to Configure Google Cloud Armor security policies in the Google Cloud Armor documentation.
A Cloud Armor Security Policy can be attached to the Ingress
that will be created. This feature requires that a Security Policy
already exist. For more information on Security Policies see:
https://cloud.google.com/armor/docs/configure-security-policies
Configure a Security Policy? [no]: yes
Determining available Security Policies
1) imply-sp
Select a policy: 1
Enter labels
You can provide labels for your resources as a comma-separated list of key-value pairs: name=value. For example, myCompany/gke=staging, org=eng.
You must provide a value for each key. For more information about requirements, see Requirements for labels in the GCP documentation.
Note that changing resource labels will cause the Node Pools and GKE cluster to be updated, which can temporarily lead to only partial query results getting returned.
Select GKE cluster type
The Imply GCP installer prompts you to choose the type of the GKE cluster—public or private. In a public GKE cluster, nodes have public IP addresses and are accessible over the public internet. In a private GKE cluster, nodes have private IP addresses and are not accessible over the public internet. For more information on private GKE clusters, refer to About private clusters in GKE documentation.
When you change an existing cluster's type, such as from public to private, Imply recreates the cluster and all its resources.
The cluster and its resources will be unavailable until that process is complete.
Confirm details
Next review and confirm the details of the deployment. If correct, press enter and proceed with the deployment. Otherwise, enter no to restart the script.
Wait for deployment to complete
The deployment will take around 30 minutes. Wait for it to finish deploying resources. When deployment finishes, you will receive a message similar to the following.
helm_release.manager: Creation complete after 3m3s [id=imply]

Apply complete! Resources: 32 added, 0 changed, 0 destroyed

Outputs:

bucket =
cidr = 10.128.0.0/16
dns_host = imply.gcp.imply.io
dns_zone = gcp-imply-io
gke_id = imply-gke
license =
project_id = pure-episode-234323
region = us-central1
sql_endpoint =
sql_password =
sql_username =
vpc =
zone =

You can access your Imply Manager by running:
  gcloud container clusters get-credentials "imply-doc-test-1-gke" --region us-central1 --project engineering-docs-321321
to get the credentials for the Kubernetes cluster and then:
  kubectl port-forward svc/imply-doc-test-1-manager-int 9097
Then visit http://localhost:9097
The details include instructions for how to access your deployment.
Start using Imply
The setup script presents you with the URL for accessing the Imply Manager, from where you can add users, access the data loader, and access Pivot.
Create an Imply Manager admin user
When you run the Imply Manager for the first time, it will prompt you to enter the initial admin user credentials. Provide account settings as prompted. When you finish, the Imply Manager home page appears, where you can add additional users. See Imply Manager users for how to add users.
Manage a cluster
To start using Imply, create a cluster by clicking New cluster. In the New cluster page, choose the instance types for the cluster.
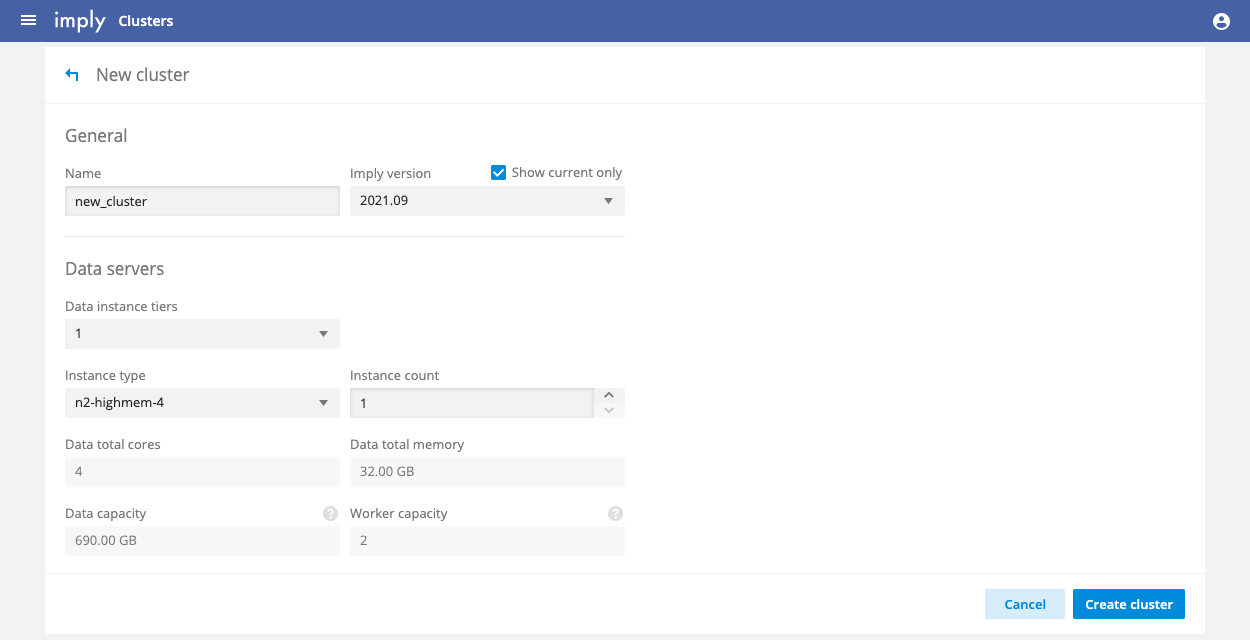
Click Create cluster when finished. The Servers page appears. It takes a few minutes for the servers in the cluster to appear on the page. Once they do, their status reports "waiting" until deployment completes, at which point their status should be OK. You can then connect to the cluster, as follows.
See cluster management documentation for information on creating and administering Imply clusters. Administration tasks you perform from the Imply Manager include stopping the cluster, starting the cluster, scaling it up, and adding data tiers.
Connect to a cluster
Once the servers finish starting and join the cluster, you can access the data loader and Pivot UI as follows:
- Click Overview from the left menu for the cluster.
- Click Open under cluster actions. Pivot appears.
- Click Load data to access the data loader for the cluster.
If you are new to Imply, follow the Quickstart to learn how to get started quickly with sample data. If you want to load your own data from Google Cloud Storage, see the next section.
Load data
The following steps take you through an example of loading data into your cluster from a Google Cloud Storage (GCS) bucket. Your ingestion source types are not limited to GCS, but GCS is a likely data source type for an Imply Enterprise on Google Kubernetes Engine (GKE) deployment. For other ingestion types, see Druid ingestion documentation.
By default, the service accounts on the Druid service pods only have data read and write access to the deep storage bucket. To ingest data from another storage bucket, you need to give the agent service account permissions needed to access that bucket. See Google's IAM documentation for details. The agent service account is named imply-default-asa.
Give service account permission to data bucket
Give the service account access to the resource from which you would like to ingest data. In this example, we will be ingesting data from Google Storage Bucket imply-doc-demo-ingest.
Use the Google Cloud Web Console to navigate to your service account, we'll need to look up the email address of the agent service account. Find the agent service account, which is named imply-default-asa, and copy the email address for the account.

In the Google Cloud web console, navigate to the bucket details for the bucket that you would like to ingest data from, and click the permissions tab.
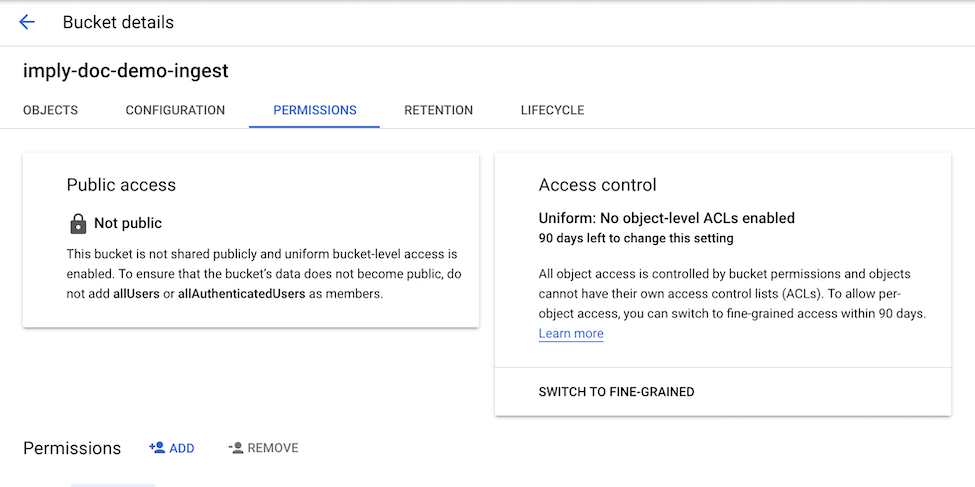
Add the service account with role storage admin using the service account email.
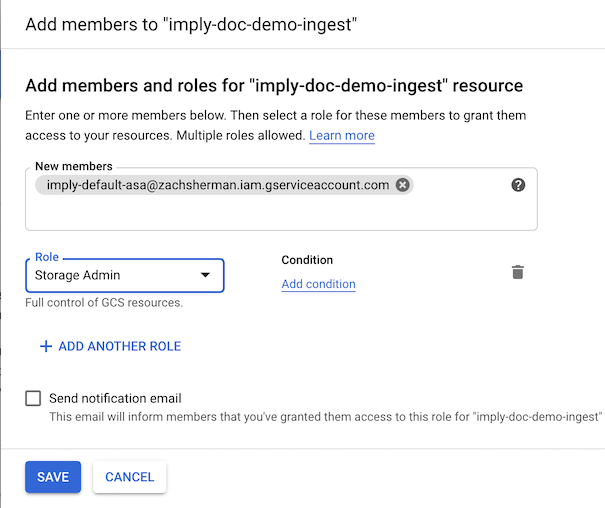
Now the service account has the permission needed to read and write to the bucket.
Ingest data using Druid console
Navigate to the Druid Web Console, click new ingestion spec and choose the Google Cloud Storage ingestion type.
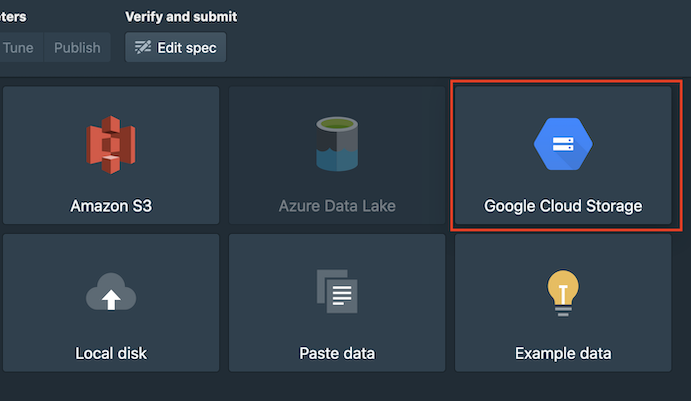
Follow the on-screen instructions for providing the path to the data that you want to ingest, and any filtering or aggregation options that you'd like to apply.
You can also download Wikipedia sample data to try. Upload the file to your Google Cloud bucket and provide the path to the file inside the Druid console.
After the data is ingested successfully, you will see a corresponding ingestion task listed in the Ingestion tab with status, SUCCESS.

Once Druid loads all of the segments data, the corresponding datasource will show as Fully available under the Datasources tab:

Query the data
The datasource is now ready to be queried. See the query tutorial documentation for details.
Updating an Imply deployment
To update an existing Imply deployment, run the setup script as described in Creating an Imply Deployment. Give the selection for the deployment that you'd like to update. When asked if you'd like to update, select update, which is the default.
Select the Google Project ID [imply]:
1) New
2) default
Select existing deployment to manage or New to create one [New]: 2
An existing deployment was selected (default).
1) update
2) uninstall
3) cancel
Select an action [update]:
You will be given the details of the deployment, and prompted whether the details are correct. If you are using an updated version of the script, and don't want to make any explicit changes to your deployment, enter yes. If you would like to make explicit changes to your deployment enter no.
Project ID:          imply
Region:              us-central1
VPC:                 [Managed]
CIDR:                10.128.0.0/16
Bucket:              [Managed]
Bucket Region:       us
IAM:                 [Managed]
MySQL:               [Managed]
MySQL Require SSL:   yes
Ingress:             yes
Policy:              [None]
GKE KMS Key:         [Default]
GCS Bucket KMS Key:  [Default]
Cloud SQL KMS Key:   [Default]

Is the above information correct [yes]:
Select yes if you are just updating the version and do not need to change any of your previous answers. If you entered no, you have the option of modifying the deployment. Follow the steps as described earlier in this document.
Updating node pools
You may occasionally need to update node pool software underlying the Imply deployment, say to update the Google Kubernetes Engine version. With a single node pool, this would mean down time for the cluster.
To allow for non-interrupting upgrades, the installer creates a second node pool for every node machine type created. The name of these machine pools are appended with -pool-2. These pool-2 nodes are unused until needed.
When you need to update the node pools, follow these steps:
-
Update the pool-2 node pools following the instructions on Upgrading nodes in the Google Kubernetes Engine (GKE) documentation.
-
Deploy the cluster to the second set in the Imply Manager by clicking the Deploy to pool 2 checkbox.
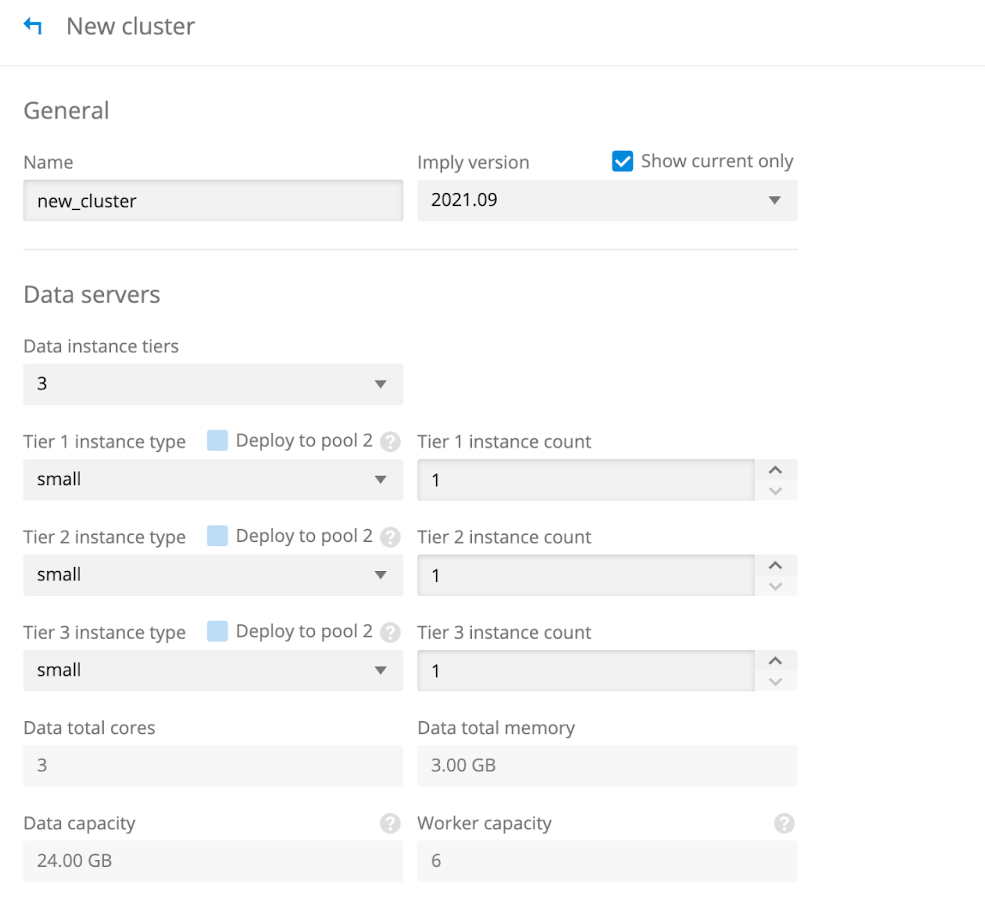
The workload is automatically transferred to pool-2. When you subsequently need to update the node pools again, you can update the first node pools, and then unselect the checkbox to return operation to the first set of node pools.
Deleting an Imply deployment
To delete an existing Imply deployment, run the setup script as described in Creating an Imply Deployment. Select the deployment that you'd like to update, and then choose uninstall.
Select the Google Project ID [imply]:
1) New
2) default
Select existing deployment to manage or New to create one [New]: 2
An existing deployment was selected (default).
1) update
2) uninstall
3) cancel
Select an action [update]:
Follow the prompts from here.
Advanced topics
The following section describes advanced use cases of the deployment.
Direct-access Pivot
Direct-access Pivot is supported in GKE but has some differences in how it works in Imply Hybrid (formerly Imply Cloud). All configuration options are the same, however, so reviewing the Direct-access Pivot docs is a good first step.
The main difference is in how the URL for Pivot access field interacts with the Pivot configuration and underlying Kubernetes resources. For example, setting the field to a name such as pivot.company.com at installation time will result in an Ingress that points to Pivot on port 80 of the Nginx Ingress Controller. This means that once DNS has been configured to point to the public or private load balancers, you can use the name provided.
WARNING! Using the same domain as configured to access your Imply Manager without a URL path could render your Manager inaccessible.
If your URL for Pivot access field contains a path as well—for example, imply.mycompany.com/10257016-8bfd-433a-9e98-f62dd23bce1e/pivot—then Pivot is automatically configured to use the serverRoot from the path configured. This means that if you had configured an Ingress during installation with a domain name, you could use a path to enable routing with the same domain and certificate that have already been configured. The easiest way to configure this would be to copy the public load balancer path and append /pivot to the end of it, as in the example above.
If the field is configured with a different domain than the Manager, it will still work, but you will need to configure the domain and TLS certificate separately. To configure this from the GCP Console, select Network Service, then Load balancing. You can choose whether to make it available publicly on the internet or only within your VPC. From there you will want to configure the Backend configuration. If you have many services available, it may be hard to determine the correct one to select. To figure out the correct service in a new GCP Console tab, select Kubernetes Engine, Services & Ingresses, and then select the Imply cluster named imply-default-gke, by default. Then select the ingress-nginx-controller. On the Details page under Annotations, you should see it displayed as the Network Endpoint Group name. It should look something like k8s1-31d25674-default-ingress-nginx-controller-80-c05a40bc, which you can select in the Backend configuration screen.
Once that is completed, select the Frontend configuration. Here you can configure options like reusing an existing TLS certificate or having one generated, as well as SSL policies. Review the Google Cloud Load Balancing documentation for a full list of configuration options.
Note that when accessing Direct access Pivot any configured CloudArmor policy will automatically apply as well.
Multiple deployments
The setup script can be used to create multiple Imply deployments. If you do not currently have any deployments, you will not be prompted for a deployment name, and instead a name of default will be automatically given for your first deployment. If you have at least one deployment, you will be prompted to select which deployment to use or can create a new deployment at this time.
Select the Google Project ID [pure-episode-234323]:
1) New
2) default
Select existing deployment to manage or New to create one [New]:
If using a non-default deployment, the name of the agent service account will be imply-{DEPLOYMENT-NAME}-asa.
Common issues
The following section goes over some common issues that you may face in the field and how to resolve them.
Deployment terraform state locked
The setup script uses terraform to create, update, or delete resources in Google Cloud for the Imply deployment. If an error occurs while terraform is in the process of modifying resources, such as the user's terminal window being closed, the next time the setup script is run, terraform will complain that it was not able to acquire a lock on the state for the deployment. Such a message would look something like the following:

To resolve this situation, ensure that no other operations are being performed on the deployment, and unlock the state file using terraform force-unlock. If this fails, delete the lock file from the Google storage bucket noted in the message.
Cluster create or update fails to scale up node pool
You may encounter an issue when creating or updating an existing cluster, where a failure occurs because a particular node pool fails to scale to the required number of nodes, as shown below:
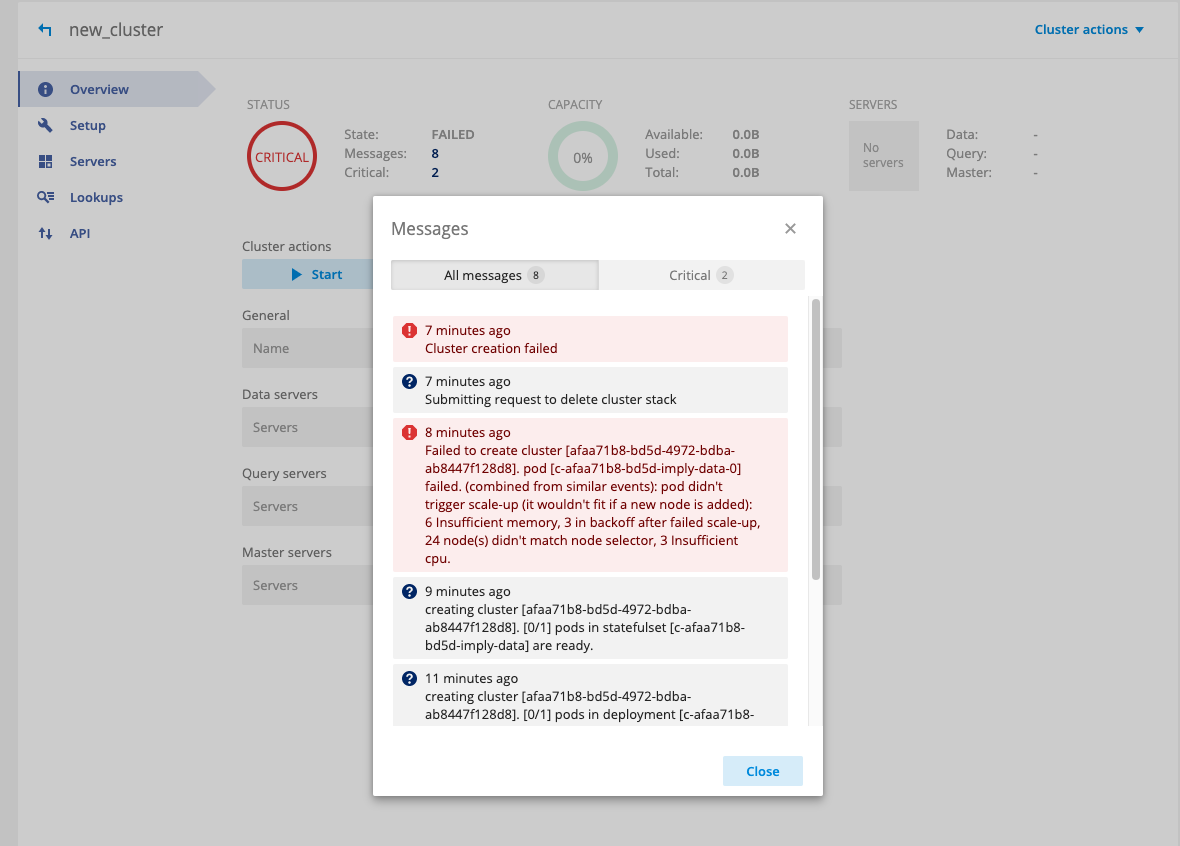
This can be caused by quota limits in the account being hit. To fix this issue, you will need to increase the corresponding quota.