Authenticate with API keys
You can use API keys to authenticate REST API requests to the Polaris API via HTTP basic authentication. When authenticating with an API key, you don't need to reference your account credentials. Instead, you pass the API key in the HTTP header of your authentication request.
Each organization can have up to 20 API keys.
API keys are associated with an organization and not individual users. If the user who generated the API key leaves the organization, the API key continues to be active until expired or revoked.
This topic describes how to authenticate to the Polaris API with API keys. If your application authenticates with OAuth, see Authenticate with OAuth instead.
For development purposes, you can store API keys in environment variables on your machine.
Examples in this topic store the API key value in the variable named POLARIS_API_KEY.
Prerequisites
To create and manage API keys, you must have one of the following permissions:
AdministerApiKeys: Users with this permission can view, create, and manage all API keys for the organization. Members of the Organization Admin group have theAdministerApiKeyspermission assigned to their profiles by default.ManageApiKeys: Users with this permission can view and create API keys for the organization. Users can manage only the API keys that they create. Members of the Data Manager group have theManageApiKeyspermission assigned to their profiles by default.
For more information on permissions, see Permissions reference.
Authentication
You authenticate to the Polaris API by including the API key in the Authorization header of your request:
--header "Authorization: Basic $POLARIS_API_KEY"
The following example shows how to upload a file by passing the API key through the request header:
curl --location --request POST "https://ORGANIZATION_NAME.REGION.CLOUD_PROVIDER.api.imply.io/v1/projects/PROJECT_ID/files" \
--header "Authorization: Basic $POLARIS_API_KEY" \
--form 'file=@"kttm-2019-08-20.json.gz"'
Alternatively, you can pass the key value in a curl command using the -u or --user curl command-line option.
Add a colon after the API key to prevent curl from asking for a password.
curl converts the key value into a Base64-encoded string and adds the appropriate header to the request.
--user ${POLARIS_API_KEY}:
The following example shows how to upload a file by passing the API key through the --user command-line option:
curl --location --request POST "https://ORGANIZATION_NAME.REGION.CLOUD_PROVIDER.api.imply.io/v1/projects/PROJECT_ID/files" \
--user ${POLARIS_API_KEY}: \
--form 'file=@"kttm-2019-08-20.json.gz"'
When establishing a connection to Polaris from an external application, you may be required to enter authentication credentials. You can use any string value as the username. For the password, enter your Polaris API key. For more information on how to integrate Polaris with external applications, see Connect from external business intelligence applications.
Create API keys
To create an API key, you must give it a name and assign applicable projects and permissions.
The maximum combined size of the API key name and description values is 191 bytes. One character does not equal one byte because Polaris supports Unicode characters, which take a variable number of bytes.
The API key is only visible in its entirety when you first create it. Each future access only shows the API key in redacted form.
API key permissions
You enable an API key to perform specific actions by assigning permissions and applying them to projects. You can select the projects you want to apply permissions to. This allows you to create API keys that can only access certain projects.
You must specify at least one project to create an API key.
The permissions available to the API key are limited to the permissions of the Polaris account (user or API key) that creates the key.
Create keys using the UI
Follow these steps to create an API key in the Polaris UI:
- In the top-right corner of the page, click the Administration icon.
- Click API keys from the left sidebar.
- Click New API key.
- On the Create API key page, enter the following information about the API key:
- Name: The name of the key.
- Description: Optional description of the key.
- Select the projects you want to apply permissions to:
- Applies to all projects: Permissions apply to all existing and future projects.
- Applies to specific projects: Permissions apply to selected projects only. Note that Polaris only displays the projects where you have the
ManageApiKeyspermission.
- Click Add projects.
- Click Next > Add permissions.
- Polaris displays permissions that you have access to. Select the permissions you want to assign to the API key.
- Click Add permissions.
- Click Next.
- From the confirmation dialog, save your API key. This is the only time that Polaris displays your API key in its entirety.
Once you successfully create the API key, you can use it to authenticate your API requests.
Create keys using the API
The API Keys API enables you to create additional API keys programmatically.
If you don't already have an API key to authenticate to Polaris, create one in the UI first.
Make sure that your API key has either the AdministerApiKeys or the ManageApiKeys permission.
To create an API key, send a POST request to the /v1/apikeys endpoint.
See the API Keys API documentation for a description of required parameters.
The permissions array expects a list of permissions objects. For each permission object, you must provide the name of the permission and the projects the permission applies to.
To apply the permission to all projects, use syntax projects/*.
To apply the permission to a specific project, use syntax projects/PROJECT_ID.
The following example shows how to apply the AccessAlerts permission to three projects:
{
  "name":"AccessAlerts",
  "resources":[
    "projects/45c024f4-1254-4b58-8207-4111d2f80669",
    "projects/c3b5e09a-b337-4107-8e28-25e23f246f73",
    "projects/2745b3b5-7635-48f6-bbc8-25faae4ffc12"
  ]
}
Sample request
The following example shows how to create an API key named Polaris test key:
- cURL
- Python
curl --location --request POST "https://ORGANIZATION_NAME.api.imply.io/v1/apikeys" \
--header "Authorization: Basic $POLARIS_API_KEY" \
--header "Content-Type: application/json" \
--data-raw '{
    "name":"Polaris test key",
    "description":"",
    "permissions":[
        {   "name":"AccessAlerts",
            "resources":[
                "projects/45c024f4-1254-4b58-8207-4111d2f80669",
                "projects/c3b5e09a-b337-4107-8e28-25e23f246f73",
                "projects/2745b3b5-7635-48f6-bbc8-25faae4ffc12"]
        },
        {
            "name":"AccessReports",
            "resources":[
                "projects/45c024f4-1254-4b58-8207-4111d2f80669",
                "projects/c3b5e09a-b337-4107-8e28-25e23f246f73",
                "projects/2745b3b5-7635-48f6-bbc8-25faae4ffc12"]
        },
        {
            "name": "AdministerEmbedLinks",
            "resources": [
                "projects/2745b3b5-7635-48f6-bbc8-25faae4ffc12",
                "projects/45c024f4-1254-4b58-8207-4111d2f80669",
                "projects/c3b5e09a-b337-4107-8e28-25e23f246f73"
            ]
        }
    ]
}'
import requests
import json

url = "https://ORGANIZATION_NAME.api.imply.io/v1/apikeys"

apikey = os.getenv("POLARIS_API_KEY")

payload = json.dumps({
  "name": "Polaris test key",
  "description": "",
  "permissions": [
    {
      "name": "AccessAlerts",
      "resources": [
        "projects/45c024f4-1254-4b58-8207-4111d2f80669",
        "projects/c3b5e09a-b337-4107-8e28-25e23f246f73",
        "projects/2745b3b5-7635-48f6-bbc8-25faae4ffc12"
      ]
    },
    {
      "name": "AccessReports",
      "resources": [
        "projects/45c024f4-1254-4b58-8207-4111d2f80669",
        "projects/c3b5e09a-b337-4107-8e28-25e23f246f73",
        "projects/2745b3b5-7635-48f6-bbc8-25faae4ffc12"
      ]
    },
    {
      "name": "AdministerEmbedLinks",
      "resources": [
        "projects/2745b3b5-7635-48f6-bbc8-25faae4ffc12",
        "projects/45c024f4-1254-4b58-8207-4111d2f80669",
        "projects/c3b5e09a-b337-4107-8e28-25e23f246f73"
      ]
    }
  ]
})
headers = {
  'Authorization': f'Basic {apikey}',
  'Content-Type': 'application/json'
}

response = requests.request("POST", url, headers=headers, data=payload)

print(response.text)
Sample response
The following example shows a successful response:
Click to view the response
{
    "id": "963aab18-4930-4ec5-9f48-8ccd04cxxxxx",
    "name": "Polaris test key",
    "description": "",
    "apiKey": "pok_YYh9dxxxxxx3W1603MJf4x57oMxxxxxgM9gxjTKwJ0hxxxsp7SorM0U5A0KMB1j3lf",
    "redactedApiKey": "pok_YYh9d...B1j3lf",
    "permissions": [
        {
            "name": "AdministerEmbedLinks",
            "resources": [
                "projects/2745b3b5-7635-48f6-bbc8-25faae4ffc12",
                "projects/45c024f4-1254-4b58-8207-4111d2f80669",
                "projects/c3b5e09a-b337-4107-8e28-25e23f246f73"
            ]
        },
        {
            "name": "AccessAlerts",
            "resources": [
                "projects/45c024f4-1254-4b58-8207-4111d2f80669",
                "projects/c3b5e09a-b337-4107-8e28-25e23f246f73",
                "projects/2745b3b5-7635-48f6-bbc8-25faae4ffc12"
            ]
        },
        {
            "name": "AccessReports",
            "resources": [
                "projects/c3b5e09a-b337-4107-8e28-25e23f246f73",
                "projects/2745b3b5-7635-48f6-bbc8-25faae4ffc12",
                "projects/45c024f4-1254-4b58-8207-4111d2f80669"
            ]
        }
    ],
    "createdBy": {
        "username": "api-key-pok_f3b27...np21oi",
        "userId": "d1f4aec5-3540-40af-b2bc-db3b8fd9b4b1"
    },
    "lastModifiedBy": {},
    "createdOn": "2023-10-10T21:08:17.385Z"
}
The response body contains the following important fields:
apiKey: The secret key that authorizes the use of the Polaris API. Make sure to save the value of theapiKeyproperty. The only time Polaris displays the API key in its entirety is when it is first created. All future requests return theredactedApiKeyproperty that contains the API key in redacted form.id: The unique identifier for the API key. The ID is required to retrieve or modify a single API key.
If you get a HTTP 401 Unauthorized status code, confirm that the organization name is correct in the endpoint of your request.
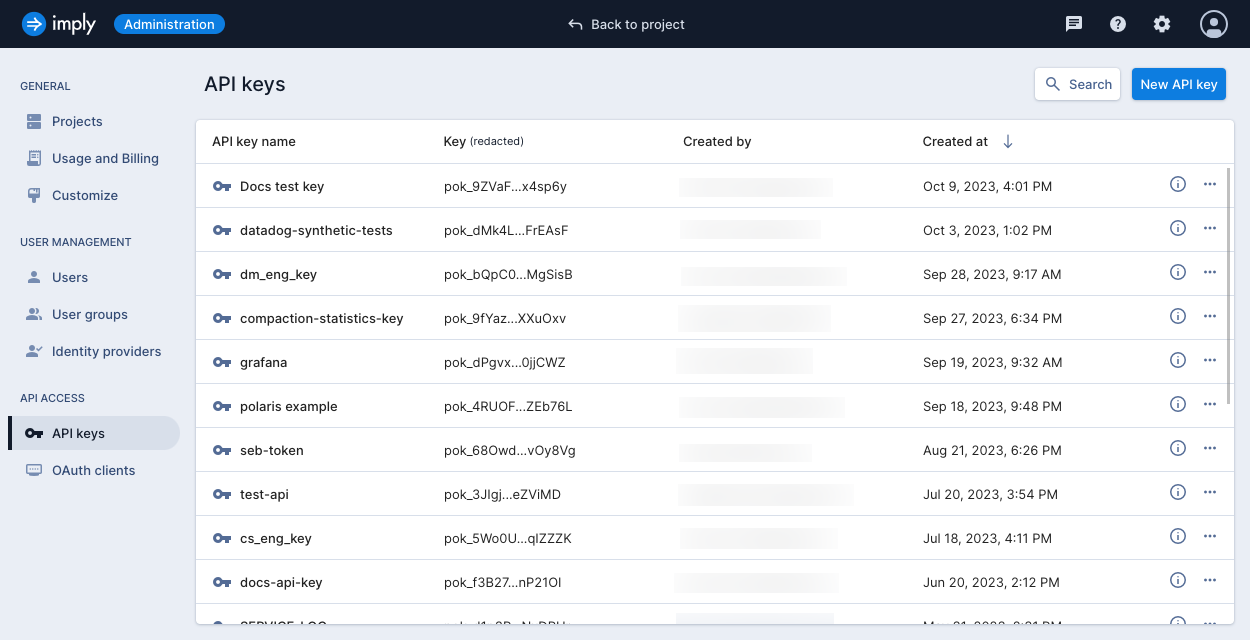
List API keys
The API keys page displays redacted API keys for an organization.
The following screenshot shows the API keys page:
To list all API keys using the API, send a GET request to the /v1/apikeys endpoint.
To view information for a single API key, send a GET request to the /v1/apikeys/ID endpoint. Replace ID with the ID of your API key.
If you get a HTTP 403 User not authorized status code, verify that you are the creator of the API key or that you have the AdministerApiKeys permission.
Sample request
The following example shows how to list all API keys for an organization:
- cURL
- Python
curl --location --request GET "https://ORGANIZATION_NAME.api.imply.io/v1/apikeys" \
--header "Authorization: Basic $POLARIS_API_KEY" \
--header "Content-Type: application/json" \
--data-raw ''
import os
import requests

url = "https://ORGANIZATION_NAME.api.imply.io/v1/apikeys"

apikey = os.getenv("POLARIS_API_KEY")

payload = ""
headers = {
  'Authorization': f'Basic {apikey}',
  'Content-Type': 'application/json'
}

response = requests.request("GET", url, headers=headers, data=payload)

print(response.text)
Sample response
The following example shows a successful response:
Click to view the response
{
    "items": [
        {
            "id": "d7b6e443-e277-4814-8a16-e379e9fxxxxx",
            "name": "datadog-scrape",
            "description": "Key to scrap datadog metrics",
            "redactedApiKey": "pok_Xguj5...Ypruwr",
            "permissions": [
                "ManageApiKeys",
                "ManageConnections",
                "ManageIngestionJobs",
                "AccessAlerts",
                "ManageTables",
                "AccessMetrics"
            ],
            "createdBy": {
                "username": "user@imply.io",
                "userId": "535c5016-e43a-42f4-9728-c620236xxxxx"
            },
            "lastModifiedBy": {
                "username": "user@imply.io",
                "userId": "535c5016-e43a-42f4-9728-c620236xxxxx"
            },
            "createdOn": "2023-01-27T22:28:00.129Z",
            "lastModifiedOn": "2023-10-03T23:22:38.03Z"
        },
        {
            "id": "963aab18-4930-4ec5-9f48-8ccd04cxxxxx",
            "name": "Polaris test key",
            "description": "",
            "redactedApiKey": "pok_YYh9d...B1j3lf",
            "permissions": [
                "AccessAlerts",
                "AdministerEmbedLinks",
                "AccessAlerts",
                "ManageFiles",
                "AccessReports",
                "AccessReports",
                "AdministerEmbedLinks",
                "AccessReports",
                "AdministerEmbedLinks",
                "AccessAlerts"
            ],
            "createdBy": {
                "username": "api-key-pok_f3b27...np21oi",
                "userId": "d1f4aec5-3540-40af-b2bc-db3b8fd9b4b1"
            },
            "lastModifiedBy": {
                "username": "api-key-pok_f3b27...np21oi",
                "userId": "d1f4aec5-3540-40af-b2bc-db3b8fd9b4b1"
            },
            "createdOn": "2023-10-10T21:08:17.385Z",
            "lastModifiedOn": "2023-10-11T03:53:23.376Z"
        }
    ]
}
Update API keys
You can modify the key's name, description, projects, and permissions. After you update the permissions for an API key, it can take up to five minutes for the changes to apply.
Update keys using the UI
To update an API key in the Polaris UI, navigate to the API keys page and click the API key you want to update.
To update the key's name or description, click Edit details in the top right corner of the page.
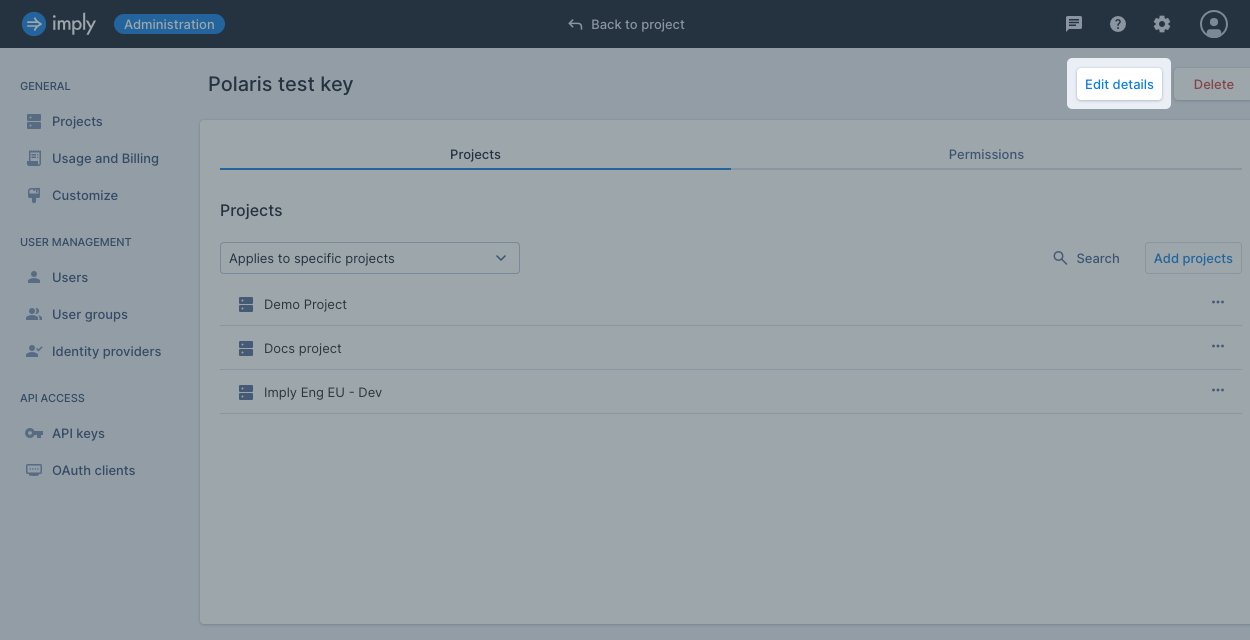
To update the key's projects and permissions, go to the Projects and Permissions tabs respectively.
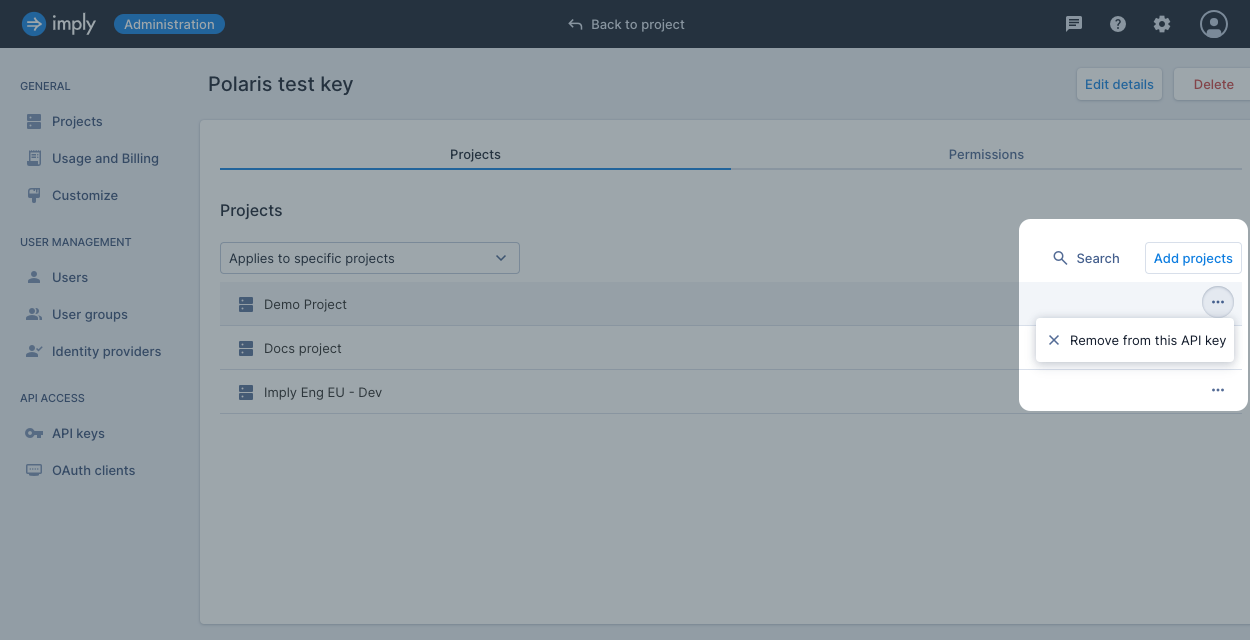
You cannot remove a project from a key's scope if you selected Applies to all projects. You must first change your selection to Applies to specific projects.
Update keys using the API
To update an API key using the API, send a PUT request to the /v1/apikeys/ID endpoint.
Replace ID with the ID of your API key.
Sample request
The following example shows how to update an API key:
- cURL
- Python
curl --location --request PUT "https://ORGANIZATION_NAME.api.imply.io/v1/apikeys/963aab18-4930-4ec5-9f48-8ccd04cxxxxx" \
--header "Authorization: Basic $POLARIS_API_KEY" \
--header "Content-Type: application/json" \
--data-raw '{
    "name": "Polaris test key",
    "description": "",
    "permissions": [
        {
            "name": "AccessAlerts",
            "resources": [
                "projects/45c024f4-1254-4b58-8207-4111d2f80669",
                "projects/c3b5e09a-b337-4107-8e28-25e23f246f73",
                "projects/2745b3b5-7635-48f6-bbc8-25faae4ffc12"
            ]
        },
        {
            "name": "AccessReports",
            "resources": [
                "projects/c3b5e09a-b337-4107-8e28-25e23f246f73",
                "projects/2745b3b5-7635-48f6-bbc8-25faae4ffc12",
                "projects/45c024f4-1254-4b58-8207-4111d2f80669"
            ]
        },
                {
            "name": "AdministerEmbedLinks",
            "resources": [
                "projects/2745b3b5-7635-48f6-bbc8-25faae4ffc12",
                "projects/45c024f4-1254-4b58-8207-4111d2f80669",
                "projects/c3b5e09a-b337-4107-8e28-25e23f246f73"
            ]
        },
        {
            "name": "ManageFiles",
            "resources": ["projects/*"]
        }

    ]
}'
import os
import requests
import json

url = "https://ORGANIZATION_NAME.api.imply.io/v1/apikeys/963aab18-4930-4ec5-9f48-8ccd04cxxxxx"

apikey = os.getenv("POLARIS_API_KEY")

payload = json.dumps({
  "name": "Polaris test key",
  "description": "",
  "permissions": [
    {
      "name": "AccessAlerts",
      "resources": [
        "projects/45c024f4-1254-4b58-8207-4111d2f80669",
        "projects/c3b5e09a-b337-4107-8e28-25e23f246f73",
        "projects/2745b3b5-7635-48f6-bbc8-25faae4ffc12"
      ]
    },
    {
      "name": "AccessReports",
      "resources": [
        "projects/c3b5e09a-b337-4107-8e28-25e23f246f73",
        "projects/2745b3b5-7635-48f6-bbc8-25faae4ffc12",
        "projects/45c024f4-1254-4b58-8207-4111d2f80669"
      ]
    },
    {
      "name": "AdministerEmbedLinks",
      "resources": [
        "projects/2745b3b5-7635-48f6-bbc8-25faae4ffc12",
        "projects/45c024f4-1254-4b58-8207-4111d2f80669",
        "projects/c3b5e09a-b337-4107-8e28-25e23f246f73"
      ]
    },
    {
      "name": "ManageFiles",
      "resources": [
        "projects/*"
      ]
    }
  ]
})
headers = {
  'Authorization': f'Basic {apikey}',
  'Content-Type': 'application/json'
}

response = requests.request("PUT", url, headers=headers, data=payload)

print(response.text)
Sample response
The following example shows a successful response:
{
    "id": "963aab18-4930-4ec5-9f48-8ccd04cxxxxx",
    "name": "Polaris test key",
    "description": "",
    "redactedApiKey": "pok_YYh9d...B1j3lf",
    "permissions": [
        {
            "name": "ManageFiles",
            "resources": [
                "projects/*"
            ]
        },
        {
            "name": "AccessAlerts",
            "resources": [
                "projects/45c024f4-1254-4b58-8207-4111d2f80669",
                "projects/c3b5e09a-b337-4107-8e28-25e23f246f73",
                "projects/2745b3b5-7635-48f6-bbc8-25faae4ffc12"
            ]
        },
        {
            "name": "AdministerEmbedLinks",
            "resources": [
                "projects/2745b3b5-7635-48f6-bbc8-25faae4ffc12",
                "projects/45c024f4-1254-4b58-8207-4111d2f80669",
                "projects/c3b5e09a-b337-4107-8e28-25e23f246f73"
            ]
        },
        {
            "name": "AccessReports",
            "resources": [
                "projects/c3b5e09a-b337-4107-8e28-25e23f246f73",
                "projects/2745b3b5-7635-48f6-bbc8-25faae4ffc12",
                "projects/45c024f4-1254-4b58-8207-4111d2f80669"
            ]
        }
    ],
    "createdBy": {
        "username": "api-key-pok_f3b27...np21oi",
        "userId": "d1f4aec5-3540-40af-b2bc-db3b8fd9b4b1"
    },
    "lastModifiedBy": {
        "username": "api-key-pok_f3b27...np21oi",
        "userId": "d1f4aec5-3540-40af-b2bc-db3b8fd9b4b1"
    },
    "createdOn": "2023-10-10T21:08:17.385Z",
    "lastModifiedOn": "2023-10-11T03:53:23.376Z"
}
Delete API keys
API keys never expire and must be kept secret and secure. If a key becomes compromised, you should delete it immediately. When you delete an API key, Polaris permanently removes it from the system. Deleted API keys cannot be used to authenticate to the Polaris API.
To delete an API key in the Polaris UI, navigate to the API key page and click the key you want to delete. Click Delete. Confirm your selection and click Delete API key.
To delete an API key using the API, send a DELETE request to the /v1/apikeys/ID endpoint. Replace ID with the ID of your API key.
After you delete an API key, it can take up to five minutes for it to stop working.
Sample request
The following example shows how to delete an API key:
- cURL
- Python
curl --location --request DELETE "https://ORGANIZATION_NAME.api.imply.io/v1/apikeys/963aab18-4930-4ec5-9f48-8ccd04cxxxxx" \
--header "Authorization: Basic $POLARIS_API_KEY" \
--header "Content-Type: application/json" \
import os
import requests

url = "https://ORGANIZATION_NAME.api.imply.io/v1/apikeys/963aab18-4930-4ec5-9f48-8ccd04cxxxxx"

apikey = os.getenv("POLARIS_API_KEY")

payload = ""
headers = {
  'Authorization': f'Basic {apikey}',
  'Content-Type': 'application/json'
}

response = requests.request("DELETE", url, headers=headers, data=payload)

print(response.text)
Learn more
See the following topics for information on using the Polaris API: