Azure Private Link for querying and publishing data
Azure Private Link is a networking service in Microsoft Azure that allows you to establish a unidirectional secure connection from your Azure virtual network (VNet) to Imply Polaris over a private endpoint. When you query the Polaris endpoints through Azure Private Link, traffic between your Azure VNet and Polaris travels the Microsoft backbone network and doesn't traverse the public internet.
The following diagram shows the Azure Private Link connection between Azure and Polaris subscriptions:
This topic describes how to set up a secure connection between Azure and Polaris using Azure Private Link to query and publish data from an event stream to Polaris. Don't use this method for consuming data directly from an event stream.
All traffic that flows through Azure Private Link incurs interface endpoint expenses. For information on interface endpoint pricing, see Azure Private Link pricing.
General workflow
The following is the general workflow to establish a private connection from an Azure VNet to Polaris:
- Create a private endpoint
- Contact Polaris support to approve your connection request
- Create a private DNS zone
- Add record set
- Add virtual network link
The resulting Private Link connection is unidirectional with Polaris acting as the service provider and the private endpoint acting as the service consumer.
Create a private endpoint
Follow these steps to create a private endpoint in Azure. For field descriptions and latest instructions, refer to the Azure documentation.
- In the Azure portal, go to the Private endpoints page.
- Click + Create.
- In the Basics tab, enter your Azure project and instance details. Note that your private endpoint must be in the same region as your virtual network.
- Click Next: Resource.
- In the Resource tab, set the following options:
- Connection method: Select Connect to an Azure resource by resource ID or alias.
- Resource ID or alias: Enter the Polaris alias
saas-prod-eastus-aks-private-link.767f571e-95bf-43af-9fb6-322cedb2a588.eastus.azure.privatelinkservice
- Click Next: Virtual Network.
- In the Virtual Network tab, set the following options:
- Virtual network: Select the virtual network for the private endpoint.
- Subnet: Select the subnet.
- Network policy for private endpoints: Accept the default.
- Private IP configuration: Select Dynamically allocate IP address.
- Complete the rest of the steps to create the endpoint. You can accept the default values in the DNS and Tags tabs.
- Click Next: Review + create, then click Create.
This creates a private endpoint in the Pending connection state.
Contact Polaris support
Contact Polaris support to approve the connection request. Polaris must accept your connection request to grant your private endpoint access to Polaris. After Polaris accepts the request, the endpoint enters the Approved connection state.
Create a private DNS zone
You must configure a private DNS zone to ensure that DNS queries resolve correctly to the private IP address of your private endpoint.
Follow these steps to create a private DNS zone in Azure. You can find the information needed to configure a private DNS zone on the Private endpoints page in the Azure portal. For field descriptions and latest instructions, refer to the Azure documentation.
-
In the Azure portal, go to the Private DNS zones page.
-
Click + Create.
-
In the Basics tab, enter the project and instance details:
- Enter your subscription and resource group information.
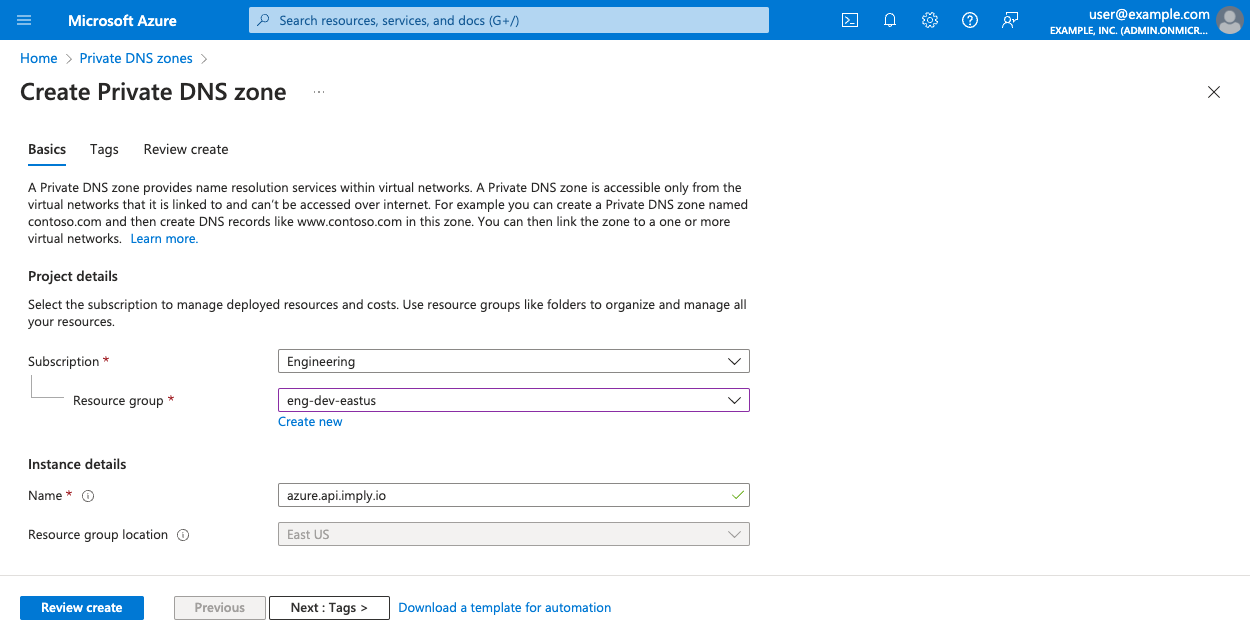
- In the Name field, enter the value
azure.api.imply.io.
The following screen capture shows an example private DNS configuration:

-
Complete the rest of the steps to create a private DNS zone. You can accept the default values in the Tags tab.
-
Click Next: Review + create.
-
Click Create.
Add record set
Follow these steps to create a new DNS record set in Azure. For field descriptions and latest instructions, refer to the Azure documentation.
- In the Azure portal, navigate to the Private DNS zones page.
- Select the DNS zone you created.
- On the DNS zone page, click + Record set.
- In the Add record set window, enter the following:
- Name: Enter the hostname to resolve to the specific private IP address in the formant
ORGANIZATION_NAME.REGION, such asexample.eastus.
Replace the following:ORGANIZATION_NAME: Custom domain through which you access Polaris.REGION: Azure region of your Polaris project, such aseastus. See Azure regions for more information.
- Type: Select A - Address record.
- TTL and TTL unit: Time-to-live of the DNS request.
- IP address: IP address of your private endpoint. You can find this information on the Private endpoints page.
- Name: Enter the hostname to resolve to the specific private IP address in the formant
- Click OK.
Add virtual network link
After you create the private DNS zone, you need to link your VNet to it to allow VMs hosted in the VNet to access the private DNS zone. For more information, refer to the Azure documentation.
On the private DNS zone page, select Virtual network links from the left sidebar. Click + Add and specify the required values. Click OK to create a VNet link.
You can now query data in Polaris from your VNet.
Validate connectivity
To validate connectivity through Azure Private Link, run the following nslookup command from an instance within your virtual network.
nslookup ORGANIZATION_NAME.REGION.CLOUD_PROVIDER.api.imply.io
You should see something like this:
user:~$ nslookup example.eastus.azure.api.imply.io
Server:		192.0.2.53
Address:	192.0.2.53#53

Non-authoritative answer:
Name:	example.eastus.azure.api.imply.io
Address: 10.0.0.10
The host name example.eastus.azure.api.imply.io resolves to 10.0.0.10, confirming the name resolution.
Learn more
See the following topics for more information:
