Table schema
Imply Polaris stores data in tables. A table's schema determines how the data is organized. It defines the table's columns, data types, and other metadata about the table.
The table's schema enforcement mode controls how the table schema is enforced. You must declare all columns in the table schema for a strict table prior to ingesting data. Flexible tables infer their schema from the ingested data, so you don't need to declare a schema. Flexible tables allow partial schema declaration. That is, the schema on a flexible table may be a combination of declared and undeclared columns, both of which comprise the table's queryable schema.
This topic covers the process of creating a schema, components of a table schema, and the two column types in a schema.
Prerequisites
To create and edit a schema in Polaris, you need the following:
- An existing table.
- The
ManageTablespermission assigned to your user profile. For more information on permissions, see Permissions reference.
Creating a schema
A table that contains data has a schema, whether the columns in the schema are declared by the user or inferred by Polaris. Flexible tables do not require a schema before ingestion since Polaris can automatically discover the schema during ingestion.
You can create the schema for a table using the UI or API. In the UI, Polaris provides a suggested schema based on the data it samples before ingestion.
Schema suggestion during sampling in the UI
In the UI, Polaris can suggest the schema for a table for batch or streaming ingestion by sampling your data. With this feature, Polaris scans the first 1000 entries of your source data to create a table schema. During this data mapping phase, Polaris infers a name and a data type for each column in your table based on the detected values from your input fields. This method is best suited for cases when you do not have a predefined schema and want to get started quickly. For an example, see Quickstart.
For details on the difference between schema suggestion and inferred schema for flexible tables, see Relation to sampling.
For streaming ingestion, add data to your topic or stream before creating an ingestion job. The Polaris UI samples this data so that you can preview it. You can include this previewed data in your ingestion job when you select the beginning offset. Select the end offset if you want to omit the previewed data and only ingest events that arrive after creating the job.
Declare a schema in the UI
You can use the Polaris UI to create a schema manually. You can add and remove columns, as described in the example. This method is best suited for cases when you know exactly what your schema should look like and want to define it before loading any data.
For schema updates including adding columns to the declared schema, see Updating a schema.
Declare a schema with the API
You can use the Tables API to create tables and manage schemas programmatically. This method is best suited for automated workflows.
Column types
Based on the table type, columns in a table are either dimensions or measures. A detail table only contains dimensions. Schema measures are only available for aggregate tables.
Schema dimensions and schema measures relate 1:N with data cube dimensions and measures. Data cubes can model additional dimensions and measures using expressions, and can also remove dimensions and measures as needed.
Schema dimensions
Schema dimensions are data columns that contain qualitative information. You can group by, filter, or apply aggregators to dimensions at query time.
Timestamp
Every schema has a timestamp dimension by default. Polaris uses the timestamp to partition and sort data, and to perform time-based data management operations, such as dropping time chunks.
When you create a table without a schema, Polaris automatically creates the primary timestamp column __time.
If you use the Polaris API to manually define your schema,
include the __time column in the schema object of the request payload.
Only the __time column takes the data type of timestamp.
If you do not include __time in the table schema, Polaris automatically creates this column for the table.
When creating an ingestion job, you can transform timestamps using input expressions in the ingestion job specification. For more information, see Timestamp expressions.
Schema measures
Schema measures are quantitative data fields or probabilistic data structures derived from the original data source. A schema measure stores data in aggregated form based on an aggregation function you apply on your source data in your ingestion job. For supported aggregation functions, see Map and transform data with input expressions.
When you create an aggregate table, it automatically includes a __count measure that counts the number of source data rows combined into a given table row using rollup. The __count measure is mapped to the input expression COUNT(*). For SQL-based ingestion, you have to include the measure in your SELECT clause. For example, COUNT(*) AS "__count".
You can remove the __count column from a strict table when the table has no data or running ingestion jobs.
You can undeclare the __count column from a flexible table when the column has no data and the table has no running ingestion jobs. Polaris subsequently removes the column.
Schema components
When you define a schema, you must specify a name and a data type for each column. Column definitions are immutable.
Column names
The following restrictions apply to column names:
- Must be unique and non-empty when trimmed of leading and trailing spaces.
- Can't start with two underscores, such as
__timeand__count. These are reserved for use by Polaris.
Data types
By default, Polaris automatically detects the appropriate schema for your table based on the data you ingest. Polaris determines data types for table columns based on the input data as well as any transforms you apply. This behavior applies for ingestion into flexible tables.
Otherwise, if you want to ensure that a column has a specific type, you can explicitly declare it with the intended data type. You can declare some columns in a flexible table while having some columns automatically typed. Or you can create a strict table in which all columns are explicitly declared.
For information on data types and any required transformations for those types, see Ingesting specific data types.
To learn how to declare a column, see Updating a schema.
Updating a schema
You can add a new column to a table at any time. When you add a column to a table that already contains data, the previously ingested rows will list null values for the new column. In other words, Polaris applies the updated schema to subsequent ingestion jobs and does not backfill data from previous jobs.
You can only delete a column from a table when the table has no data and no running ingestion jobs. Note that deleting a column is different from undeclaring a column. When you undeclare a column from a flexible table, Polaris removes the column from the declared table schema but retains the column and its data.
After a schema update, existing ingestion jobs for strict tables do not automatically ingest new columns. To ingest data into new columns for strict tables, start a new ingestion job and include the new mapping from the input field to the table column. For more information, see Create an ingestion job. Note that streaming ingestion jobs into flexible tables may use schema auto-discovery to automatically detect and ingest new input fields as undeclared columns without having to start a new ingestion job.
Update a schema in the UI
To update a schema on an already existing table, go to the table view and click Manage > Edit table. There, you can add new columns as well as declare columns on flexible tables.
-
To add a new column, select Add column from the menu bar. Enter the column name, and click Add. If you declare the column, you can also set the column type and its data type.
-
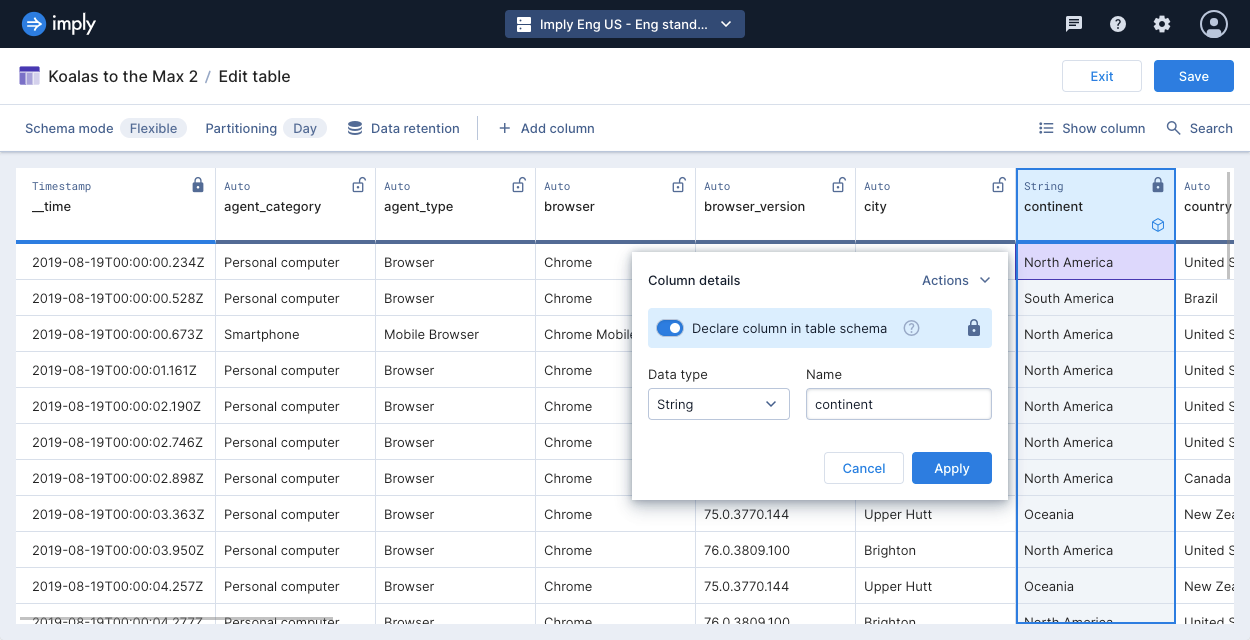
To declare an existing column, hover over the column and click Edit. Click the toggle to declare the column. Click Apply to save your settings. Polaris marks declared columns with a solid lock icon.
-
To undeclare a column that's declared, hover over the column and click Edit. Click the toggle for declaring the column to the off position. Click Apply to save your settings. Polaris marks undeclared columns with a hollow unlock icon.
Update a schema with the API
You can use the Tables API to update the schema on a table. This method is best suited for automated workflows.
Example
The following example walks you through the steps to create an empty table with a schema definition.
-
Click Tables from the left navigation menu.
-
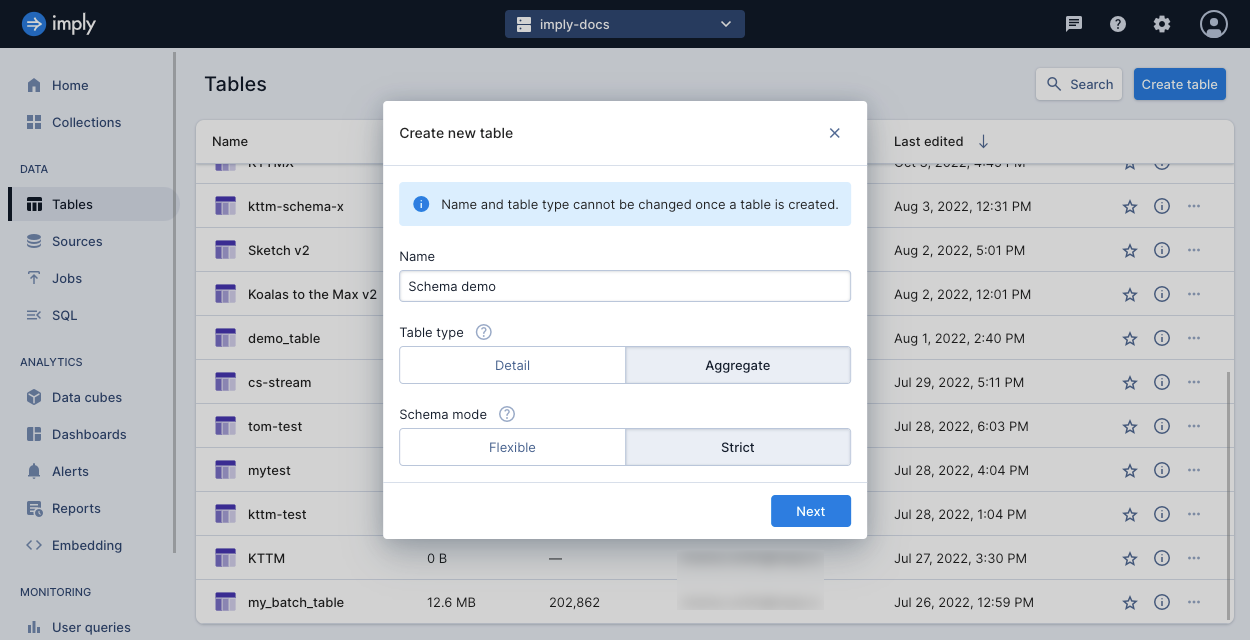
Click Create table.
-
Enter a unique name for your table, select Aggregate for the table type, and select Strict for the schema mode. For more information, see Introduction to tables.
-
Click Next.
Polaris displays an empty table with two columns automatically created,
__timeand__count.- The
__timedimension stores the primary timestamp for all Polaris tables. - The
__countmeasure holds the number of source data rows that were rolled up into a given table row for aggregate tables.
Polaris labels dimensions with a blue cube icon and labels measures with a green triangle ruler icon. For more details on dimensions and measures, see Schema dimensions and Schema measures.
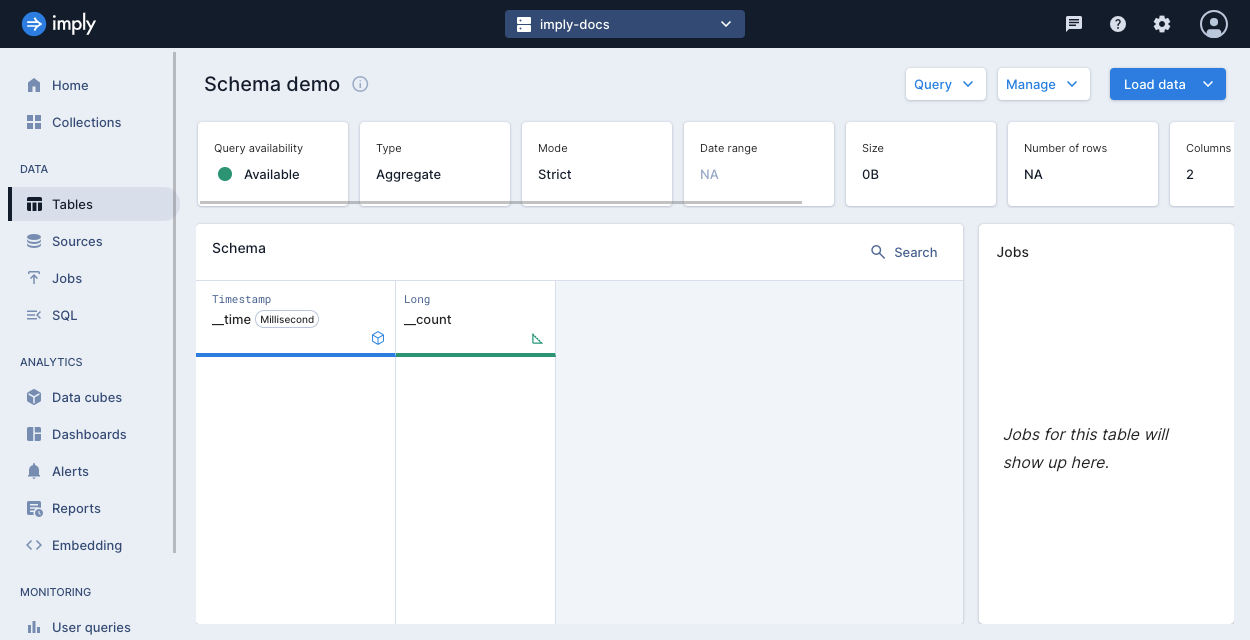
- The
-
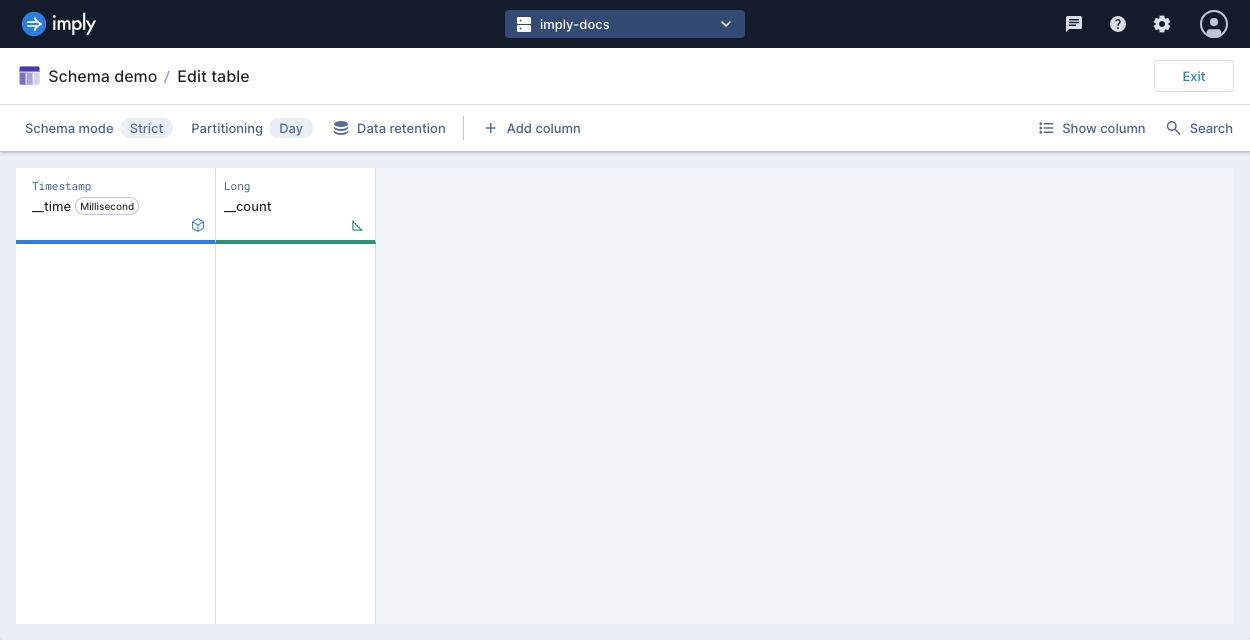
Click Manage > Edit table.
-
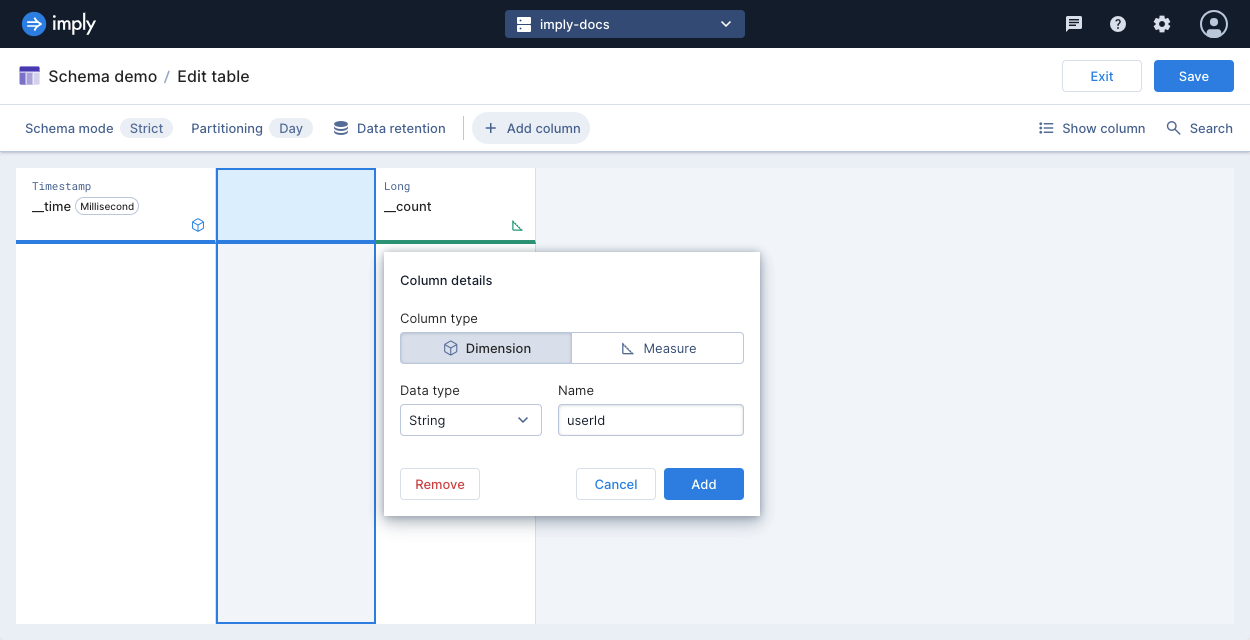
To add a dimension to your schema, click Add column. Select the Dimension column type, and enter its name and data type. Click Add.
-
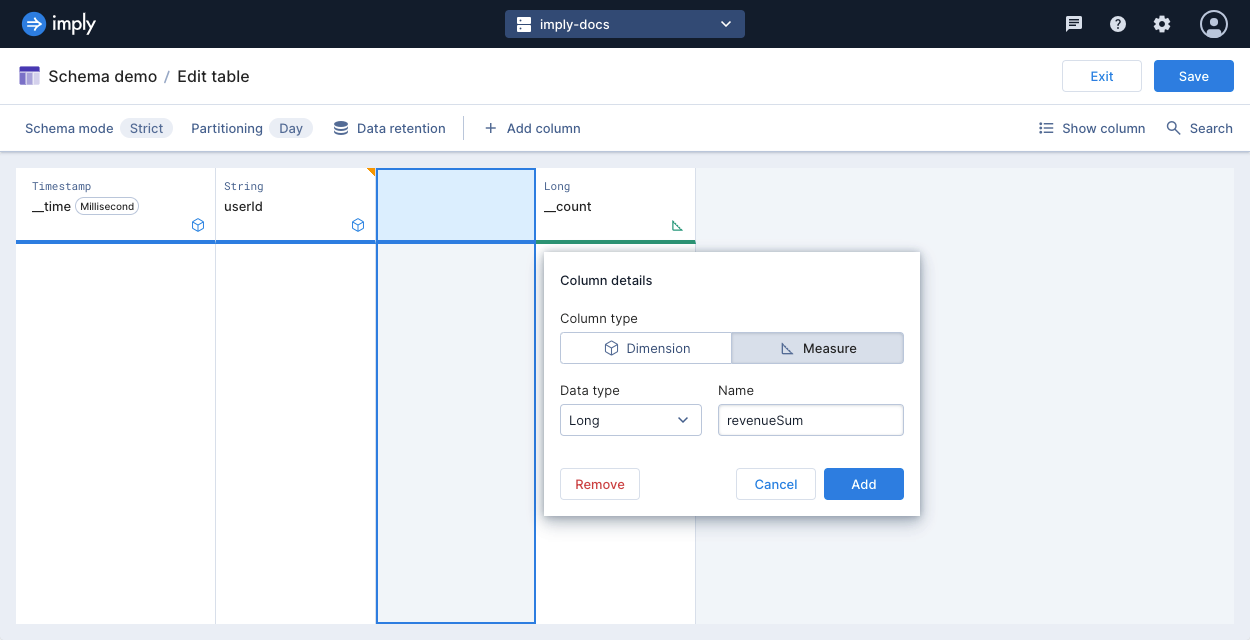
To add a measure to your schema, click Add column. Select the Measure column type, and enter its name and data type. Click Add.
Certain data types, such as theta and HLL sketches, are only available for measures. The data type of a measure determines any aggregation functions to apply during ingestion and querying.
-
When you finish editing your schema, click Save. Your table now has declared columns in the table schema.
Learn more
- For more information on tables, see Tables overview.
- To work with tables using the Polaris API, see Create a table by API.
- For details on ingestion jobs, see Create an ingestion job.
- For a reference on ingesting specific data types, see Input expressions reference.