Introduction to tables
This topic provides an overview of tables in Imply Polaris.
A Polaris table is a first-class object that holds interrelated data organized in rows and columns. Polaris uses tables to store and display data records.
You can have up to 2000 tables per project in an organization, and each table can hold up to 1000 columns.
Required user permissions
Members of the Organization Admin, Project Admin, or Data Manager groups, and users with the ManageTables permission can view table data and modify table schema.
Members of the Data Analyst or Viewer groups and users with the ViewTables permission can view table data and schema.
For more information on permissions, visit Permissions reference.
Create a table
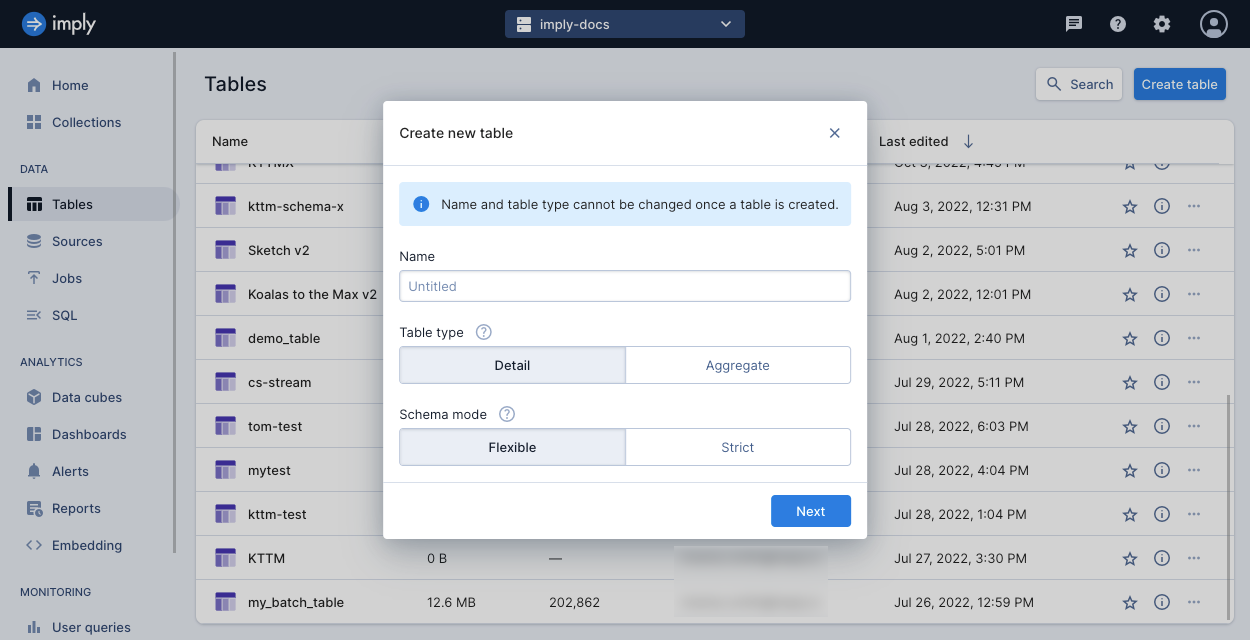
You create a table using the Polaris UI or the Tables API. To create a table, you need its name, table type, and schema mode. Polaris can also automatically create the table and configure these details for you when you start a new ingestion job.
To create a table in the Polaris UI, select Tables from the left pane to access the Tables page. Click the Create table button located in the top-right corner of the page to create a new table.
The following screenshot shows the Tables page with the Create new table dialog displayed:
To create a table by API, see Create a table by API.
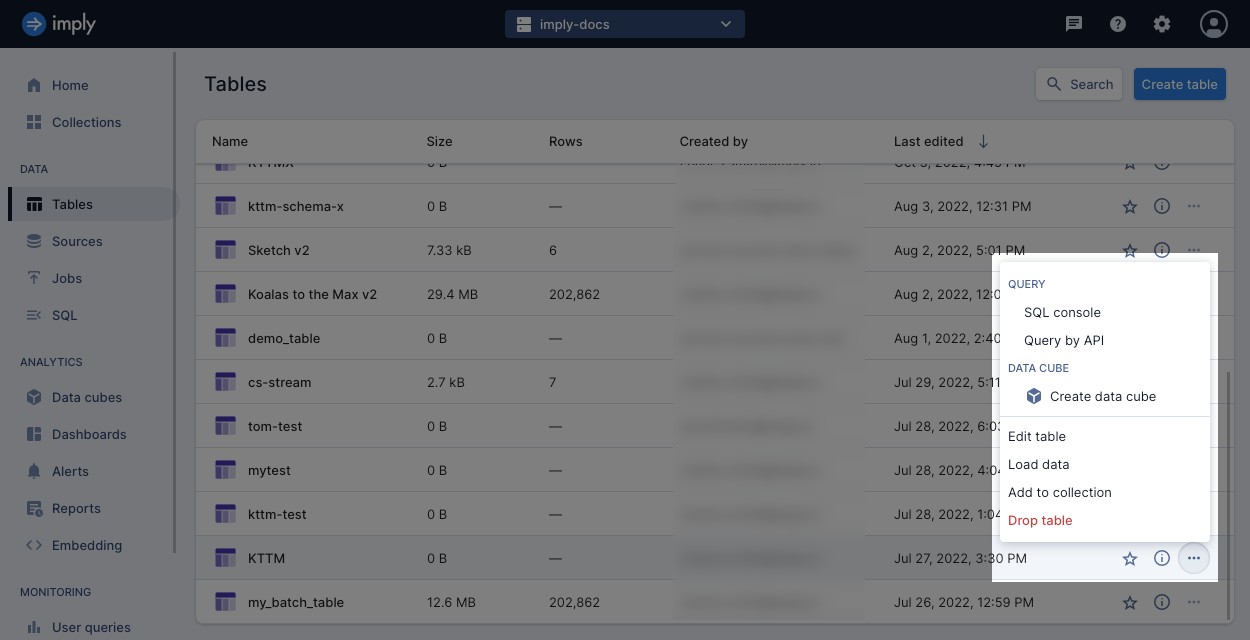
Once you create a table, click the ellipsis on the right side of the table's row to access some table options. For example, you can query the table in the SQL console or by API or create a data cube from the table. You can also edit the table, load data into it, add it to a collection, or delete it.
Automatically created tables
You can submit an ingestion job without creating a table in advance, and Polaris will create the table before starting the job.
To enable this behavior by API, set createTableIfNotExists to true in the ingestion job spec.
Note that if the ingestion job fails, Polaris still retains the table.
When automatically creating a table, Polaris uses the following framework:
Name: Supplied by the user in the Create new table dialog or in the API request.
Table type: If the ingestion job contains one or more aggregation functions in the mappings, Polaris creates an aggregate table. Otherwise, Polaris creates a detail table. For information on mappings, see Map and transform data with input expressions.
Schema mode: Polaris creates tables in flexible mode.
Time partitioning: Set to
dayunless otherwise specified in the ingestion job. For details, see Time partitioning.Clustering columns: Set to null unless otherwise specified in the ingestion job. For details, see Clustering columns.
Table name limitations
The table name must be unique. Additionally, the table name cannot:
- Be empty
- Have leading or trailing spaces
- Start with the
.character - Be longer than 255 characters
- Contain the following characters:
/,;,{,},$- Whitespace characters except space
- ASCII characters between ASCII 0-31 and 127-159. See the complete table of ASCII characters for more information.
- Emojis and Unicode block specials,
\uFFF0–\uFFFF. - Unicode characters in the
\uD800 - \uF8FFrange, which are reserved exclusively for use with UTF-16.
Visualize your data
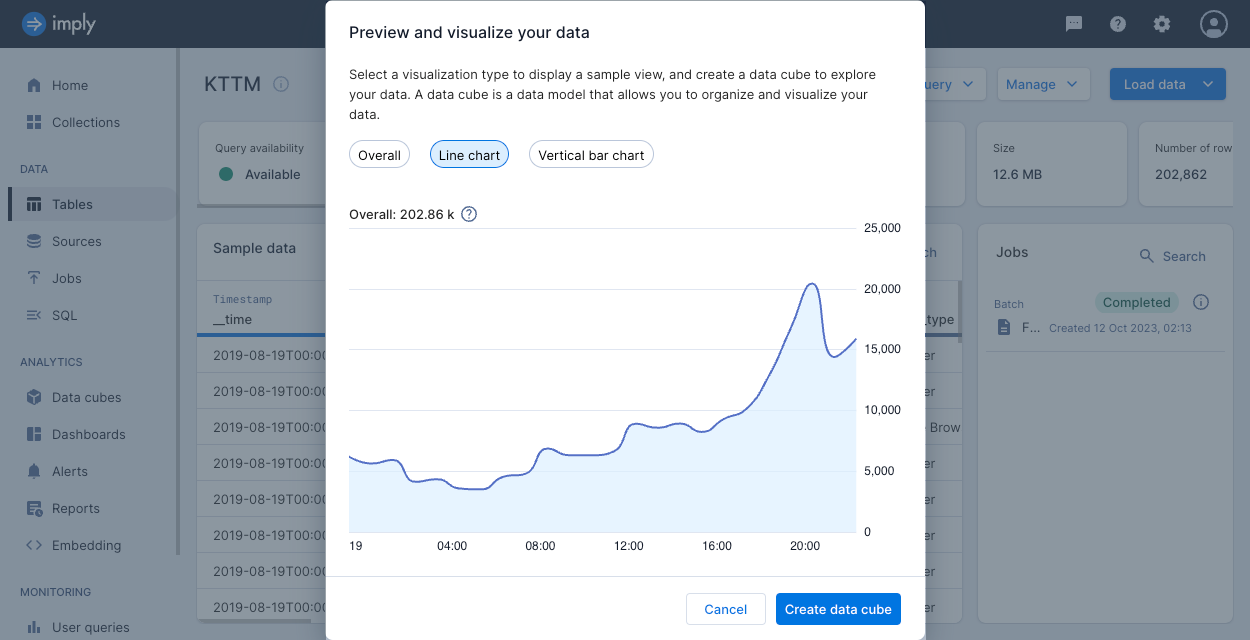
On a table's page, you can click Visualize data to display a sample view of your data as an overall, line chart, or vertical bars visualization.
Click Create data cube to create a data cube from the Visualize data window.
See Visualize data for more information on using data cubes to visualize and explore your data.
Delete a table
To delete a table, navigate to the Tables page. Click the ellipsis icon for the table you want to delete and select Drop table.
After you delete a table, data might still be available for a short time until the backend drops all the data.
For information on deleting data from a table, see Delete data.
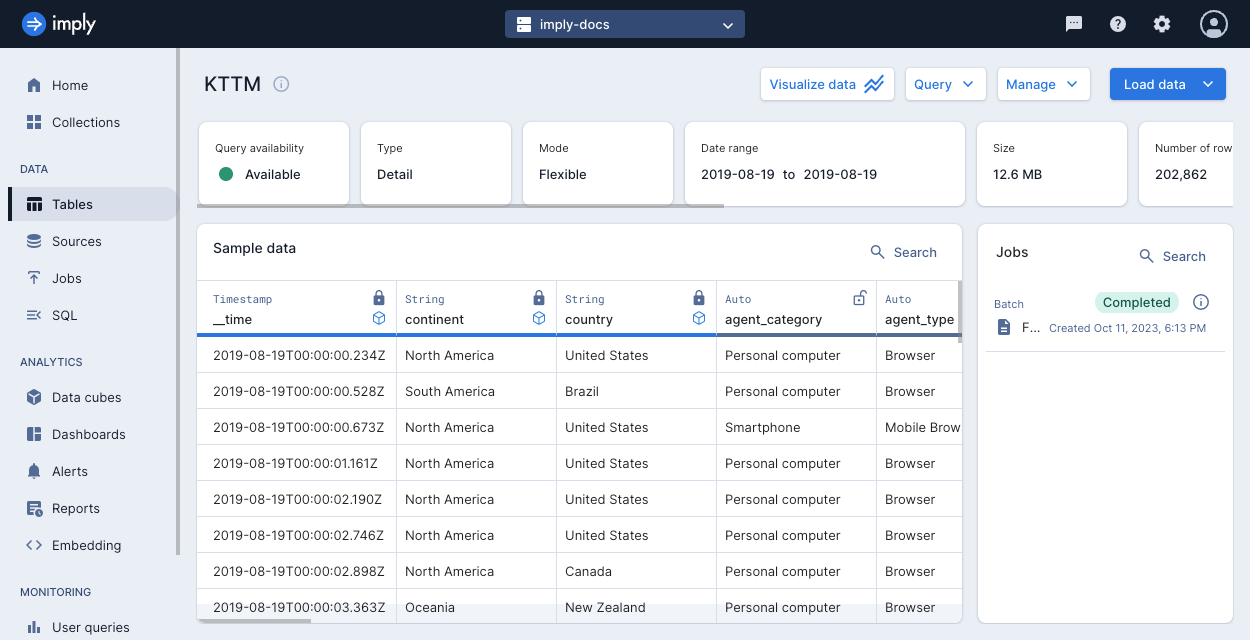
View a table
Select any table to view details and sample data in the table. Polaris displays the following attributes for a table:
- Query availability:
- Available: All data that satisfies the cache policy is cached, that is, available for synchronous querying.
- Unavailable: Some data that satisfies the cache policy isn't available for querying.
Querying an unavailable table can lead to partial query results.
For example,
COUNT(*)may not return all the rows that satisfies the table's cache policy.
This status occurs as part of normal operation, such as shortly after an ingestion job when Polaris is still loading new data. If this status occurs frequently or persists, this may signify an issue such as your total data size exceeding your project size. - Deleting: the table is being deleted.
- Type: Detail or aggregate.
- Mode: Flexible or strict schema mode.
- Date range spanning the data in the table.
- Size of the table in bytes.
- Number of rows.
- Columns: Number of columns. Flexible tables display the number of declared and undeclared columns.
- Partitioning: Granularity for time partitioning.
- Clustering: Columns used for clustering, if any.
- Data storage policy.
- Compaction status in terms of percentage of data in the compacted table.
Types of tables
Polaris supports two types of tables: detail and aggregate. A table's type is determined by its rollup status.
There is no conversion between table types. You cannot switch from a detail table to an aggregate table or the other way around.
Detail table
A detail table is the default type. Detail tables have rollup disabled and store each ingested record as is, without any pre-aggregation. For example, an online store manager keeps track of every purchase that is made. When the manager ingests those purchase records into a detail table, the table shows one row for each purchase. Detail tables store columns as dimensions only.
Aggregate table
An aggregate table has rollup enabled to group individual records according to the table's rollup granularity and dimensions. For example, an online store manager is only interested in the total sales per hour for a region. In this case, the manager does not need to see records for every sale, only a summary by hour. Aggregate tables store columns as either dimensions or measures.
Table schema and mode
A table schema is an ordered collection of columns that describe a table. You specify the column names and data types for a table in its schema. A table schema may have declared columns or undeclared columns. Declared columns are explicitly provided by the user, and undeclared columns are inferred by Polaris during ingestion. Both the declared columns and undeclared columns make up the queryable schema for a table.
The schema enforcement mode on a table, or schema mode, controls how Polaris enforces the schema on the table. A strict table requires all columns to be declared in the table schema prior to ingestion. A flexible table does not require but allows declared columns in the table schema. Polaris creates tables in flexible mode by default. The schema mode you choose depends on your data governance strategies. If you want to enforce strict schema conformity on your data, use a strict table. If you want to allow for a changing or flexible schema, use a flexible table.
A table's type is independent of its mode. That is, a detail table may be either flexible or strict in its schema enforcement, and an aggregate table may also be either flexible or strict. When you ingest data into an aggregate table in flexible mode, you must specify both input fields and mappings in an ingestion job to define the aggregations for table measures.
Either schema enforcement mode can be used in batch or streaming ingestion jobs.
Strict table
Strict tables require all columns in the table schema to be fully declared before data is ingested. The schema of a strict table only consists of declared columns. Polaris does not create new columns even if it detects there are more input fields not associated with any table columns.
If you created a table before Polaris introduced schema enforcement modes, the table is strict.
Flexible table
Known limitation: For tables created in flexible mode, the UI labels undeclared columns as Auto and does not label them as dimensions or measures.
For a flexible table, Polaris auto-discovers the table schema during ingestion. Polaris dynamically adds columns to the table based on the data it discovers during ingestion. The schema of a flexible table can have both declared and undeclared columns. You cannot change the name or data type of a declared column once it contains data. However, you can undeclare a declared column. If you choose to declare an existing, undeclared column, its data type must be compatible with the queryable schema.
When you delete all data from an undeclared column, Polaris removes the column from the table. This applies to manual deletion as well as data deleted from the retention policy. To retain a column in the table schema when its data is deleted, declare the column.
Schema enforcement
The advantage of declaring columns in the schema is to enforce a strict schema for those columns. The data type of a declared column does not change as data is ingested. On the other hand, the data type of an undeclared column may change as more data is ingested into it. The column's data type takes the most generic (least restrictive) type for the data stored in the column. For example, a job that ingests both long and string values into a column will assign the column a string data type.
Supported column declarations
You can declare a column in the table schema even after it has data ingested. Polaris enforces the data type in subsequent ingestion jobs.
You cannot declare a column when it has data incompatible with the preexisting auto-discovered data type. To ingest data into a declared column with a specified data type, create a new table in which the column is declared, then ingest from the existing table. You can perform table-to-table ingestion in the UI or the API.
For information on how to declare columns, see Creating a schema.
Relation to sampling
When you create an ingestion job in the UI, Polaris samples your data to infer and suggest a schema for the table. This schema is a suggestion; it does not signify that the table is in flexible mode.
The following are the main differences between sampling and schema auto-discovery:
- Sampling occurs before ingestion, while schema auto-discovery happens during ingestion.
- Sampling scans the first 1000 rows of your source data, whereas schema auto-discovery scans all of the data.
Schema mode conversion
You can change the schema enforcement mode on a table. When changing the mode, the following behavior applies:
Strict to flexible: There are no conditions when converting a table from strict to flexible mode. In this conversion, Polaris retains all columns, and these columns stay declared.
Flexible to strict: You can only change from flexible to strict mode when the table is empty and has no running ingestion jobs. In this conversion, Polaris converts all columns into declared columns.
To change the schema mode with the UI, follow these steps:
- From a table view, click Manage > Edit table.
- Select Schema mode from the menu bar.
- Select the schema mode to convert to.
- Click Save.
To change the schema mode using the API, see Change schema mode.
Learn more
See the following topics for more information:
- Table schema for information on column types and how to define a table's schema.
- Introduction to data rollup for details about rollup on tables.
- Data partitioning for configuring partitioning on a table to improve query performance.
- Create a table by API for creating tables and schemas using the Polaris API.
- Create an ingestion job for ingesting data into tables.