Set up reports
You can schedule reports that deliver select data to specified recipients via email or in the Polaris UI.
You configure a report to include data from a selected data cube, for a specified period of time. You can choose the delivery options for the report, and set the recipients to receive the report.
Prerequisites
Users with AdministerReports or ManageReports permissions can set up reports in Polaris. For information on permissions that control who can access and manage reports, see Permissions reference.
Create a report
Follow these steps to create a report:
-
Click Reports in the left pane, then click New report:
You can also create a report from a data cube. Click the Alerts and reports ellipsis in the top right corner of the page, then select Schedule report.
-
Configure report options, then click Delivery options.
-
Configure delivery options, then click Access options.
-
Manage access to the report, then click Create report.
If Polaris times out during report creation, try refining the report options to return a smaller or more specific set of results.
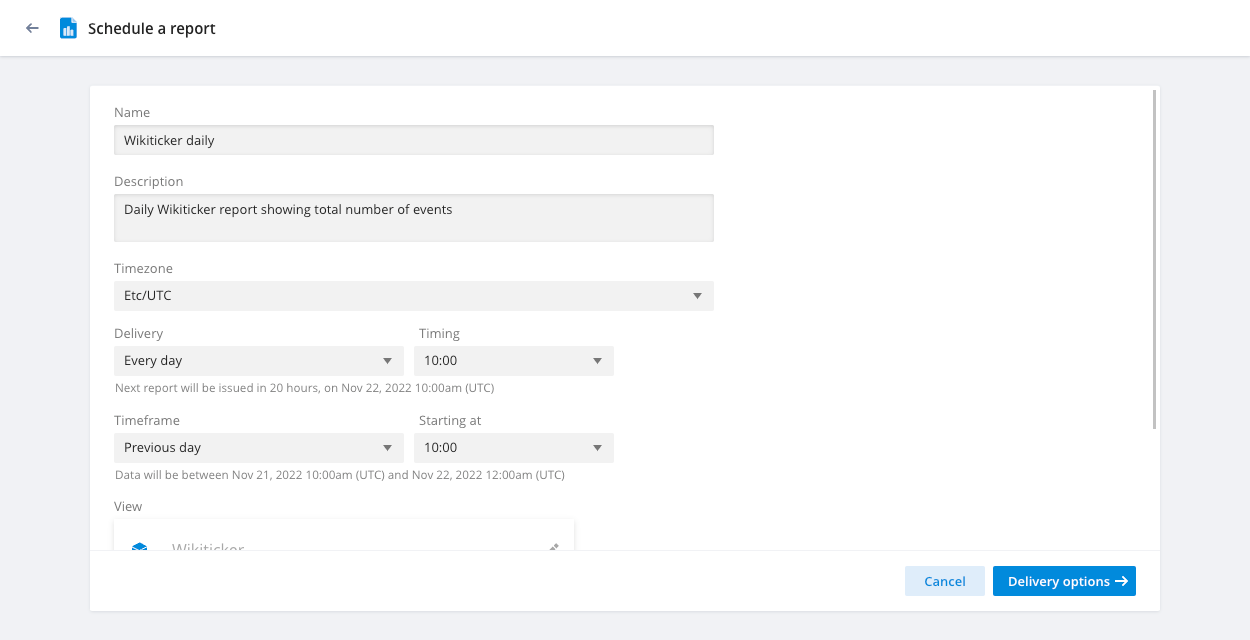
Configure report options
The following table lists all of the options you can configure for a report:
| Field | Description |
|---|---|
| Name | The name of the report. The name appears on the Reports page and in emails. |
| Description | An optional description for the report. |
| Timezone | The timezone to apply to report production and delivery. |
| Delivery | Defines how often Polaris produces the report. |
| Timing | Defines the timing of report production. The available options depend on the Delivery setting. |
| Timeframe | Controls the amount of data Polaris includes in the report. For example, set to Previous day to include data for the previous day—defined from the day and time in Starting at. The Rolling options set the report's end date to the final date of the rolling timeframe, which is the day Polaris generates the report. |
| Starting at | The starting point—day and time—for the data in the report. A message under the Timeframe field displays the period of time for which Polaris will capture data for the report. |
| View | Select a data cube for the report and click Set up view. You can add filters, dimensions and measures to restrict the data to include in the report. |
Configure delivery options
Follow these steps to configure delivery options for the report:
- Click the Delivery tab.
- By default, Polaris saves the report in the UI. You can select Email to email the report to specified recipients as well.
- If you select Email, you can additionally set the following options:
- Attach a data file: Send the report data in an email attachment. If you don't select this option, Polaris includes the first 20 rows of the report in the email body, with a link to Polaris to view the entire report—see Example report email.
- Add total row to file: Add a row to the email attachment that shows an overall total. You can't apply this option to JSON format attachments.
- Format: Select the attachment format.
- Amount to download: Select a download limit for users without the
AccessDownloadLargeDatapermission attached to their user profile. See Permissions reference for more information on Polaris permissions. - Deliver to external emails: You can enter a comma-separated list of external email addresses to access the report. Set notification options for external users in the report's access options.
Manage access
By default, all project users can view a newly created report. The report creator and users with the AdministerReports or ManageReports permission assigned to their profile can edit the report.
You can configure access to an individual report at a more granular level when you create or edit a report:
-
Click the Access tab.
-
Click Add people.
-
Select one or more users and groups from the drop-down lists for the following access levels:
- Can view: View the report. Users with this access level also need the
AccessReportspermission assigned to their profile. - Can edit: View and edit the report. Users with this access level also need the
ManageReportsorAdministerReportspermission assigned to their profile.
You can set notification options for external users if you added them in the Delivery step.
- Can view: View the report. Users with this access level also need the
-
Check the Email checkbox to send the report to the recipient by email. If you don't check the email box, recipients don’t receive the report by email but they can view the report in the Polaris UI.
In cases where different permissions on the individual level and the group level apply to the same user, Polaris applies the most privileged permission. For example, if an individual user has Can view access to a report, but they are a member of a group with Can edit access, they have permission to edit the report.
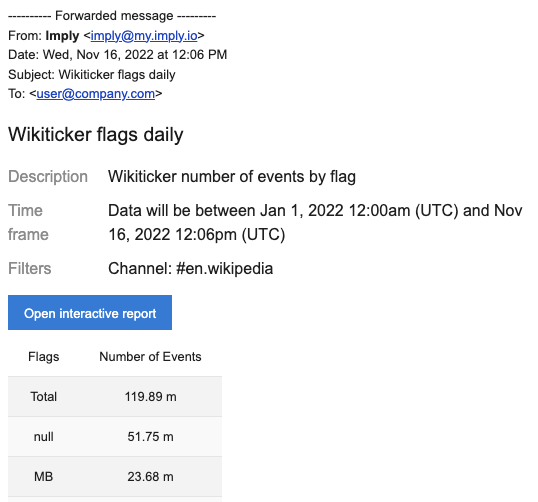
Example report email
Polaris sent the following example email when a report was generated:
Polaris report emails automatically include the X-Auto-Response-Suppress: All header to suppress replies to email messages.
Manage reports
You can click the ellipsis to the right of the report name on the Reports page to manage a report.
Select the corresponding option to edit, duplicate, or delete the report, toggle its active status, or add the report to a collection. Click the star icon on the right side of the report's row to add it to your favorites.
View report history
You can view the history of generated reports in the Polaris UI.
Click Reports in the left pane to view the reports page, and click the name of a report to view its history page.
From this page, you can view more information about the report (the times the report has been produced) and its file attachments.
Learn more
See the following topics for more information:
- Manage data cubes for creating and editing data cubes.
- Visualize data for using Polaris visualization features to draw insights from your data.
- Set up alerts for configuring alerts based on your data.